本帖最后由 GeForceLegend 于 2020-4-13 10:21 编辑
Minecraft with RTX: PBR Texturing Guide
Minecraft光追:PBR材质绘制教程
By Andrew Burnes, Johnny Costello, Kelsey Blanton on March 30, 2020 | Featured Stories, Guides, Minecraft with RTX, Ray Tracing
由Andrew Burnes,Johnny Costello,Kelsey Blanton撰写于3月30日 | 精选文章,教程,Minecraft光追,光线追踪
Introduction
介绍
Bedrock Minecraft, a.k.a. Minecraft for Windows 10, is being updated with cutting-edge path-traced ray tracing, enabling gamers and world builders to craft incredible new sights, and immersive environments. To take full advantage of the new possibilities ray tracing introduces, physically-based textures have also been introduced, featuring extra surface detail, the ability to emit light, and more.
《Minecraft》基岩版,亦称《Minecraft》Windows10版(译者注:《Minecraft》Windows10版是基岩版的一个版本,基岩版包括了许多平台的不同版本),正在更新具有最先进的基于路径追踪的光线追踪,使游戏玩家和世界建造者能够创造出巧夺天工的新景观和身临其境的环境。为了充分利用光线追踪带来的新的可能性,基于物理的材质也被引入了,拥有额外的表面细节以及发光能力等特性。
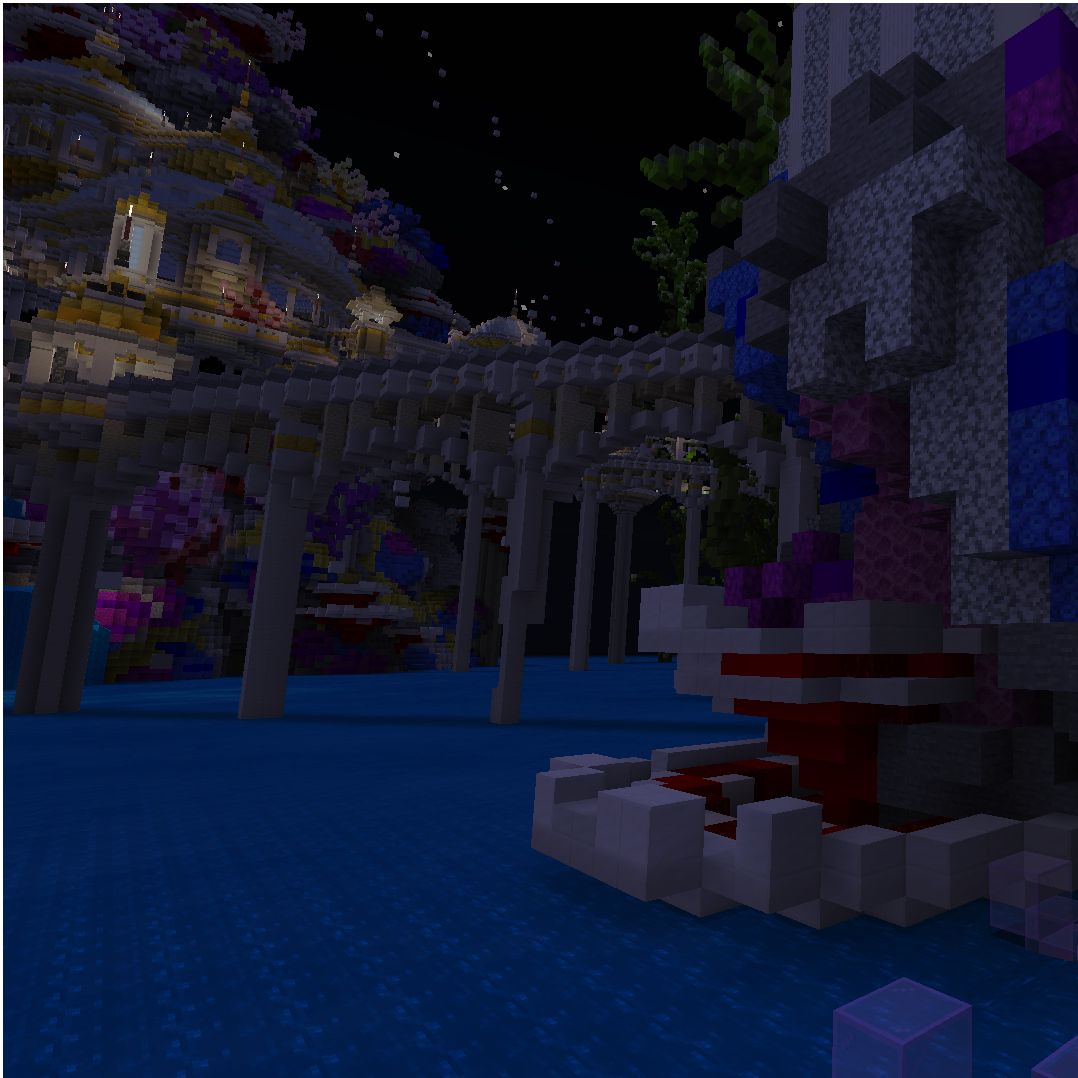
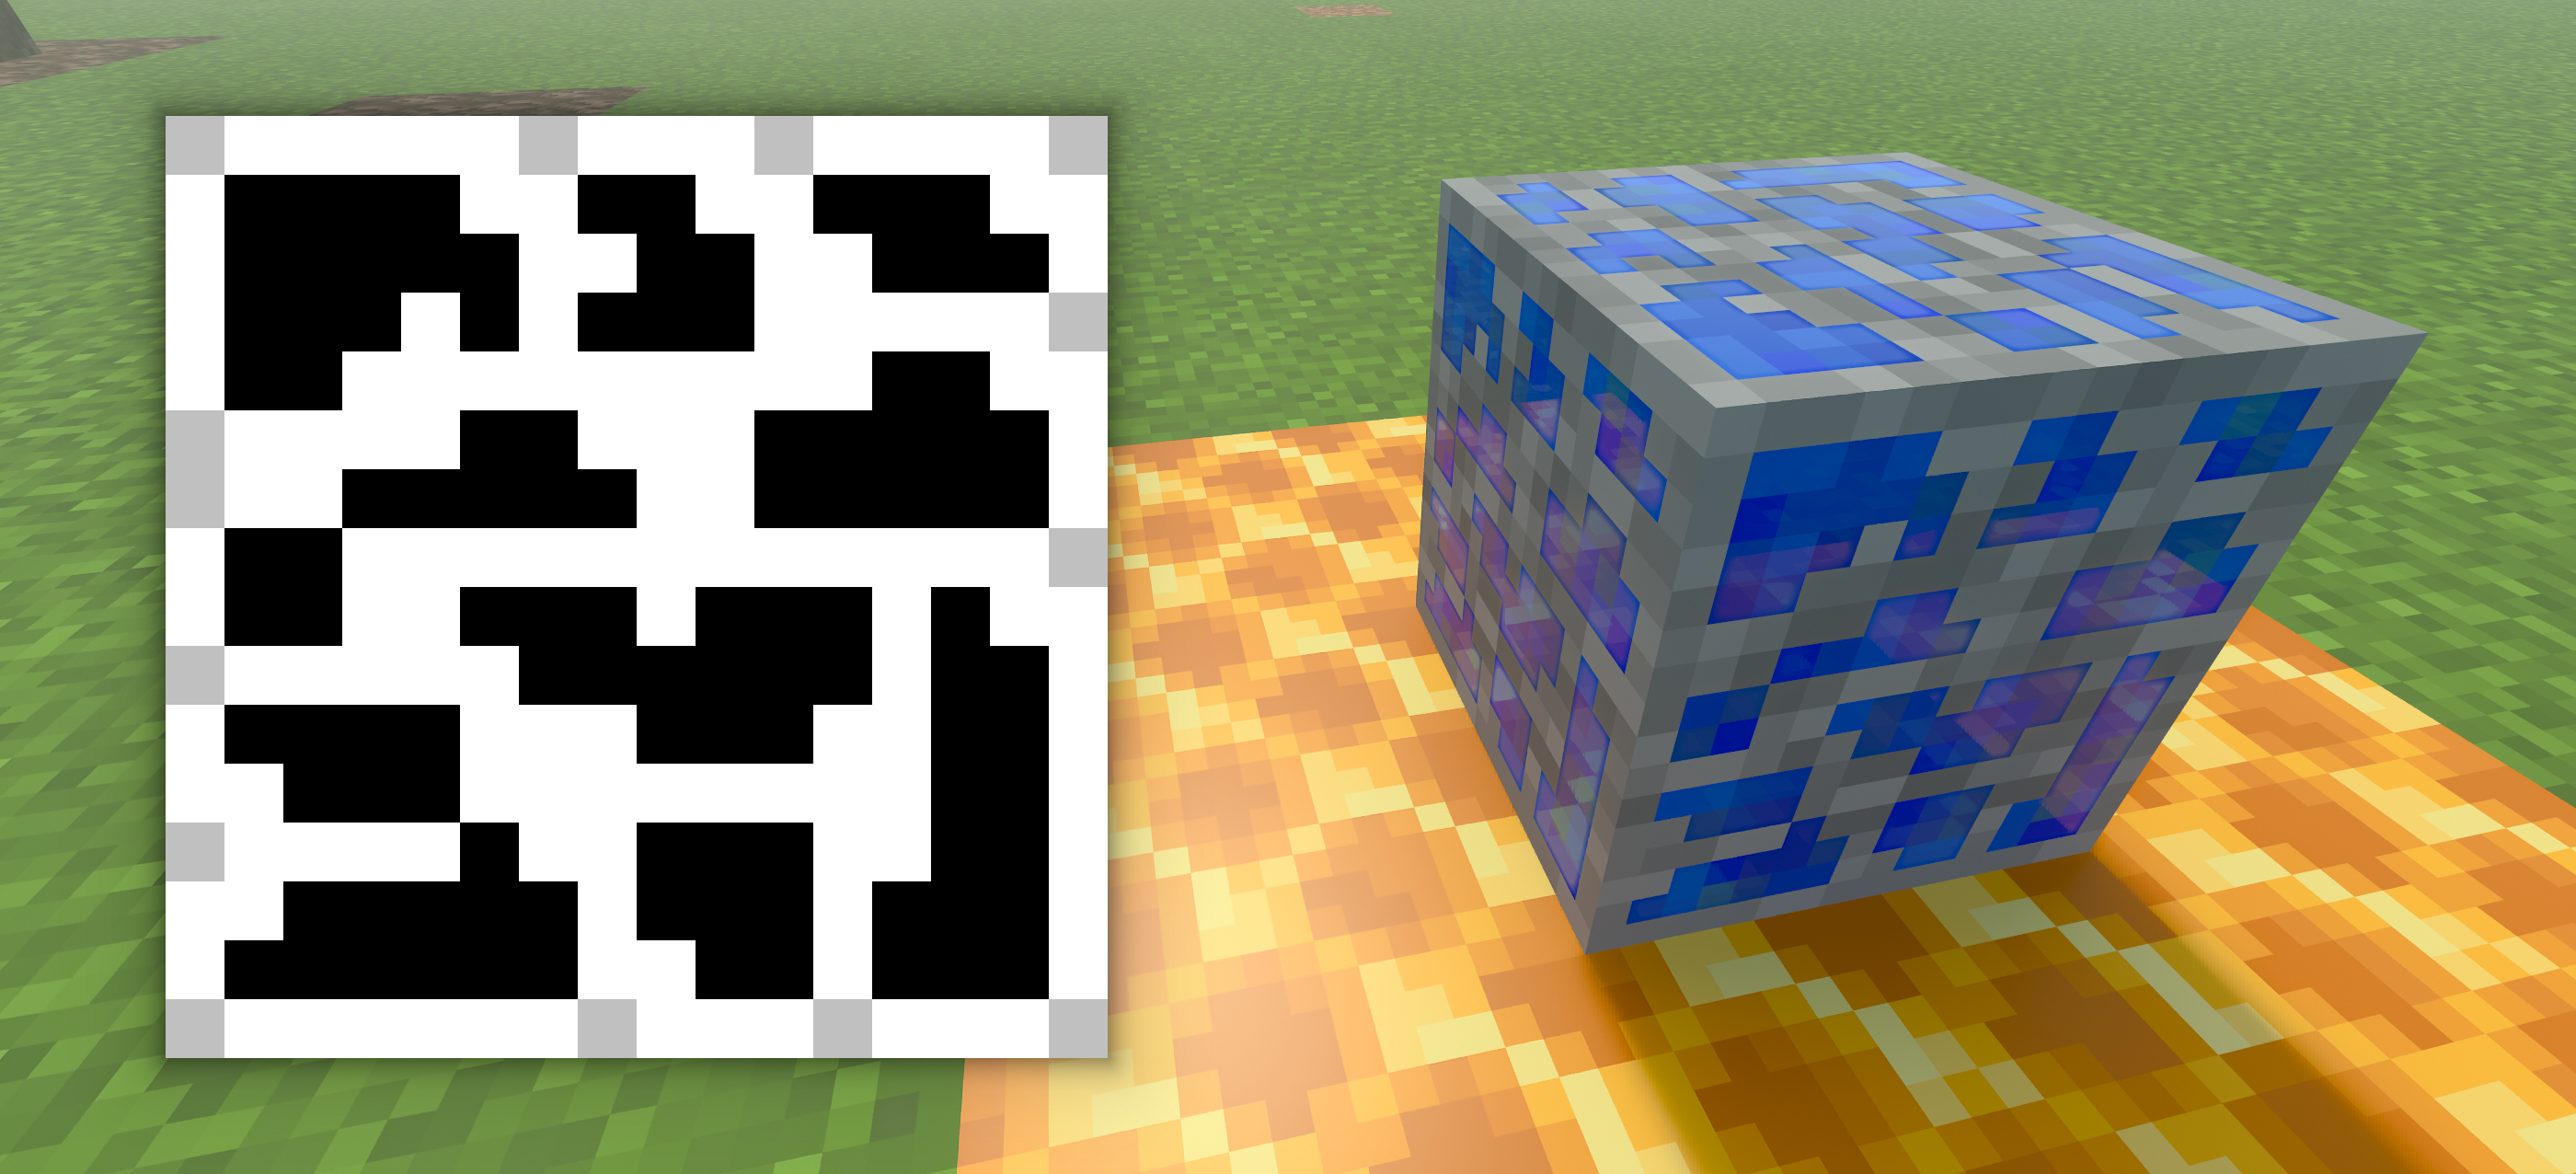
Ray Tracing Off(PBR Enabled Textures)
光线追踪关闭(开启PBR材质)
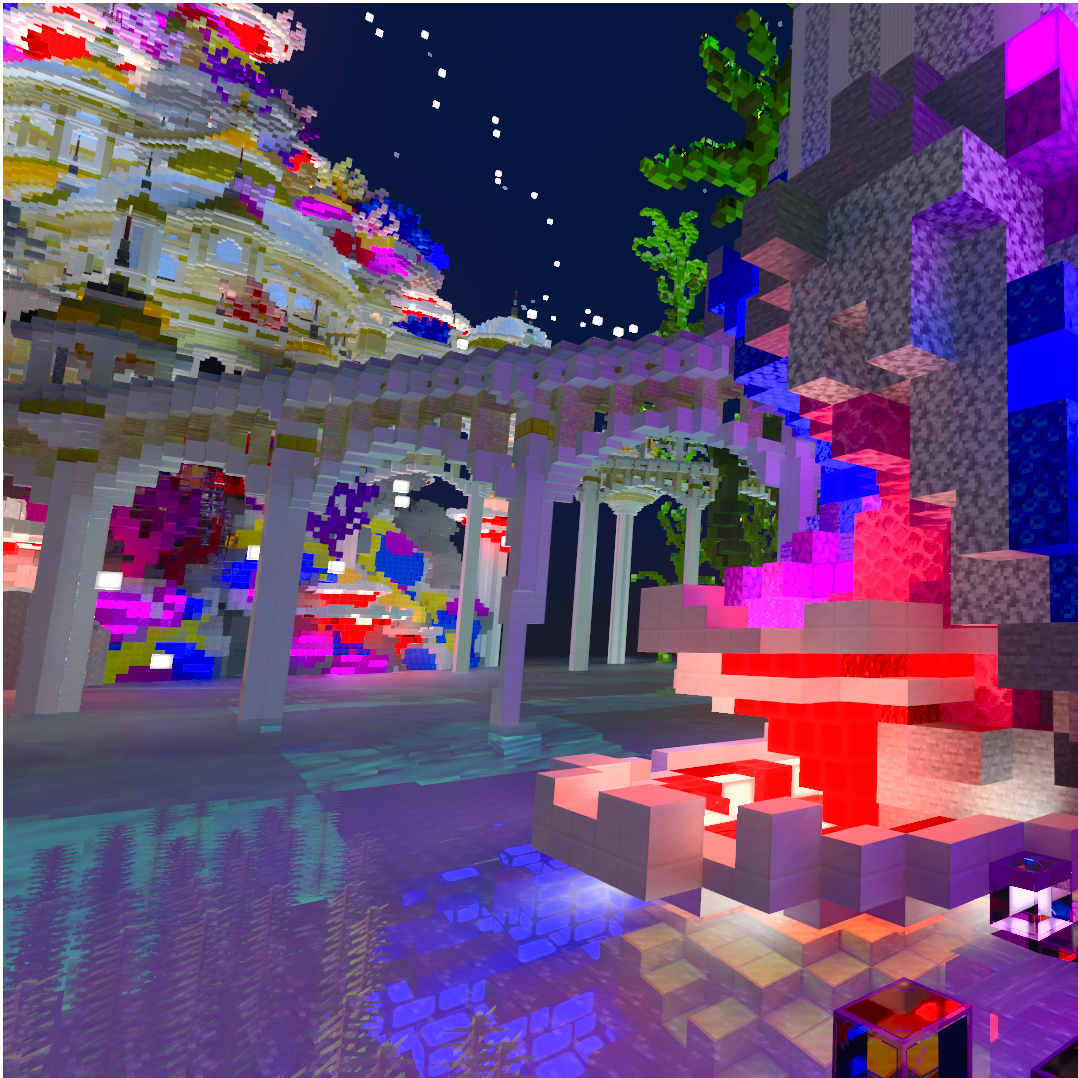
Ray Tracing On(Same PBR Enabled Textures)
光线追踪开启(同样开启PBR材质)
In this guide, we’ll walk you through the steps of creating your own Minecraft PBR textures, or upgrading your existing textures and texture packs, so that your ray-traced Minecraft worlds take full advantage of everything that Bedrock Minecraft brings to the table.
在本教程中,我们将引导您完成创建自己的《Minecraft》PBR贴图,或者升级现有的材质和材质包的步骤,以使您光线追踪的《Minecraft》世界充分利用《Minecraft》基岩版带来的一切。
In addition, we’ll demonstrate how you can create your own high resolution textures for worlds made of lifelike high definition blocks, and offer an alternative, simpler, easier workflow using the premium Substance Painter application.
此外,我们还将演示该如何为由栩栩如生的高清晰度方块组成的世界创建自己的高分辨率材质,并使用优质的Substance Painter软件提供一个可替代的、更简易的工作流程。
For a guide on how to convert your world, head here. And to ensure you have optimal gaming experiences, download the latest Game Ready Driver for Minecraft with RTX when it launches.
要了解如何转换您的世界,请点击这里。为了确保您有最佳的游戏体验,当《Minecraft RTX》发行时,请为它下载最新的Game Ready驱动程序。
Minecraft with RTX: PBR Texturing Guide
Minecraft光追:PBR材质绘制教程
By Andrew Burnes, Johnny Costello, Kelsey Blanton on March 30, 2020 | Featured Stories, Guides, Minecraft with RTX, Ray Tracing
由Andrew Burnes,Johnny Costello,Kelsey Blanton撰写于3月30日 | 精选文章,教程,Minecraft光追,光线追踪
Introduction
介绍
Bedrock Minecraft, a.k.a. Minecraft for Windows 10, is being updated with cutting-edge path-traced ray tracing, enabling gamers and world builders to craft incredible new sights, and immersive environments. To take full advantage of the new possibilities ray tracing introduces, physically-based textures have also been introduced, featuring extra surface detail, the ability to emit light, and more.
《Minecraft》基岩版,亦称《Minecraft》Windows10版(译者注:《Minecraft》Windows10版是基岩版的一个版本,基岩版包括了许多平台的不同版本),正在更新具有最先进的基于路径追踪的光线追踪,使游戏玩家和世界建造者能够创造出巧夺天工的新景观和身临其境的环境。为了充分利用光线追踪带来的新的可能性,基于物理的材质也被引入了,拥有额外的表面细节以及发光能力等特性。
Ray Tracing Off(PBR Enabled Textures)
光线追踪关闭(开启PBR材质)
Ray Tracing On(Same PBR Enabled Textures)
光线追踪开启(同样开启PBR材质)
In this guide, we’ll walk you through the steps of creating your own Minecraft PBR textures, or upgrading your existing textures and texture packs, so that your ray-traced Minecraft worlds take full advantage of everything that Bedrock Minecraft brings to the table.
在本教程中,我们将引导您完成创建自己的《Minecraft》PBR贴图,或者升级现有的材质和材质包的步骤,以使您光线追踪的《Minecraft》世界充分利用《Minecraft》基岩版带来的一切。
In addition, we’ll demonstrate how you can create your own high resolution textures for worlds made of lifelike high definition blocks, and offer an alternative, simpler, easier workflow using the premium Substance Painter application.
此外,我们还将演示该如何为由栩栩如生的高清晰度方块组成的世界创建自己的高分辨率材质,并使用优质的Substance Painter软件提供一个可替代的、更简易的工作流程。
For a guide on how to convert your world, head here. And to ensure you have optimal gaming experiences, download the latest Game Ready Driver for Minecraft with RTX when it launches.
要了解如何转换您的世界,请点击这里。为了确保您有最佳的游戏体验,当《Minecraft RTX》发行时,请为它下载最新的Game Ready驱动程序。
Minecraft Texturing Overview
Minecraft材质绘制概述
Most texture files in vanilla Minecraft (Bedrock) only use 2 maps: base color and opacity. The base color map is stored in the RGB channels of the texture. This is the texture map that most people think of when talking about Minecraft textures.
原版《Minecraft》(基岩版)中的大多数材质文件只使用两张贴图:基础颜色和不透明度。基础颜色贴图被存储于材质的RGB通道中。这是大多数人在讨论《Minecraft》材质时想到的材质贴图。
Some textures also have an additional opacity map that is either stored in the alpha channel (for .TGA texture files) or stored implicitly (for .PNG texture files). For Minecraft with RTX, you’ll want to use .TGA files with alpha channels for opacity maps. More on that later.
一些材质还有一个额外的不透明度贴图,存储于alpha通道(用于.TGA材质文件)或者隐藏了(用于.png材质文件)。在《Minecraft RTX》中,您需要使用带有alpha通道的.TGA文件来处理不透明度贴图。在下文会详细介绍。
The new PBR system uses these 2 maps, as well as 4 additional ones, to help describe the real-world material surface that is being represented by the texture:
新的PBR系统使用这两个贴图,同时为了描绘逼真的材质表面,使用了四个在材质中表示的额外贴图:
Metallic map (sometimes called “metalness”)
金属度贴图(有时候被称为“金属性”)
Emissive map
发光度贴图
Roughness map
粗糙度贴图
Normal/Height map
法线贴图/高度图
Asset Flow
资源流
This is how the various PBR texture maps relate to objects in the game:
这是各种PBR贴图如何与游戏中的对象相关联的:
6 PBR Texture Maps >packed into> 3 Texture Files (.PNG) >referred to as a> Texture Set >for each> Block/Item/Object
6张PBR贴图 > 打包到 > 3个材质文件(.PNG) > 对应一个 > 材质集 > 对应每个 > 方块/物品/对象
Currently, each of the 6 PBR maps get packed into the channels of 3 texture files, which are then used by the game. Packing the maps reduces the overall file size and number of files of the new texture set.
目前,6张PBR贴图的每一张都会被打包进3个材质文件的通道中,并在之后被游戏使用。打包贴图减少了材质集文件的总大小和文件数量。
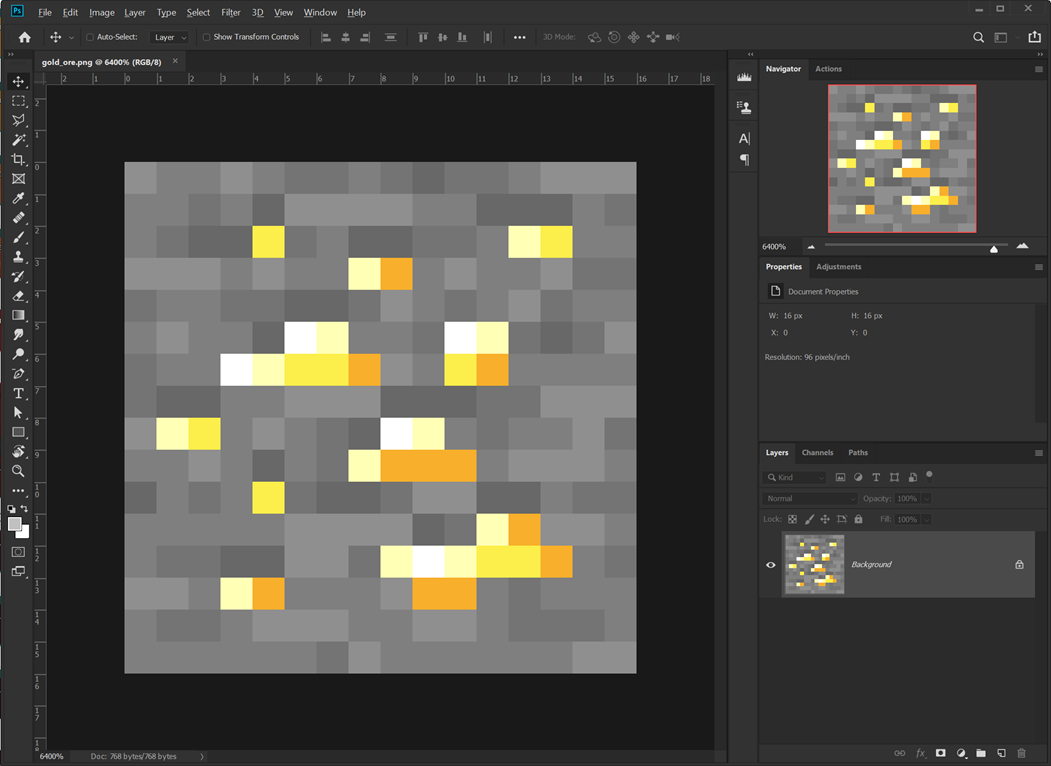
For example, for a PBR version of the “gold_ore” block:
例如,一个PBR版的金矿石方块中:
Texture file 1 = gold_ore.PNG
材质文件1 = gold_ore.PNG
Red, Green, and Blue (RGB) channels = Base Color map
红绿蓝(RGB)通道 = 基础颜色贴图
Alpha (A) channel = None. Not used for this specific texture set since the gold_ore block is intended to be fully opaque.
Alpha(A)通道 = 空,由于金矿石方块是完全不透明的,不用于此材质集。
Note: Texture sets that do use opacity maps can store them in this alpha channel. See the Opacity Maps section.
注意:使用不透明度贴图的材质集可以存储在这个alpha通道中。参见不透明度贴图章节。
Texture file 2 = gold_ore_mer.PNG
材质文件2 = gold_ore_mer.PNG
Red channel = Metallic map (grayscale)
红色通道 = 金属度贴图(灰度图)*
Green channel = Emissive map (grayscale)
绿色通道 = 发光度贴图(灰度图)*
Blue channel = Roughness map (grayscale)
蓝色通道 = 粗糙度贴图(灰度图)*
Alpha (A) channel = None. Not used at this time
Alpha(A)通道 = 空。目前未使用。
The “*_mer” suffix is just a reminder that the Metallic, Emissive, and Roughness maps go into the RGB channels, respectively.
“*_mer”后缀只是一个金属度贴图、发光度贴图和粗糙度贴图分别进入RGB通道的提醒。
*译者注:表示以灰度图存储,而不是在材质中编辑为灰色
Texture file 3 = gold_ore_normal.PNG
材质文件3 = gold_ore_normal.PNG
RGB channels = Normal map
RGB通道 = 法线贴图
Note: Alternatively, this texture file can store a height map instead of a normal map. See the Height Maps subsection of the New PBR Texture Maps section
注意:此外,这个贴图文件可以存储一张高度图而不是法线贴图。参见新PBR材质贴图章节
Alpha (A) channel = None. Not used at this time
Alpha(A)通道 = 空。暂时没有使用。
Note: In the final release, this system of channel packing will be upgraded to the new “Texture Sets” system, which will be much more flexible in regards to file naming and texture map/channel management. After the upgrade, you will still be able to use the channel packing/file system detailed in this document without having to rework any of your texture files. For the initial Minecraft with RTX release, use the channel packing listed above.
注意:在最终发布版本中,这个通道打包系统将升级为新的“材质集”系统,在文件命名和材质映射/通道管理方面将更为灵活。在这次升级之后,您仍然可以使用本文档中详细介绍的通道打包/文件系统,而不必修改您的材质文件。对于最初的《Minecraft RTX》发布版本,请使用上文所述的通道打包系统。
Tools Needed
所需工具
To create your own PBR texture sets, you will need a photo-editing/digital painting application. Here are a few excellent options:
为了创建自己的PBR材质集,您需要一个照片编辑/数字绘画应用。以下是一些不错的选择:
Adobe Photoshop
Adobe Photoshop
GIMP
GIMP
Paint.net
paint.net
Pixlr.com
Pixlr.com
GraphicsGale, etc.
GraphicsGale,等等。
This guide will cover the Photoshop workflow specifically, but the concepts should transfer to other digital painting applications.
本教程将具体介绍Photoshop的工作流程,但概念应该类比到其他数字绘画软件上。
Opacity Maps
不透明度贴图
Opacity maps work great with RTX game builds and are great for making materials like glass and tree leaves. However, you’ll need to paint them in the alpha channel of texture file 1 (see above) and save the file as a 32-bits/pixel .TGA file, instead of a .PNG file. Otherwise, the opacity map will not work correctly.
不透明度贴图在游戏的光追版本中工作非常出色,非常适合制作玻璃或者树叶这样的材质。不过,您需要在材质文件1的alpha通道中绘制它们,并且将该文件保存为32位/像素的.TGA文件而不是.PNG文件。否则不透明度贴图可能会工作得不正常。
Note: In the initial release of Minecraft with RTX, the client will use the same textures for both RTX enabled and disabled. This means that an opacity value that is tuned for RTX enabled might look too transparent when RTX is disabled.To help balance this out, the game will only use the upper half of the range of the texture’s alpha channel (0.5 - 1) when RTX is enabled, but it will map this range to the full range of opacity in the game so no functionality is lost. For RTX disabled, the full range of the alpha channel will be mapped to the full range opacity in the game.
注意:在《Minecraft RTX》的初始版本中,无论光追是否启用,客户端都会使用相同的材质。这意味着当禁用光追时,为启用光追而调整的不透明度值可能看起来过于透明。为了平衡这一点,启用光追时,游戏将只使用材质alpha通道的上半部分(0.5 ~ 1),但是它将会将这个范围映射到游戏的整个不透明度范围,所以不会丢失任何功能。当禁用光追时,alpha通道的全范围将被映射到游戏中不透明度的全范围中。
Examples:
示例:
If the texture’s alpha channel value = 0 (black), then:
如果材质的alpha通道数值 = 0(黑色),则:
For RTX enabled in the game, texture opacity =0 (fully transparent)
当光追在游戏内启用时,材质不透明度 = 0(完全透明)
For RTX disabled in the game, texture opacity = 0 (fully transparent)
当光追在游戏内禁用时,材质不透明度 = 0(完全透明)
If the texture’s alpha channel value = 0.5 (middle gray), then:
如果材质的alpha通道数值 = 0.5(中等灰色),则:
For RTX enabled in the game, texture opacity =0 (still fully transparent)
当光追在游戏内启用时,材质不透明度 = 0(仍然完全透明)
For RTX disabled in the game, texture opacity = 0.5 (50% opaque)
当光追在游戏内禁用时,材质不透明度 = 0.5(50%透明)
If the texture’s alpha channel value = 0.75 (light gray), then:
如果材质的alpha通道数值 = 0.75(浅灰色),则:
For RTX enabled in the game, texture opacity =0.5 (50% opaque)
当光追在游戏内启用时,材质不透明度 = 0.5(50%透明)
For RTX disabled in the game, texture opacity = 0.75 (75% opaque)
当光追在游戏内禁用时,材质不透明度 = 0.75(75透明)
If the texture’s alpha channel value = 1 (white), then:
如果材质的alpha通道数值 = 1(白色),则:
For RTX enabled in the game, texture opacity =1 (fully opaque)
当光追在游戏内启用时,材质不透明度 = 1(完全不透明)
For RTX disabled in the game, texture opacity = 1 (fully opaque)
当光追在游戏内禁用时,材质不透明度 = 1(完全不透明)
New PBR Texture Maps
新PBR材质贴图
The PBR system doesn’t require you to use all of the PBR maps for every texture set. However, you will get the best looking results if you do.
PBR系统不会要求您在每个材质集使用所有的PBR贴图。不过,如果您使用所有的PBR贴图,最后会更好看。
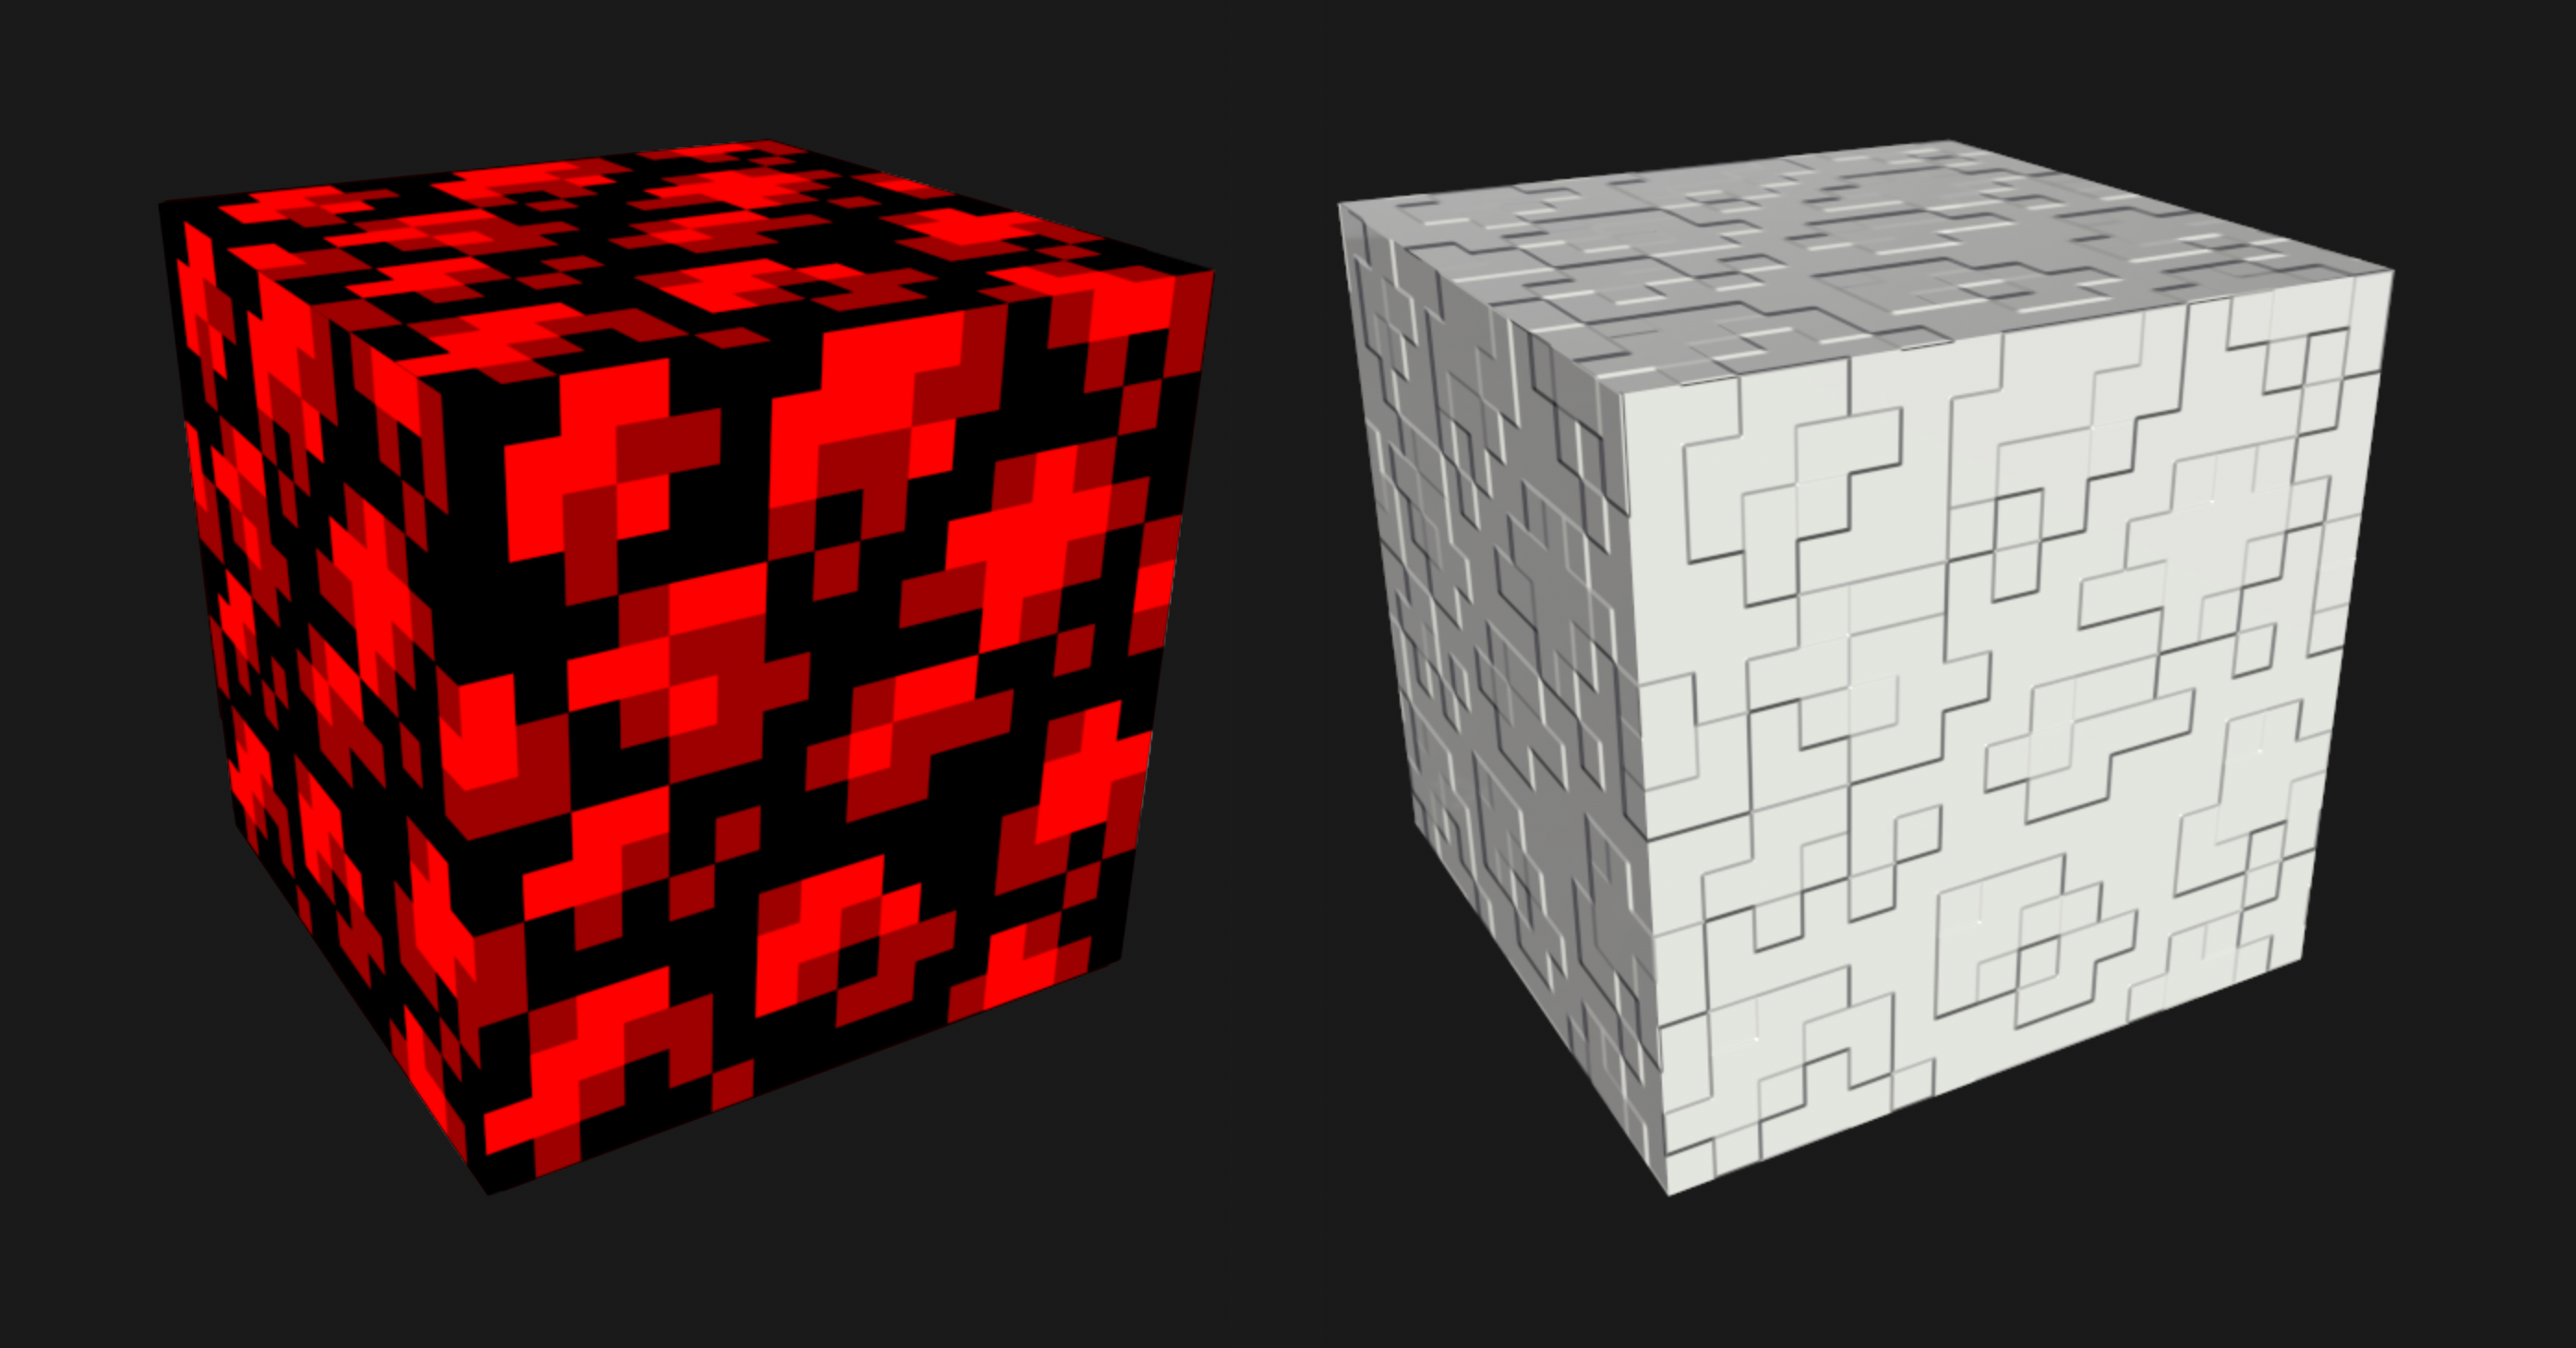
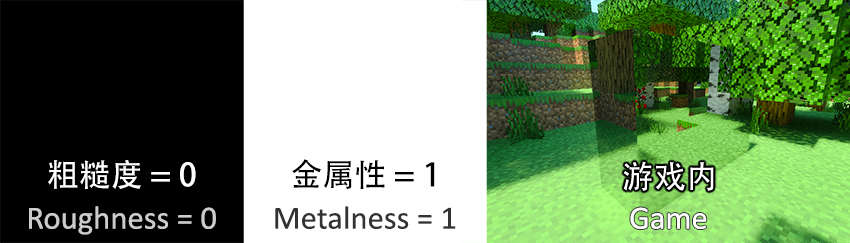
Metallic map - How metallic is a pixel in your texture:
金属度贴图 - 您的材质中一个像素的材质有多金属:
Value of 0 (black) means non-metallic (wool, wood, plastic, dirt, grass. etc.)
0的数值(黑色)表示非金属材质(羊毛、木头、塑料、泥土、草等等)
Value of 1 (white) means fully metallic (gold, iron, copper, etc.)
1的数值(白色)表示完全金属材质(金、铁、铜等)
Grayscale values between 0 and 1 can also be used
也可以使用0到1之间的灰度值(译者注:例如金属表面被氧化失去部分光泽,或者石墨等)
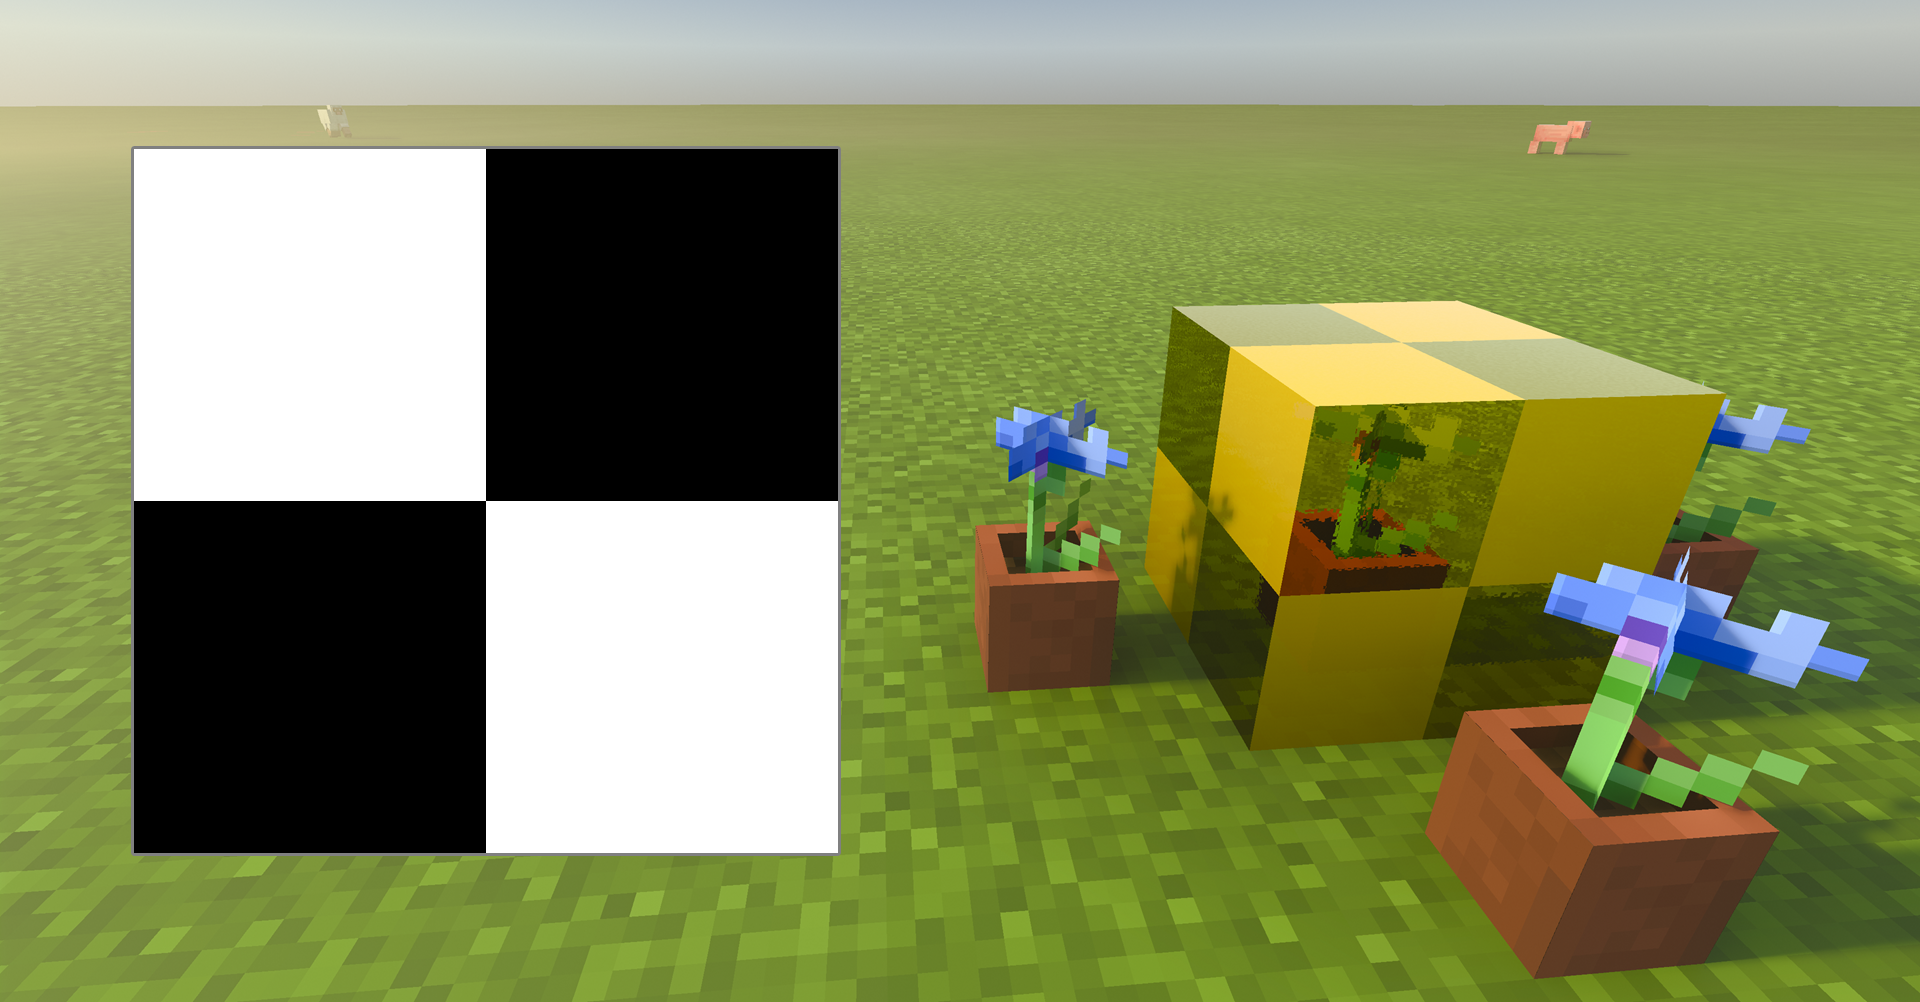
In the example above, the block has uniform roughness on all of its surfaces, but it is using a metallic map to control which pixels are metallic (white), and which pixels are non-metallic (black). The metallic pixels look more like gold while the non-metallic pixels look more like shiny, yellow plastic.
在上述示例中,方块所有的表面都有均匀的粗糙度,但是它使用金属度贴图来控制哪些像素是金属(白色),哪些像素是非金属(黑色)。金属的像素看起来更像黄金,而非金属像素看起来更像闪亮的黄色塑料。
Emissive map - How much a pixel in your texture should glow:
发光度贴图 - 您的材质中一个像素发出的光有多强:
Value of 0 (black) means no glow
0的数值(黑色)表示不发光
Value of 1 (white) means the strongest glow
1的数值(白色)表示发出最强的光
Grayscale values between 0 and 1 can also be used
也可以使用0到1之间的灰度值
Color of the glow is determined by the pixels in the base color map
发光的颜色由基础颜色图中的像素决定。
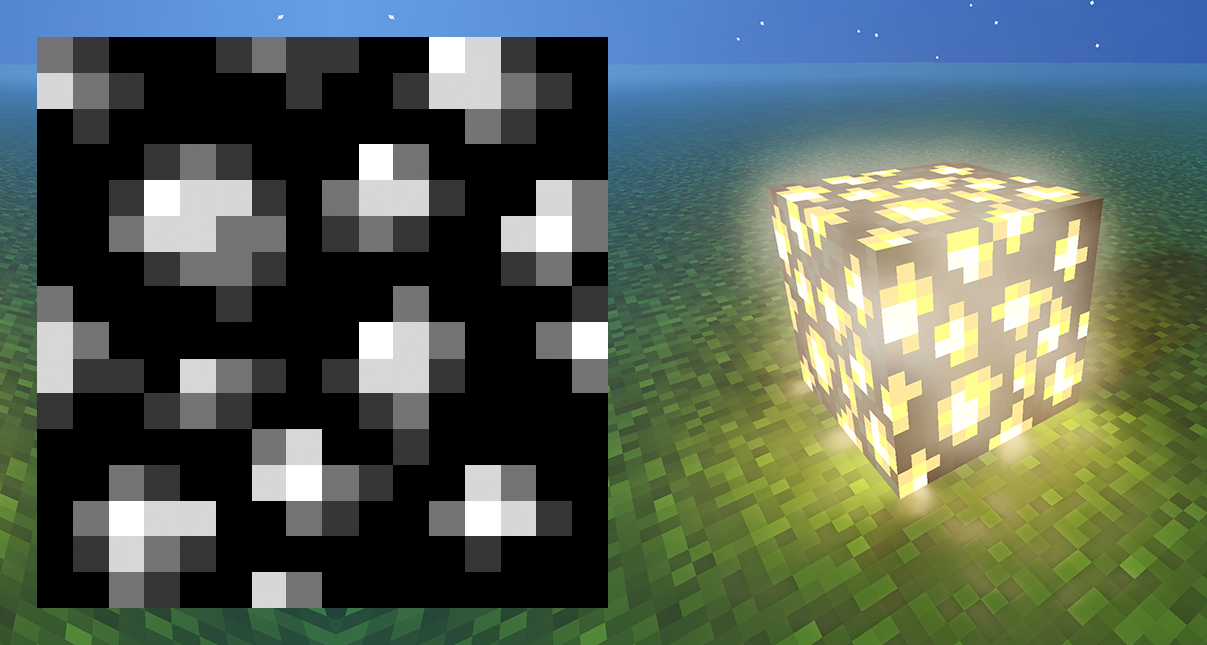
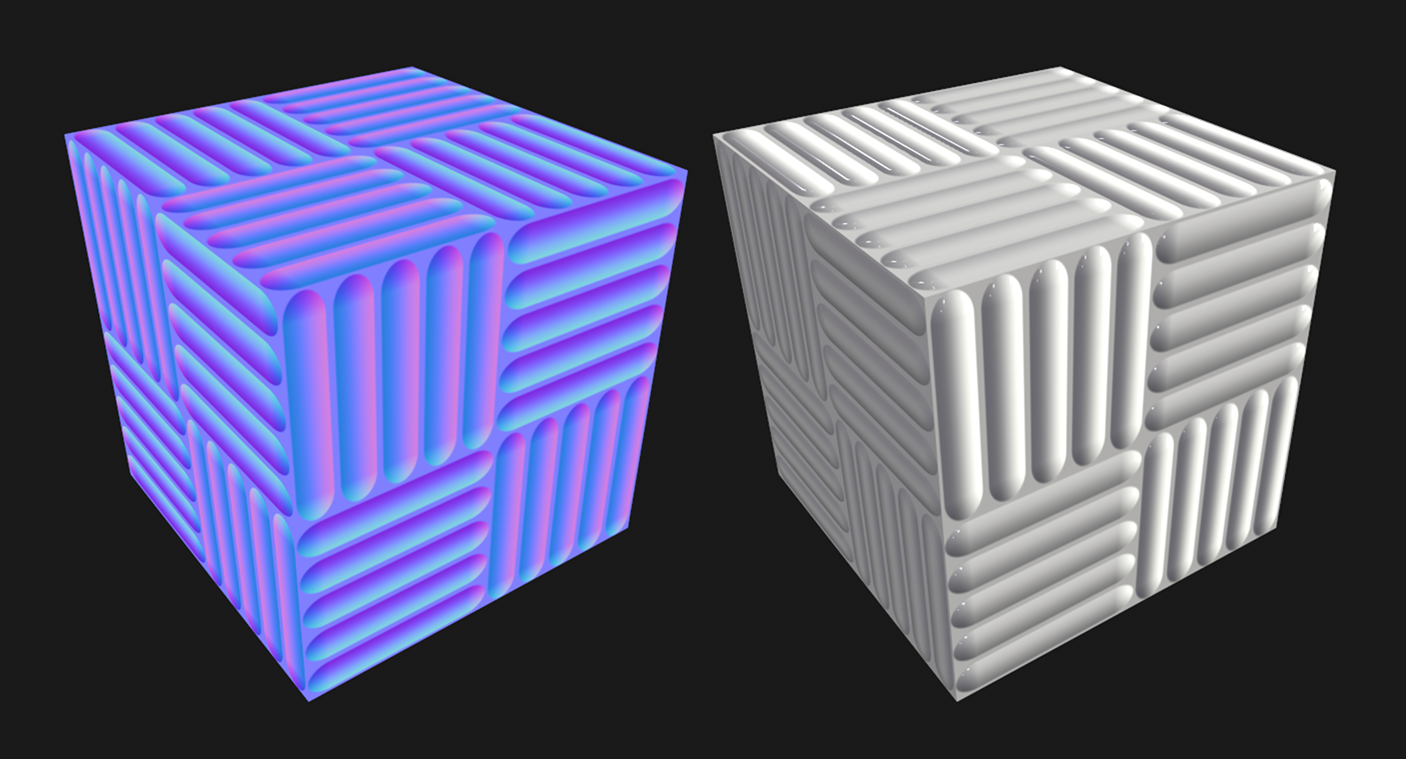
Roughness map - How rough (to the touch) is a pixel in your texture:
粗糙度贴图 - 您的材质中一个像素有多么粗糙(触觉上的)
Value of 0 (black) means very smooth (glass, polished stone, etc.)
0的数值(黑色)表示非常光滑(玻璃、磨制石头等等)
Value of 1 (white) means very rough (most dirt, bark, wool, etc.)
1的数值(白色)表示非常粗糙(大部分泥土、树皮、羊毛等)
Grayscale values between 0 and 1 can also be used
也可以使用0到1之间的灰度值
In the example above, the block has uniform metalness on all of its surfaces, but it is using a roughness map to control which pixels are very rough (white), which pixels are very smooth (black), and some pixels that are somewhere in between (gray). The smooth, less rough pixels look more like shiny blue gemstones while the rough pixels look more like rough gray rock.
在上述示例中,方块所有的表面都有均匀的金属触感,但是它使用粗糙度贴图来控制哪些像素非常粗糙(白色),哪些像素非常光滑(黑色),以及一些介于两者之间的像素(灰色)。光滑、不那么粗糙的像素看起来更像闪耀的蓝宝石,而粗糙的像素看起来更像粗糙的灰色岩石。
Normal map - How bumpy is a pixel in your texture:
法线贴图 - 您的材质中一个像素的倾斜角度如何:
Normal maps use the 3 color channels (RGB) in the texture to change how light behaves when hitting the texture. By doing this, it can fake surface details that appear to stick up or recede down into the surface of the 3D mesh.
法线贴图通过材质中的3个颜色通道(RGB)来改变光线在材质上的表现。它可以通过这种方式伪造看起来似乎在表面的三维网格中凸起或凹陷的细节,。
RGB values of (128, 128, 255) means the pixel doesn’t stick up or recede down when lit. It will appear at the height of the surface of the 3D mesh. When in doubt, use this default color for your normal map, or don’t use one at all to save on file size.
(128,128,256)的RGB值表示像素在被照亮时不会凸起或凹陷。它将会出现于3D网格的表面高度。如果有疑问,在法线贴图中使用此默认颜色,或者不使用法线贴图来减小文件大小。

RGB values other than this default color (above) should not be manually painted unless you’re confident working with normal maps this way. Normal maps are usually automatically generated from other height information when using specific software applications. More details can be found later in this document.
除非您确定这样使用法线贴图,除了此默认颜色(上述)之外的RGB值不应被绘制。法线贴图经常在使用特定的应用程序时根据其他高度信息自动生成。更多细节可以在本文下方找到。
Height map - Additionally, the normal texture file can also function as a height map.
高度图 - 另外,法线材质文件也可以作为高度图使用。
Height maps have some limitations and should only be used for pixelated texture sets like the 16x16 pixel vanilla Minecraft textures. If you’re painting non-pixelated textures, consider using a normal map instead of a height map.
高度图有一些限制,并且只应该用于像素化的材质集,例如16x16的原版Minecraft材质。如果您正在绘制非像素化的材质,考虑使用法线贴图而不是高度图。
The normal texture file will only be treated as a height map when the channels are set up in a specific way:
仅当颜色通道以特定方式设置时,法线贴图文件才会被视为高度图:
R channel = Height map (grayscale)
R通道 = 高度图(灰度图)*
Value of 1 means the pixel will appear to stick out
1的数值表示这个像素会凸出来
Value of 0 means the pixel will recede inward
0的数值表示这个像素会凹进去
Value of 0.5 means no surface change
0.5的数值表示没有表面的变动
G and B channels must both = 0 (black), otherwise the game will treat the height map as a normal map.
G和B通道必须均为0(黑色),否则游戏会视这个高度图为一个法线贴图。
*译者注:同之前的_mer.PNG中提到的,表示以灰度图存储而不是在材质中绘制为黑色
Creating the Base Color and Opacity Texture File
创建基础颜色和不透明度材质文件
First things first, let’s create custom base color and opacity maps:
首先,让我们来创建自定义基础颜色和不透明度贴图:
1. Open a vanilla Minecraft texture in the app as a starting point, or skip to Step 2.
1、第一步,在app中打开一个原版的《Minecraft》材质文件,或者跳到第二步
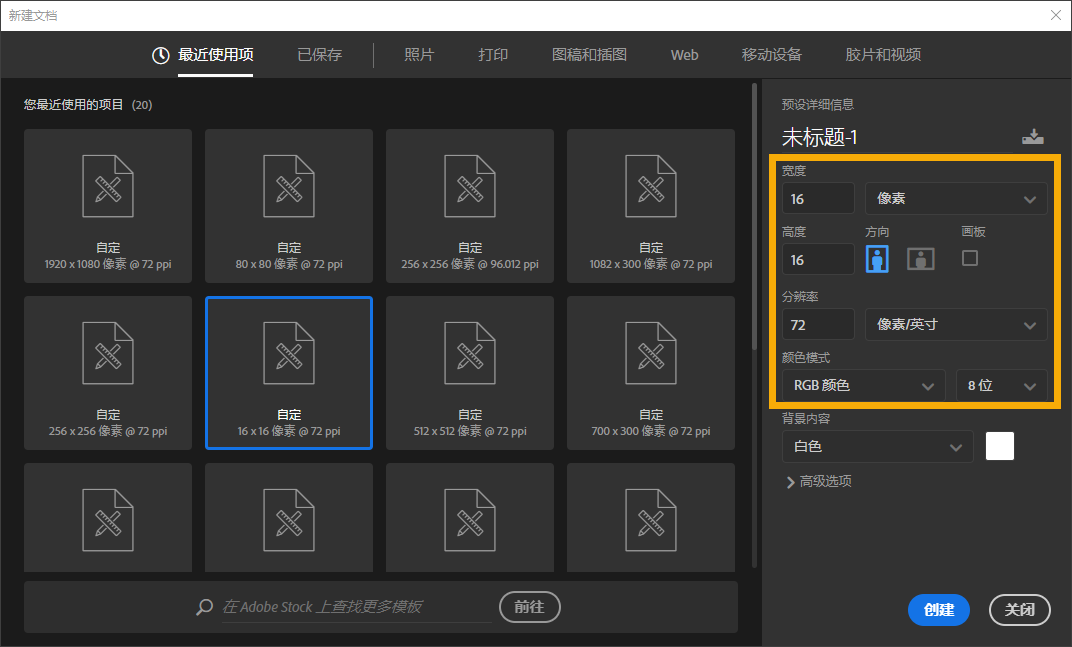
2. Create a new document at the texture resolution that you want. (16x16 pixels for most vanilla Minecraft textures) Also, 72 pixels/inch is recommended for the pixel density.
2、创建一个您想要的材质分辨率的新文档。(对于大多数原版《Minecraft》材质来说是16x16像素)同时,像素密度的推荐值是72像素/英寸。
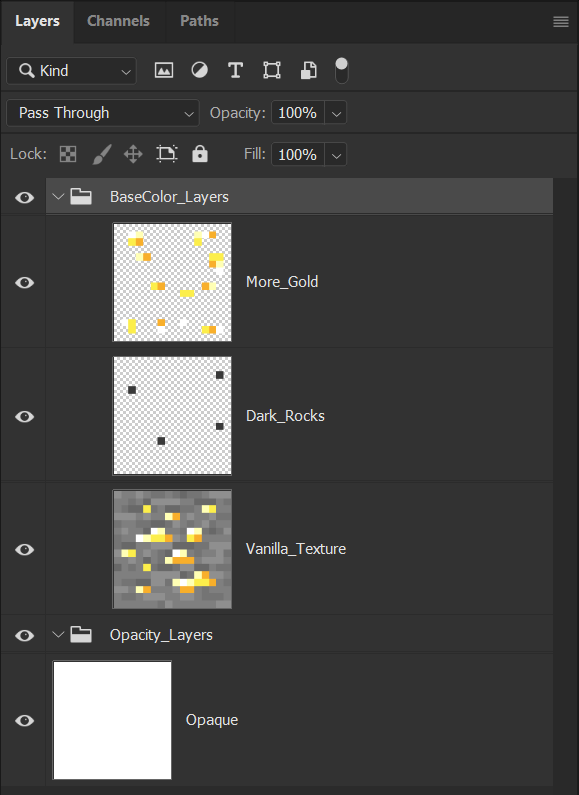
3. Create working layers for the base color and opacity map (if needed). Paint what you want and make any edits in these layers. In the example below, multiple layers have been painted to edit the base color map (more gold!).
3、为基础颜色和不透明度贴图(如果需要)创建工作图层。绘您所想,对图层做任意的修改。在下面的示例中,已经绘制了多个图层来编辑基础颜色贴图(更多的金!)。
4. Once you have the base color and opacity map layers looking the way you want, it’s a good idea to save your Photoshop document using the name of the object’s texture set. For this example, this file was saved as “gold_ore.PSD”. Next, we need to save out a texture file that the game can use.
4、当您拥有了想要的基础颜色贴图和不透明度贴图,用目标材质集的名字来保存Photoshop文档是个好主意。在这个例子中,这个文件被保存为“gold_ore.PSD”。接下来,我们需要保存一个游戏可以使用的材质文件。
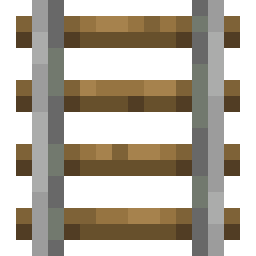
Note: For most game objects, transparent pixels in the opacity map must also be painted black in the base color map (e.g. tree leaves). However, there are exceptions where the transparent pixels must also be painted white in the base color map in order to appear correct in the game (e.g. rails). Some experimentation may be necessary.
注意:对于大部分游戏对象来说,不透明度贴图中透明的像素也需要在基础颜色贴图中绘制为黑色(例如树叶)。不过,为了在游戏中正确显示,也有透明像素需要在基础颜色贴图中绘制为白色的特殊情况(例如铁轨)。一些实验可能是必要的。
5. (Optional, for non-opaque objects only) - Duplicate your opacity map layers, merge the duplicates together to create a single layer, and then copy it (Ctrl+C).
5、(可选,仅部分透明的对象) - 复制您的不透明度图层,合并成一个图层,复制此图层(Ctrl+C)。
6. (Optional, for non-opaque objects only) - In the Channels tab, create a new alpha channel, and paste (Ctrl+V) your merged opacity map into this channel. Click on the small gray box to the left of the RGB channel to make the RGB channels visible again.
6、(可选,仅部分透明的对象) - 在通道选项卡中,创建一个新的alpha通道,并向此通道粘贴(Ctrl+V)合并后的不透明度贴图。点击RGB通道左侧的小灰框以使RGB通道再次可见。
(译者注:图片中的按钮是创建alpha通道的按钮。在通道/图层不可见时,左侧的眼睛图标会变成小灰框)
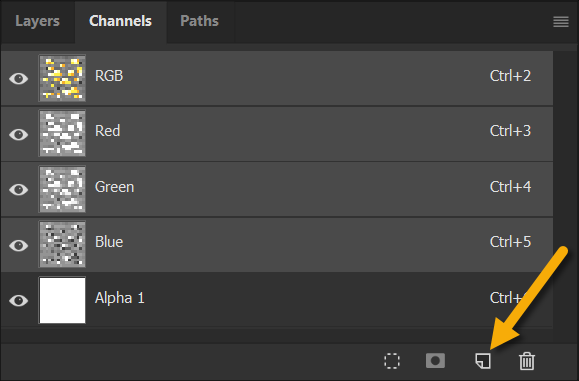
You now have your base color map being stored in the RGB channels and the opacity map stored in the alpha channel.
现在您的基础颜色贴图存储在RGB通道,不透明度贴图存储在alpha通道。
7. (Optional, for non-opaque objects only) - Go back to the Layers tab and hide any of your opacity map layers. Only your base color map layers should be showing.
7、(可选,仅部分透明的对象) - 返回图层选项卡,隐藏所有的不透明度图层。显示的应该只有基础颜色图层。
8. Re-save the .PSD.
8、重新保存.PSD文件。
9. Use the Save As command to save a .PNG texture file that can be used by the game.
9、使用“存储为”命令保存一个游戏中可使用的.PNG材质文件。
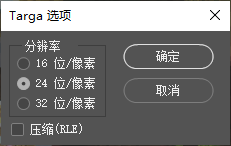
Note on opacity: You will save out a 32-bits/pixel .TGA file at this step if your object is intended to be non-opaque and uses an opacity map in the alpha channel. See the Opacity Maps section above.
不透明度注意事项:如果您的目标打算部分透明并且在alpha通道使用了不透明度贴图,您将在这一步保存一个32位/像素的.TGA文件。参见上方的不透明度贴图章节。
Note on naming: File naming is important at this step! This .PNG should have the same name as the game object that you are modifying. For this example, this file was saved as “gold_ore.PNG”.
命名注意事项:这一步的文件命名十分重要!这个.PNG文件必须与您修改的游戏内对象名称相同。在这个示例中,文件被保存为“gold_ore.PNG”。
10. You have successfully created the first of 3 texture files for a complete PBR texture set.
10、您成功创建了一个完整的PBR材质集中3个材质文件的第一个。
Creating the Metallic, Emissive, and Roughness Texture File
创建金属度,发光度和粗糙度材质文件
Next, you’ll want to create the second PBR texture file combining the metallic, emissive, and roughness PBR maps.
现在,您将需要创建第二个结合了金属度,发光度和粗糙度PBR贴图的PBR材质文件。
1. (Optional) Open a vanilla Minecraft texture in Photoshop or a similar app as a starting point, or skip to the next step.
1、(可选)在Photoshop或者相似的app内打开一个原版《Minecraft》材质作为第一步,或者跳到下一步。
2. Create a new document at the same texture resolution as your first texture file (base color and opacity map). (16x16 pixels for most vanilla Minecraft textures) Again, 72 pixels/inch is recommended for the pixel density.
2、新建一个材质分辨率与您的第一个材质文件(基础颜色和不透明度贴图)相同的文档。(对于大多数原版Minecraft材质来说是16x16像素)。同样,推荐的像素密度是72像素/英寸。
3. Create working layers for the metallic, emissive, and roughness map. Paint what you want and make any edits in these layers.
3、为金属贴图、发光贴图和粗糙度贴图创建新的图层。绘您所想,对图层做任意的修改。
Note: You only need to paint these maps using grayscale values.
注意:您只需要使用灰度值绘制这些贴图。
In the example below, multiple layers have been painted to create the desired roughness map result.
在下面的示例中,为了创建所需的粗糙度贴图绘制了多个图层。
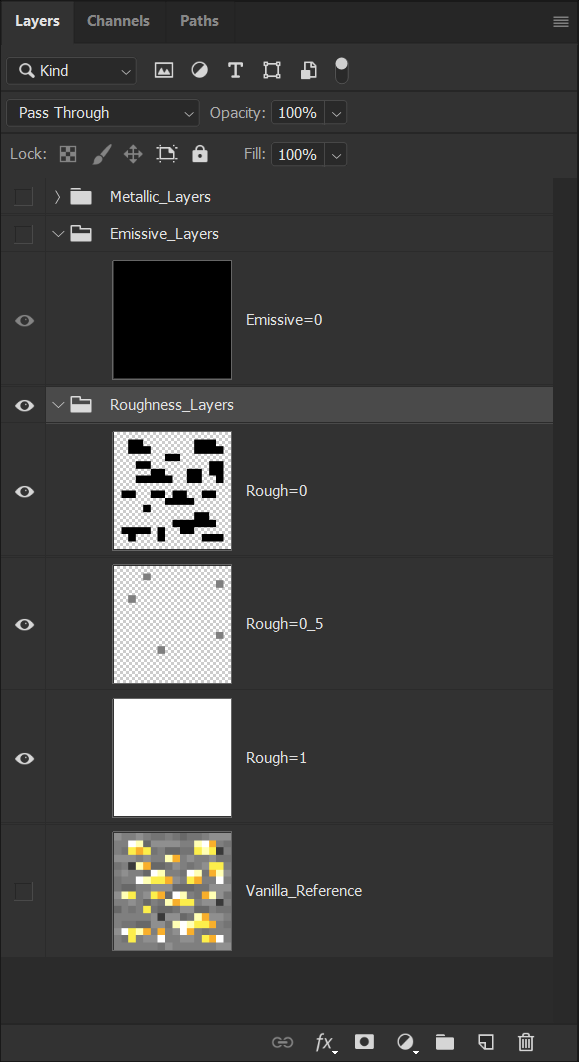
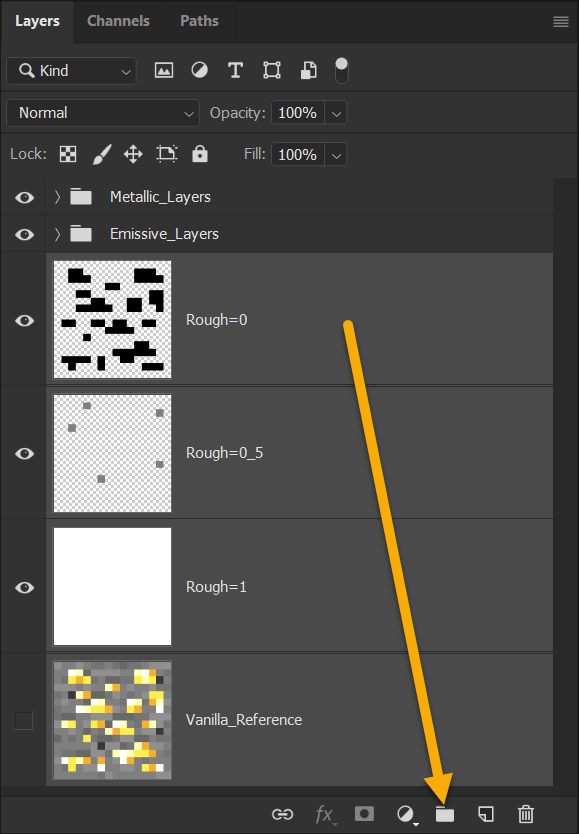
4. Make sure to place layers of each map type into layer groups. This is important for the next few steps.
4、确保各个贴图的图层放进了对应的图层组。这对下一步来说很重要。
(译者注:图片中指向的按钮为创建图层组。选中多个图层并点击此按钮可以把选中的图层放进新建的图层组中。)
5. Right-click on the Metallic layer group and select “Blending Options”.
5、右击金属度贴图的图层组,选择“混合选项”
6. Uncheck the green (G) and blue (B) channels:
6、取消勾选绿色(G)和蓝色(B)通道:
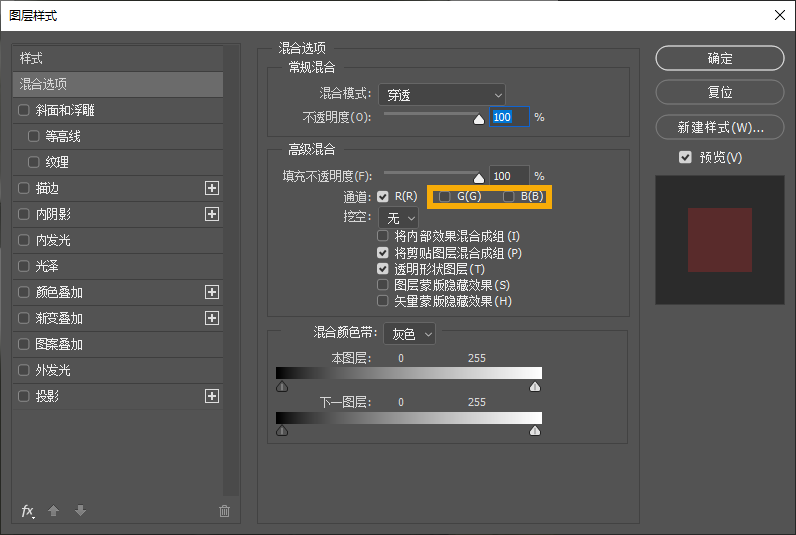
7. Click “OK” to close the Blending Options window for the Metallic layer group.
7、点击“OK”以关闭金属贴图图层组的混合选项窗口。
8. Right-click on the Emissive layer group and select “Blending Options”.
8、右击发光度贴图的图层组,选择“混合选项”
9. Uncheck the red (R) and blue (B) channels:
9、取消勾选红色(R)和蓝色(B)通道:
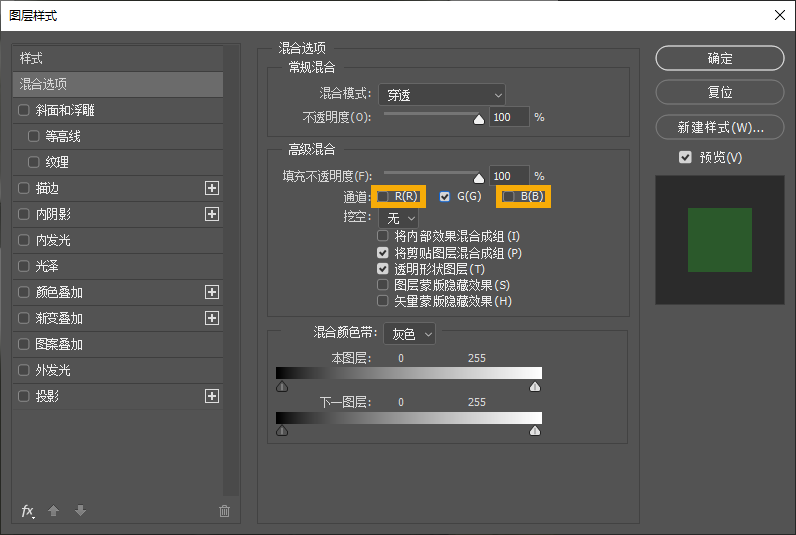
10. Click “OK” to close the Blending Options window for the Emissive layer group.
10、点击“OK”以关闭发光贴图图层组的混合选项窗口。
11. Right-click on the Roughness layer group and select “Blending Options”.
11、右击粗糙度贴图的图层组,选择“混合选项”
12. Uncheck the red (R) and green (G) channels:
12、取消勾选红色(R)和绿色(G)通道:

13. Click “OK” to close the Blending Options window for the Roughness layer group.
13、点击“OK”以关闭粗糙度贴图图层组的混合选项窗口。
14. Once you have the metallic, emissive, and roughness map layers looking the way you want, it’s a good idea to save your Photoshop document using the name of the object’s texture set with the addition of the *_mer suffix.
14、当您的金属度、发光度和粗糙度贴图看起来就是您想的那样时,使用目标的材质集名称并添加*_mer后缀来命名并保存您的Photoshop文档是个好主意。
For this example, this file was saved as “gold_ore_mer.PSD”. Next, we need to save out a texture file that the game can use.
在此示例中,文件被保存为“gold_ore_mer.PSD”。下一步,我们需要导出一个游戏可以使用的材质文件。
15. Use the Save As command to save a .PNG texture file that can be used by the game.
15、使用保存为命令保存一个游戏可以使用的.PNG材质文件。
Note: Again, file naming is important at this step. This .PNG file should have the same name as the game object that you are modifying with the addition of the *_mer suffix. For this example, the file was saved as “gold_ore_mer.PNG”.
注意:同样,文件命名在这一步很重要。这个.PNG文件必须与您想要修改的游戏内对象拥有相同的名字并在后面加上*_mer后缀。在此示例中,文件被保存为“gold_ore_mer.PNG”。
16. Finished! You have created the second of 3 texture files for a complete PBR texture set.
16、完成了!您现在已经创建了一个完整的PBR材质集中3个材质的第二个。
Creating the Normal Texture File
创建法线材质文件
Normal maps are usually created using specialized tools. There are many professional software options as well as some great, free alternatives available:
法线贴图一般使用专门的工具创建。有许多专业的软件以及一些免费而优质的软件可供选择。
Free Tool - xNormal
免费的工具 - xNormal
Adobe Photoshop - Filters → 3D → Generate Normal Map
Adobe Photoshop - 滤镜 → 3D → 生成法线图
PBR Painting - Substance Painter
PBR绘制 - Substance Painter
PBR Painting - Quixel Mixer
PBR绘制 - Quixel Mixer
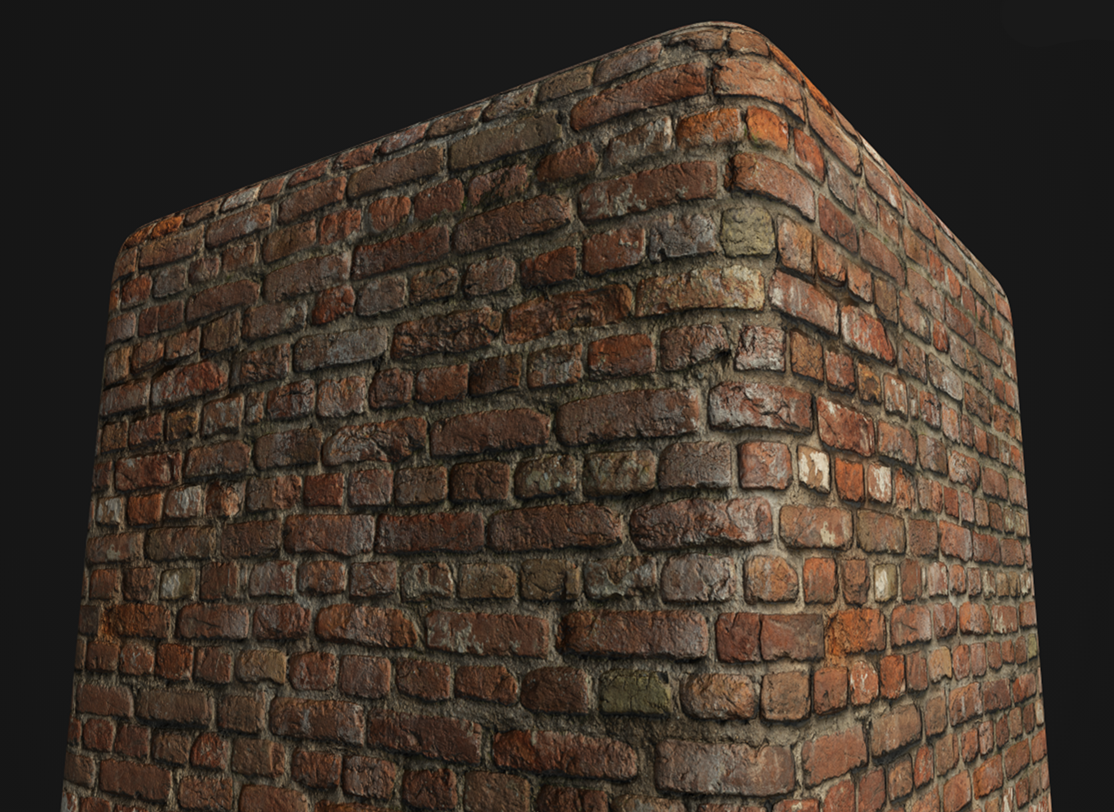
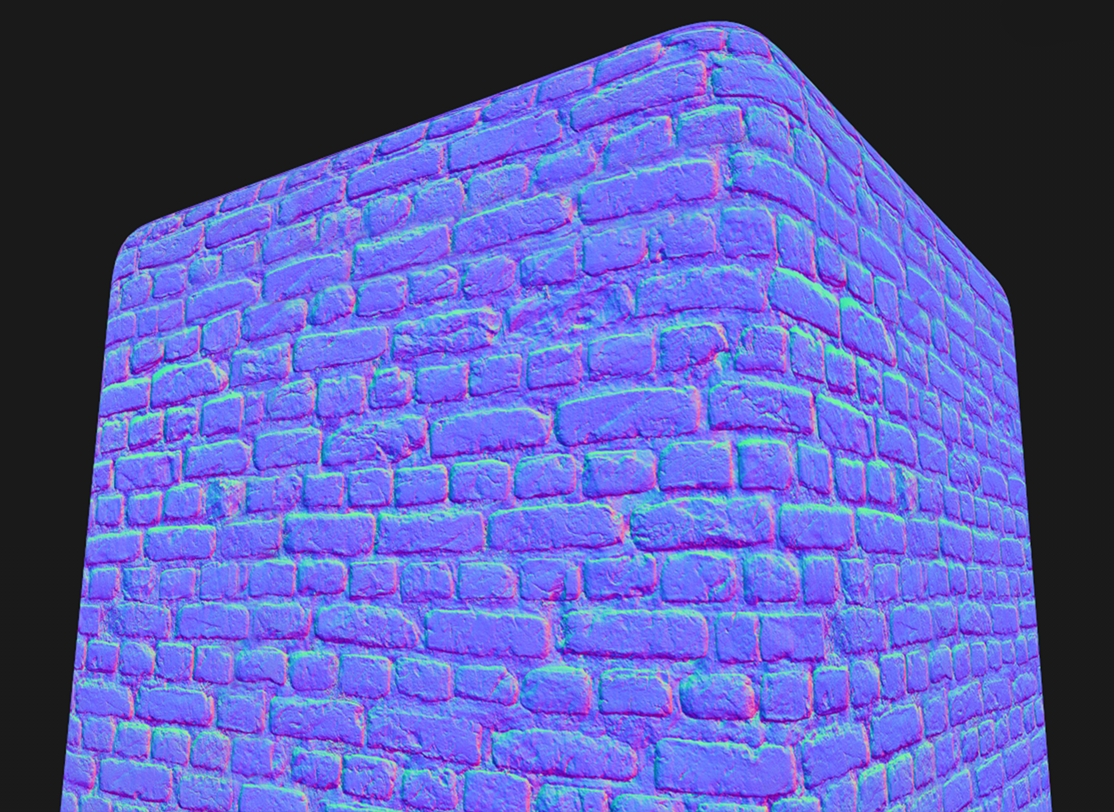
Example of a brick wall PBR texture set (left) and its normal map (right):
以一个砖墙的PBR材质集(左)和它的法线贴图(右)为例:
1.Create a normal map using your preferred tool or workflow at the same resolution as your first texture file (base color and opacity map). Again, 72 pixels/inch is recommended for the pixel density.
1、使用您喜欢的工具或者工作流程创建一个分辨率与第一个材质文件(基础颜色和不透明度贴图)相同的法线贴图。同样,像素密度建议使用72像素/英寸。
2.Use the Save As command to save a .PNG texture file that can be used by the game.
2、使用保存为命令保存一个游戏可以使用的.PNG材质文件。
Note: Again, file naming is important at this step. This .PNG should have the same name as the game object that you are modifying with the addition of the *_normal suffix. For this example, the file was saved as “gold_ore_normal.PNG”.
注意:同样,文件命名在这一步很重要。这个.PNG文件必须与您想要修改的游戏内目标拥有相同的名字并在后面加上*_normal后缀。在此示例中,文件被保存为“gold_ore_normal.PNG”。
If you’re not familiar with creating normal maps, you can always just leave it out or create a “blank” normal map by filling a texture with (128, 128, 255) RGB color and saving the .PNG file.
如果您不熟悉法线贴图,您可以总是不创建法线贴图或者通过使用(128,128,255)的RGB颜色填满一张贴图并保存为.PNG文件来创建一个“空的”法线贴图。
Alternatively, since the “gold_ore” example is a pixelated texture, we could have also used the height map option to create surface details. The file name would still be “gold_ore_normal.TGA” in this example, but the information stored in the texture channels would be different. See the Height Maps subsection of the New PBR Texture Maps section above for more info.
此外,由于示例“gold_ore”是一个像素化的材质,我们也可以选择高度图来制作表面细节。此示例中文件名称依然是“gold_ore_normal.TGA”,但是材质通道中存储的信息会有所不同。更多信息参见新PBR贴图章节中的高度图小节。
3.Finished! You have created the third and final texture file for a complete PBR texture set.
3、完成了!现在您已经创建了一个完整的PBR材质集中的最后一个材质文件。
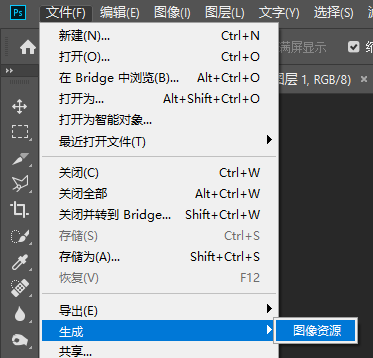
Alternate Workflow: Using Photoshop’s Generate Image Assets Function
可选工作流程:使用Photoshop的生成图像资源功能
Instead of having 3 Photoshop .PSD files for each of the 3 PBR texture files, you could alternatively use a single .PSD file and take advantage of Photoshop’s Generate → Image Assets function in the File menu.
您可以选择只使用一个.PSD文件,并利用Photoshop文件菜单中的生成 → 图像资源功能,以免为了3个PBR贴图文件各生成总共3个Photoshop的.PSD文件。
As long as you create a layer group for each PBR texture file and name it with the correct file name and file type (.png), they will save themselves automatically after each change (after you initially save the .PSD file).
只要您为每个PBR材质文件创建一个图层组,并使用正确的文件名和文件类型(.png)命名它,它们就会在每次更改后自动保存自己(在您初次保存.PSD文件之后)。
More information can be found here.
在这里查询更多信息。
Note: Since this function cannot output .TGA files, you won’t be able to use it to save a texture file with an alpha channel like those needed for non-opaque texture sets.
注意:由于这个功能无法输出.TGA文件,您不能使用它来保存带有alpha通道等用于部分透明材质文件组的材质文件。
Caveats for Flipbook Textures/Animated Objects
关于动态材质/带有动画的对象的注意事项
In Minecraft, animated objects (such as sea lanterns, fire, and lava) utilize flipbook textures and must be handled differently. At present, these animated objects do not support PBR features. For the final release, Minecraft with RTX will support these flipbook textures once altered to a higher level of detail using the steps above.
在《Minecraft》中,带有动画的对象(例如海晶灯、火和岩浆)使用了动态材质,必须使用不同的方式处理。目前,这些带有动画的物体暂时不支持PBR特性。在最终发布版中,如果使用上述步骤改变更高级别的细节,《Minecraft RTX》将会支持这些动态材质。
Caveats for Creating Mirrors with Perfect Reflections
关于创建拥有完美的反射的镜面的注意事项
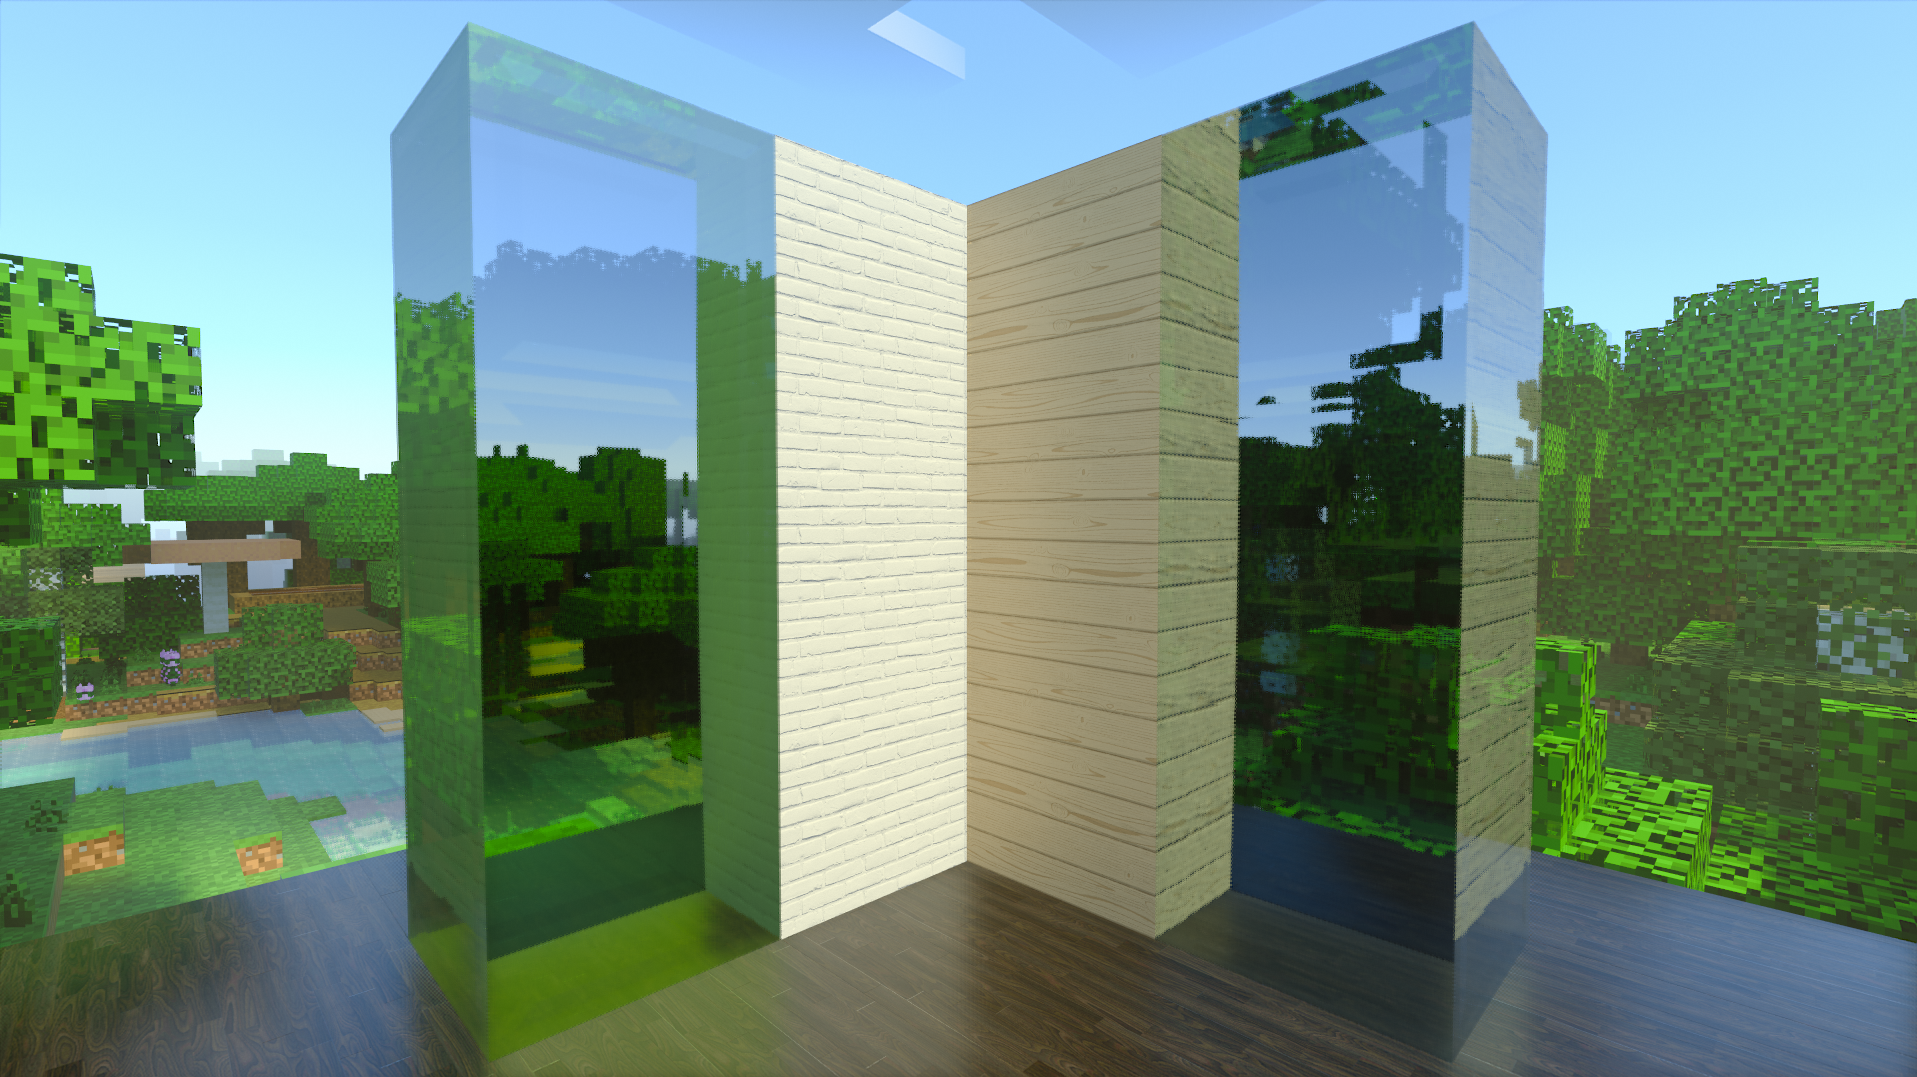
Using PBR maps like metalness and roughness along with ray tracing, you can create highly reflective materials like shiny plastics, smooth metal, or polished stone. All of these will have high quality reflections.
您可以通过和光追一起使用金属性和粗糙度贴图之类的PBR贴图来创建高反射度的材质,例如闪光的塑料,光滑的金属或者磨制的石头。这些都会有高质量的反射。
However, for perfectly reflective objects like mirrors, you’ll want to configure your PBR maps to enable a perfect mirror.If you use a solid black roughness map (0.0) and a solid white (1.0) metalness map, the game will interpret your material as a perfect mirror. This means that the ray tracing code can take some shorter paths during its calculations since it knows that the material will fully reflect the environment without any additional details to take into account.
但是,对于像镜子这样的完全反射的物体,您需要配置您的PBR贴图以启用一个完美的镜面。如果您使用一张纯黑的粗糙度贴图(0.0)和一张纯白的金属性贴图(1.0),游戏会将您的材质表现为一个完美的镜面。这意味着光线追踪的代码在计算过程中可以采用一些捷径,因为它知道材质将完全反射环境,而不用考虑任何额外细节。
Resource Pack Setup
资源包设置
Finally, before testing your textures in the game as part of a resource pack, you’ll need to make one small addition to the resource pack’s manifest.JSON file in order to enable RTX.
最后,把您的材质作为资源包的一部分在游戏内测试前,您需要在资源包的manifest.JSON文件中小小地添加一点东西以启用光追。
Add this section to manifest.JSON before the final closed curly brace:
把这一小段加入到manifest.JSON最后一个右花括号的前面:
"capabilities": [
"raytracing"
]
How to Test Your Textures in the Game
如何在游戏中测试您的材质
When Minecraft with RTX is released, you can test your new PBR texture set in-game by following these steps:
当《Minecraft RTX》发布时,您可以通过以下步骤在游戏中测试您的PBR材质集:
1.Copy the new PBR texture files into the appropriate location in your resource pack.
1、将新的PBR材质文件复制到资源包中的适当位置。
For the “gold_ore” example, the texture files were copied into a resource pack named VanillaPBR located here:
以“gold_ore”为例,材质文件被复制到一个叫VanillaPBR的资源包中,位置为:
C:\Users\[username]\AppData\Local\Packages\Microsoft.MinecraftUWP_8wekyb3d8bbwe\LocalState\games\com.mojang\resource_packs
C:\Users\[用户名]\AppData\Local\Packages\Microsoft.MinecraftUWP_8wekyb3d8bbwe\LocalState\games\com.mojang\resource_packs
2.Run the game build.
2、启动游戏。
3.Enable your resource pack.
3、启用您的资源包。
4.Create/Open a world.
4、创建/打开一个世界。
5.Construct the game object that matches up with your new texture set.
5、建造匹配您的新材质集的游戏对象。
6.Enjoy your new PBR texture set!
6、享受您的新PBR材质集!
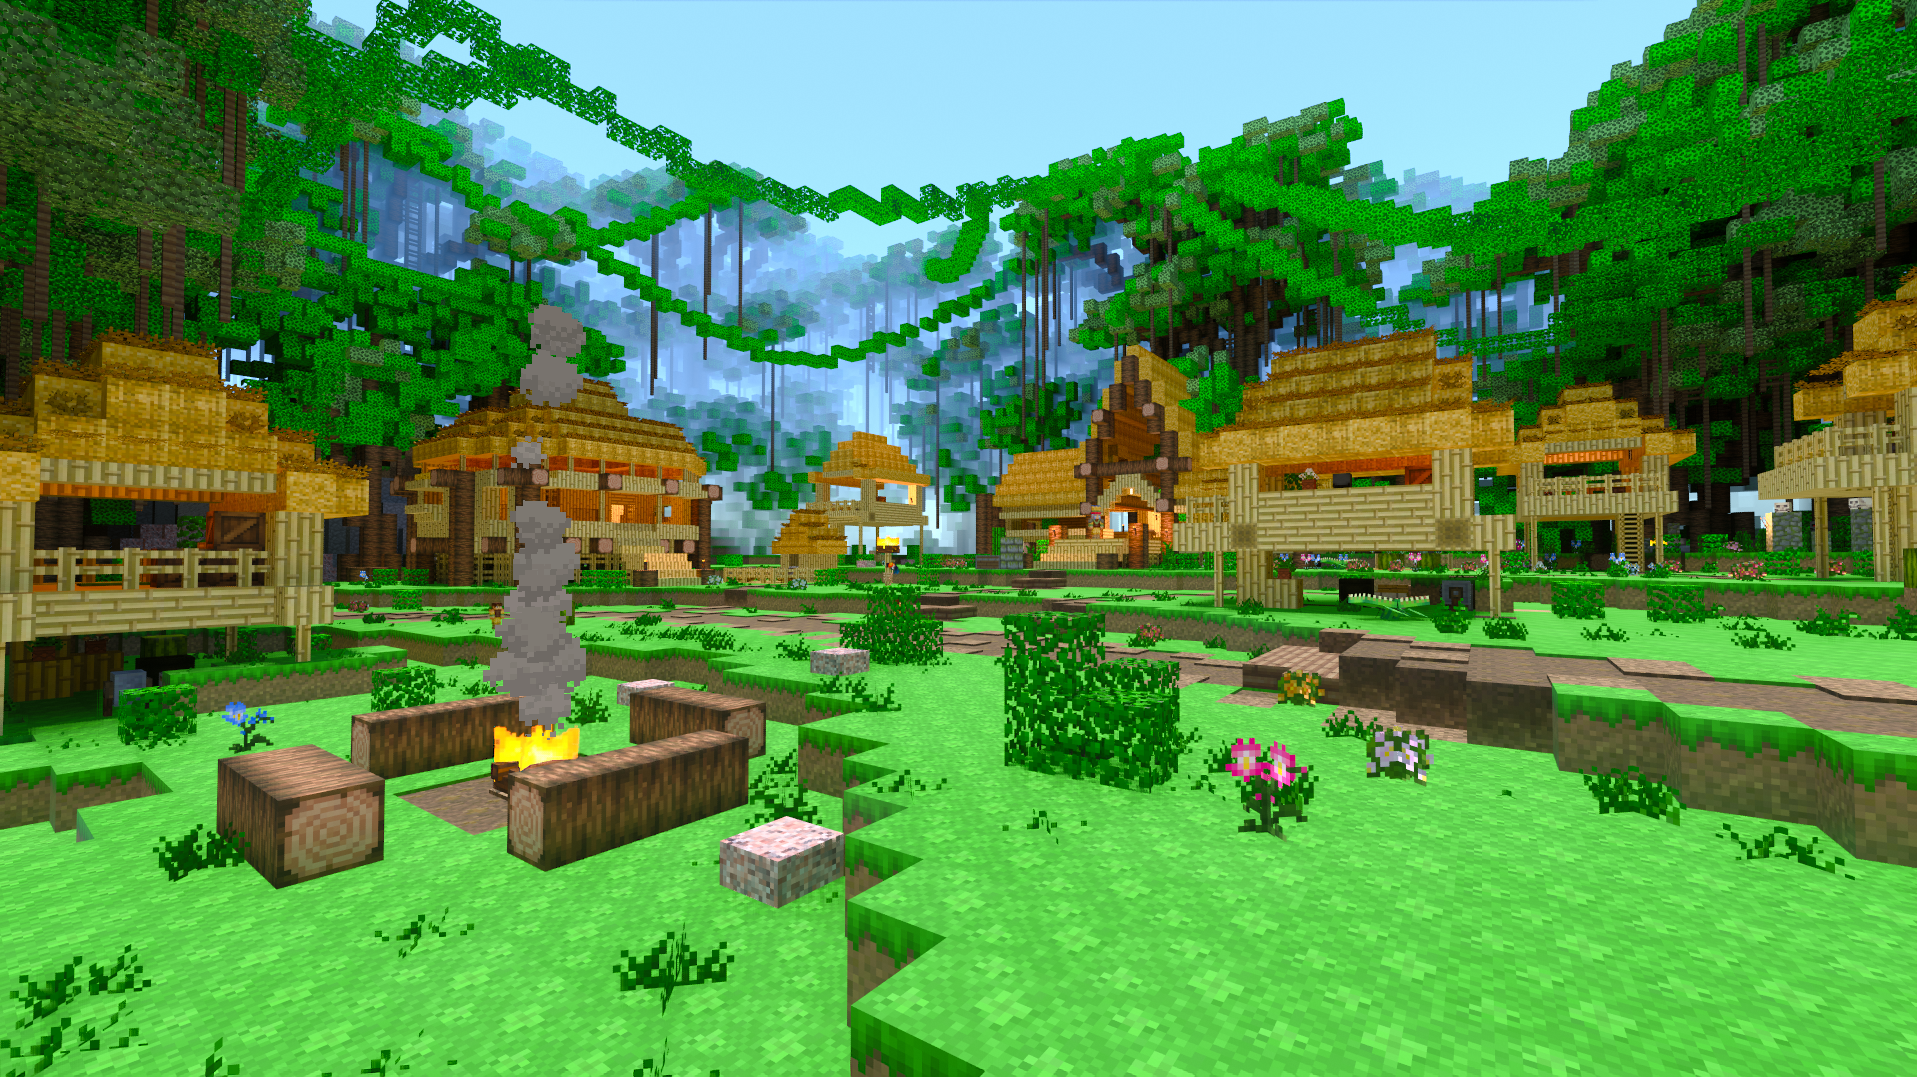
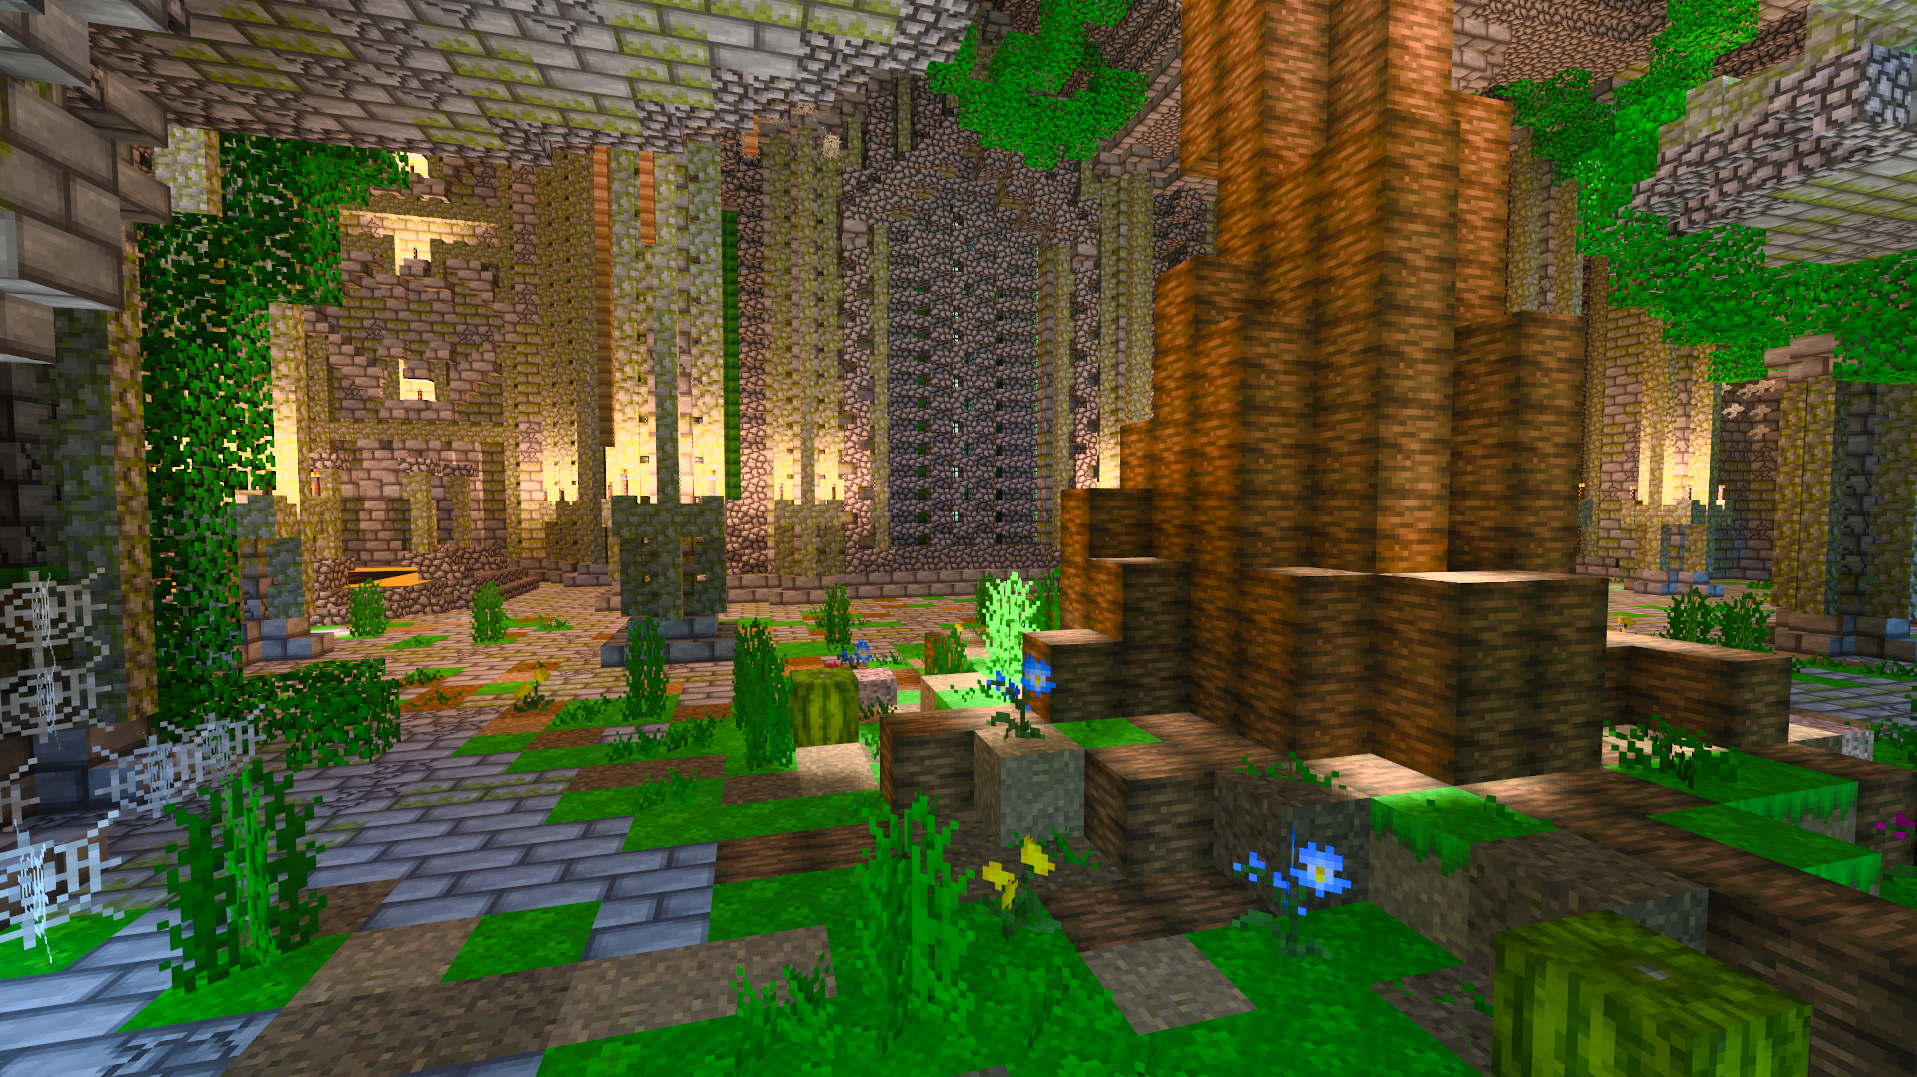
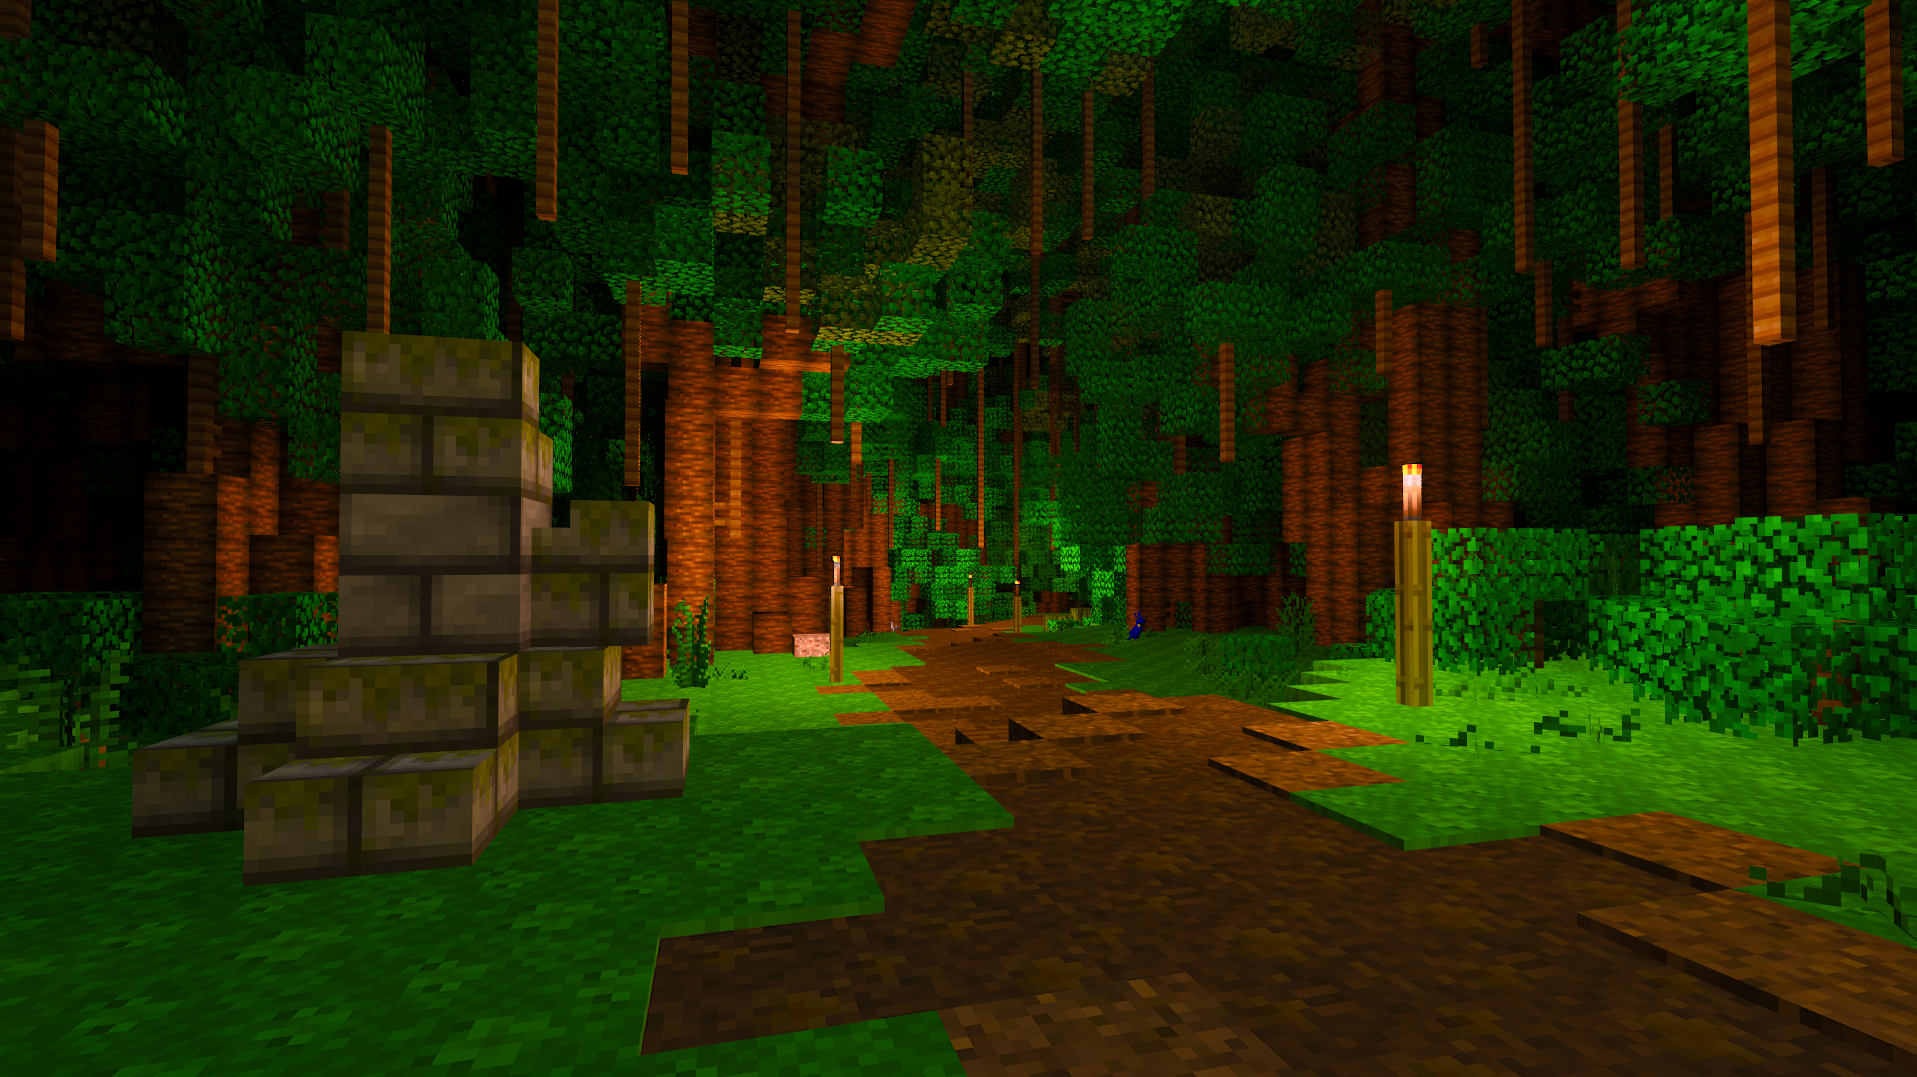
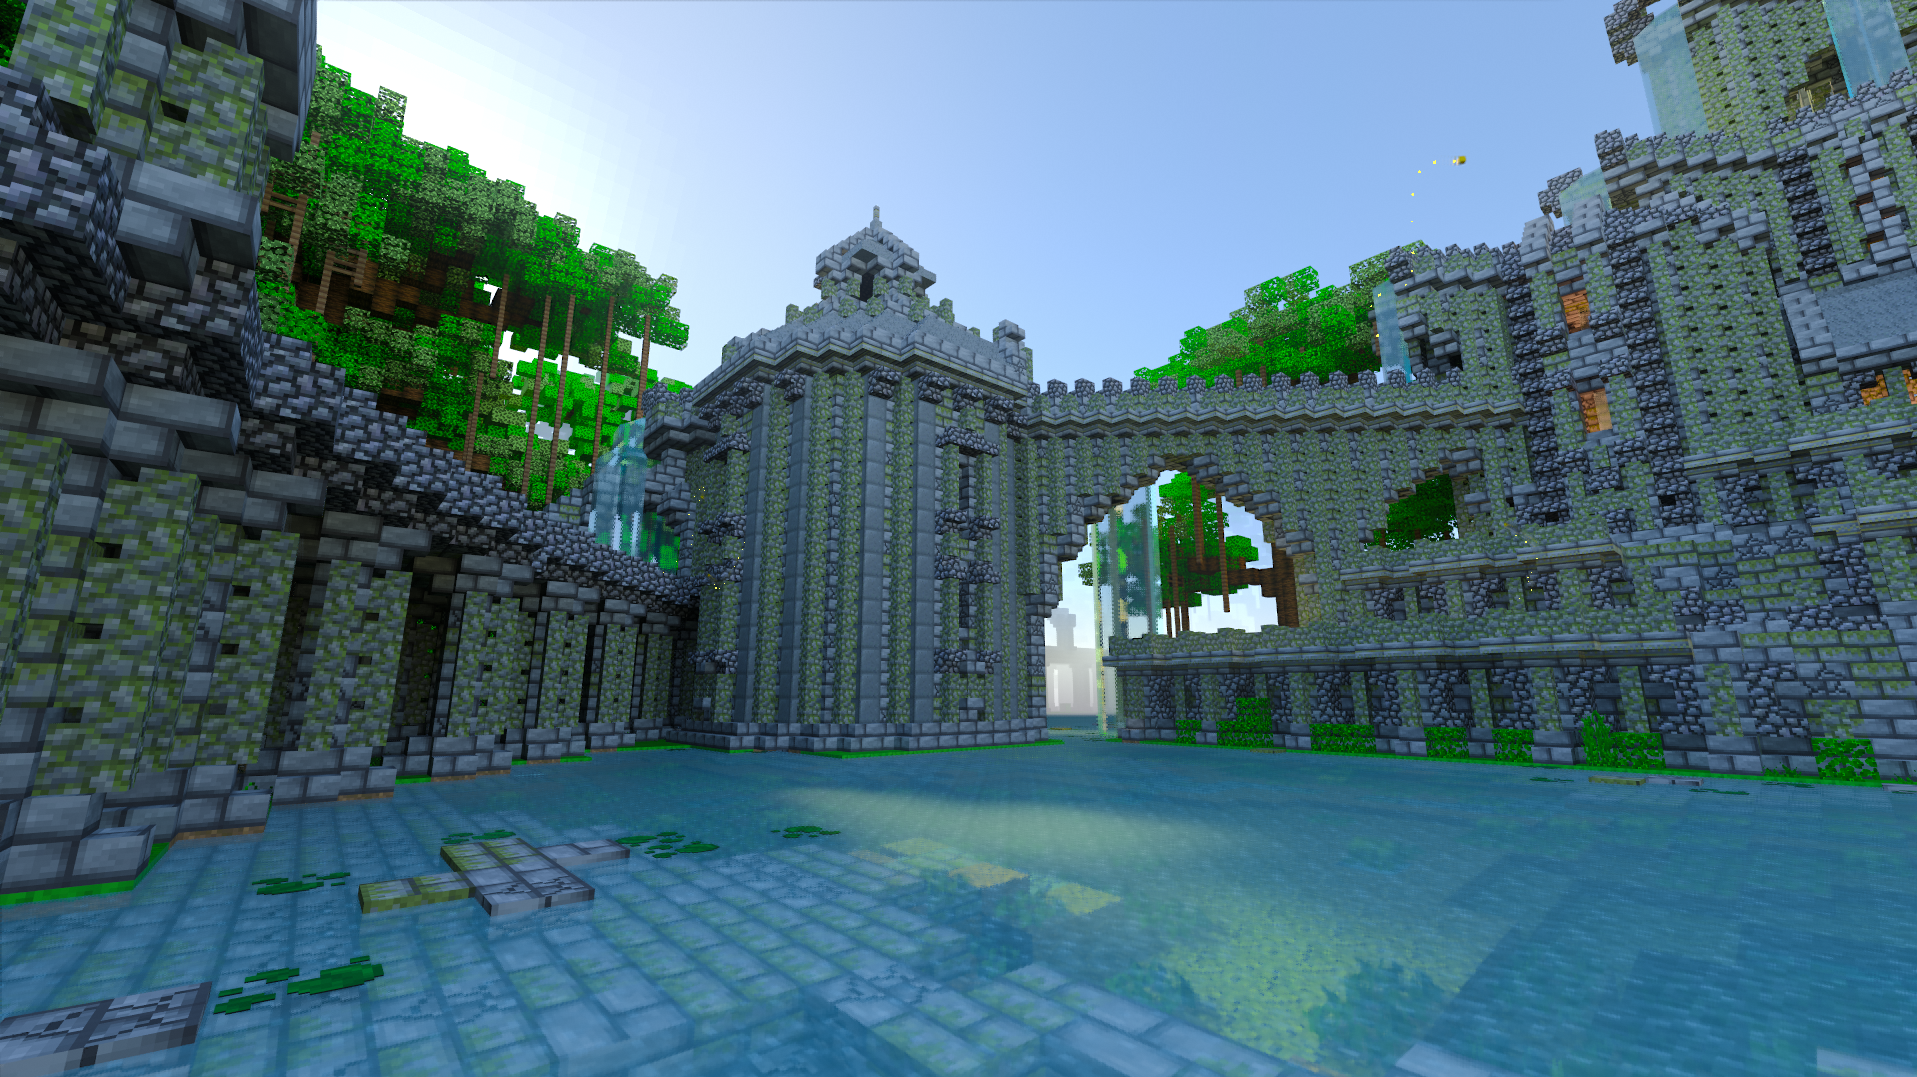
To demonstrate the possibilities of the new Minecraft PBR textures, we’ve worked with Razzleberries to create the Texture Expo world, a large Smithsonian-esque museum showcasing every enhancement, benefit and improvement offered by Minecraft with RTX. As you stroll through the world, when released alongside Minecraft with RTX, you’ll see how PBR textures work in concert with ray tracing to enable a level of detail and fidelity that was previously impossible to achieve with traditional rasterization and effects.
为了展示新的《Minecraft》 PBR材质的可能性,我们与Razzleberries合作创建了材质展览会世界,一个巨大的史密森式的博物馆,展示了《Minecraft RTX》带来的每一处增强,优点与改进。当您在已发布的《Minecraft RTX》的世界中漫步时,您将会看到PBR材质如何与光追协同工作,以实现高等级的细节和保真水平,这在以前是不可能通过传统的光栅化和特效实现的。
Hopefully, this stunning showcase will provide you with inspiration for your own PBR textures and ray-traced world. For other examples of what can be achieved, stay tuned to our YouTube channel, where we’ll be showcasing several more ray-traced creations.
这个令人震惊的演示将会为您的PBR材质和光线追踪的世界提供灵感。对于其他可以实现的示例,请继续关注我们的YouTube频道,我们会在那展示更多的光线追踪的创作。
How to Create PBR Textures in Substance by Adobe
如何使用Adobe的Substance创作PBR贴图
(译者注:由于软件汉化不完全,软件未汉化的部分将在后方用括号注释英文原文)
If you have access to the Substance Painter app, you can create higher resolution PBR texture sets in a much more intuitive manner. This software lets you see all of the maps of your PBR texture set displayed in real-time on mesh geometry. This allows you to tune your texture maps as you work without having to launch the game, move any files around, or modify channels.
如果您可以访问Substance Painter软件,您可以使用一种更直观的方式创建分辨率更高的PBR材质集。这个软件让您可以实时看到显示在几何网格中的PBR材质集内所有的贴图。这允许您在工作时调整您的材质贴图,而不需要启动游戏,移动文件,或者修改通道。
1. Launch the application and select New Project from the File menu.
1、启动应用程序,从“文件”菜单中选择“新建...”。
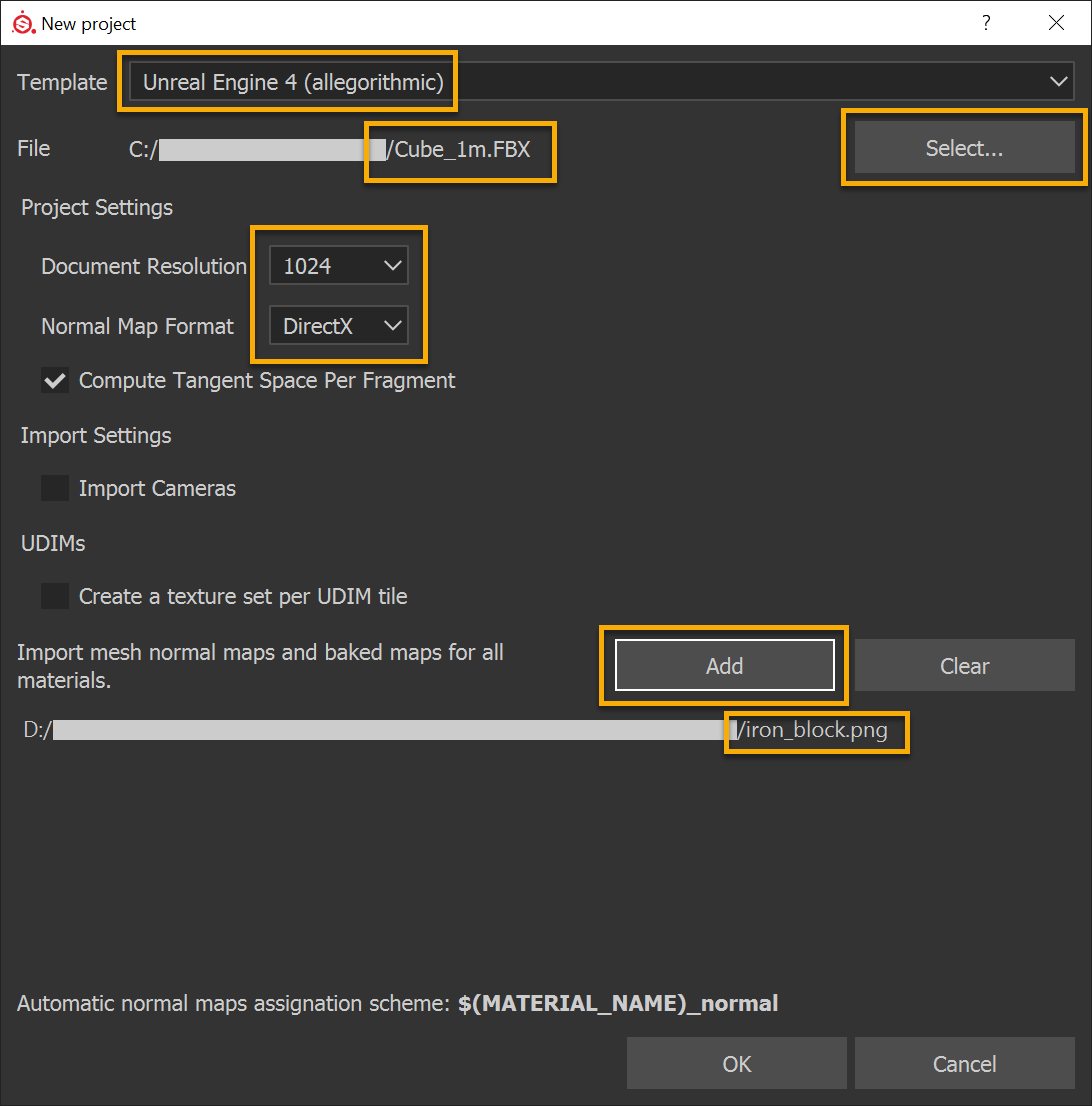
2. Template = Unreal Engine 4 - This will automatically set a variety of application and viewer settings. Feel free to try other options or make your own template!
2、模版(Template)选择虚幻引擎4(Unreal Engine 4) - 这将自动设置各种应用程序和浏览器的设置。您可以尝试其他选项或者自己制作模版!
3. File → Select - This is where you select what mesh you would like to display and paint your textures on. For Minecraft with RTX, using a 1 meter by 1 meter cube mesh with just 6 faces (no subdivisions) will give you an exact preview of how your textures will look when mapped onto a block in the game. Using the .FBX mesh format is recommended.
3、文件(File) → 选择(Select...) - 您可以在这里选择使用哪种模型来显示并绘画材质。对于《Minecraft RTX》来说,使用一个1mx1m的只有六个面的方块(没有曲面细分)会使您的材质在游戏中映射到一个方块的样子得到精确的预览。建议使用.FBX网格格式。
4. Document Resolution - This is the texture resolution that you’re targeting. Note: This setting can be changed later non-destructively at any time. For HD textures, it’s recommended to work at 1024 - you’ll get lots of detail in your textures with minimal pixelation, the app will run nice and fast on most PC setups, and your HD textures should look sharp in the game.
4、文档分辨率(Document Resolution) - 这是您材质分辨率的目标。注意:这个设置可以在此后的任何时候进行无损更改。对于高清材质,建议在1024的分辨率下工作——您的材质在像素化程度极低的时候能获得很多的细节,应用程序能在大部分电脑的设置上运行速度更快,而且这样您的高清材质在游戏中看起来应该会较为清晰。
If you’ve only ever worked with textures in vanilla Minecraft, you’ll notice that you can’t select 16 pixels by 16 pixels here for your resolution (the lowest is 128). However, you can always author and export textures at 128x128 (or larger) and scale them down later in an image-editing application like Photoshop.
如果您只使用过原版《Minecraft》中的材质,您将会发现不能选择16x16像素的分辨率(最低的是128)。不过,实际上您可以在128x128(或者更大的)画布上绘制并导出材质,并在Photoshop之类的图像编辑程序中缩小它们。
5. Normal Map Format = DirectX (leave as default)
5、法线贴图格式(Normal Map Format) = DirectX(留为默认值)
6. Compute Tangent Space Per Fragment = True (leave as default)
6、计算每个片段的切线空间(Compute Tangent Space Per Fragment) = 是(留为默认值)
7. Add - (Optional) Here you can choose to import any supporting textures that you already have completed. If replacing a vanilla Minecraft texture with an HD version, it can be helpful to import the vanilla texture here for use as a reference. Note: This import step can also be performed later at any time. For this example, the vanilla “iron_block” texture file is going to be imported when the new project is created to be used as a reference.
7、添加(Add) - (可选)您可以在这里选择导入任何您做好的材质。如果使用高清材质替换原版的《Minecraft》材质,在这里导入原版材质作为参考会有很大的帮助。注意:此导入步骤也可以在任何时候执行。在本示例中,原版的“iron_block”材质将会在创建新项目时作为参考导入。
8. Click “OK”. The application should open this new project that you’re creating and look something like this:
8、点击“确定”。应用程序应该会打开您正在创建的新项目,看起来是这样的:
9. It’s a good idea to add the emissive map to your texture set list at this point. Even if your texture set isn’t going to use emissivity, don’t worry, it will default to black (0.0) and won’t hurt anything.
9、这时候最好将发光度贴图添加到材质集列表。即使您的材质集并不打算使用发光强度,也不用担心,它将留为黑色(0.0),不会有任何影响。
Note: You can also add an opacity map to your texture set list in the same way if you’re planning on creating a non-fully opaque texture set.
注意:如果您打算创建一个部分透明的材质集,也可以使用同样的方式将不透明度贴图添加到您的材质集列表中。
10. (Optional) Next, add your texture reference to a new fill layer in the Base Color slot. You’ll find your imported reference texture on the Shelf under the Project heading.
10、(可选)接下来,将您的材质参考添加到基础色槽中的一个新填充图层中。您可以在项目标题下的展架中找到导入的参考材质。
(译者注:译者本人安装的Substance Painter中,展架最初在整个窗口的最下层。)
Layers are automatically set to bilinear filtering when created, which can make pixelated textures like vanilla Minecraft textures look blurry. To correct this, just set the layer’s Filtering to Nearest. However, if you’re not using pixelated textures, leave your layer filtering on the default setting of bilinear HQ.
图层在创建时会自动设置为双线性过滤。这可能会使原版《Minecraft》材质之类的像素化材质看起来模糊不清。只需要把图层的滤镜从双线性调整至最近点就可以修正这一点。不过,如果您没有使用像素化的材质,把您的图层滤镜保留为双线性|HQ的默认设置。
From here, it’s also a good idea to set this reference layer to have full roughness (1.0), no metalness (0.0), and no emissivity (black: 0, 0, 0). This will make sure that the reference texture is displayed in Painter as close to the vanilla game as it can be.
从现在开始,最好将这个参考图层设置为完全粗糙(1.0)、无金属感(0.0)、完全不发光(黑色:0,0,0)。这将确保参考材质在Substance Painter中的显示效果尽可能接近原版游戏。
Note: If you didn’t import reference textures or other resources when you created the project, you can do so at any time using the Import Resources button on the Shelf.
注意:如果您在创建项目的时候没有导入参考材质或者其他资源,您可以随时使用展架上的导入资源按钮进行导入。
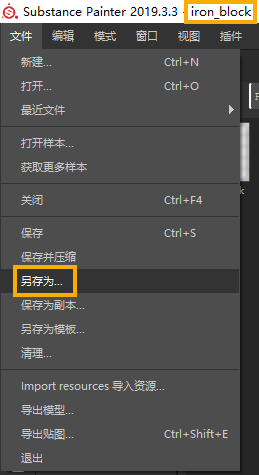
11. Now is a great time to save your project. It’s recommended to name your Painter project after the game object whose texture set you are replacing. For this example, this project file has been saved as “iron_block.SPP”. Naming your project this way will make things easier when exporting your texture set later.
11、现在是保存您的项目的好时机。建议以您想要替换的游戏对象的材质集名称来命名您的Substance Paint项目。在本示例中,项目文件被保存为“iron_block.SPP”。这样命名您的项目会让以后导出材质集时更方便。
12. From here, you can create your texture set with all of its PBR maps as you see fit.
12、从这一步开始,您可以根据自己的需要创建材质集的所有PBR贴图。
In this example, a new fill layer was added (with some adjustment sub-layers) to create a dark, high definition iron material.
在本示例中,添加了一个新的填充图层(有一些调整子层)以创建一个暗色、高清晰度的铁质材料。
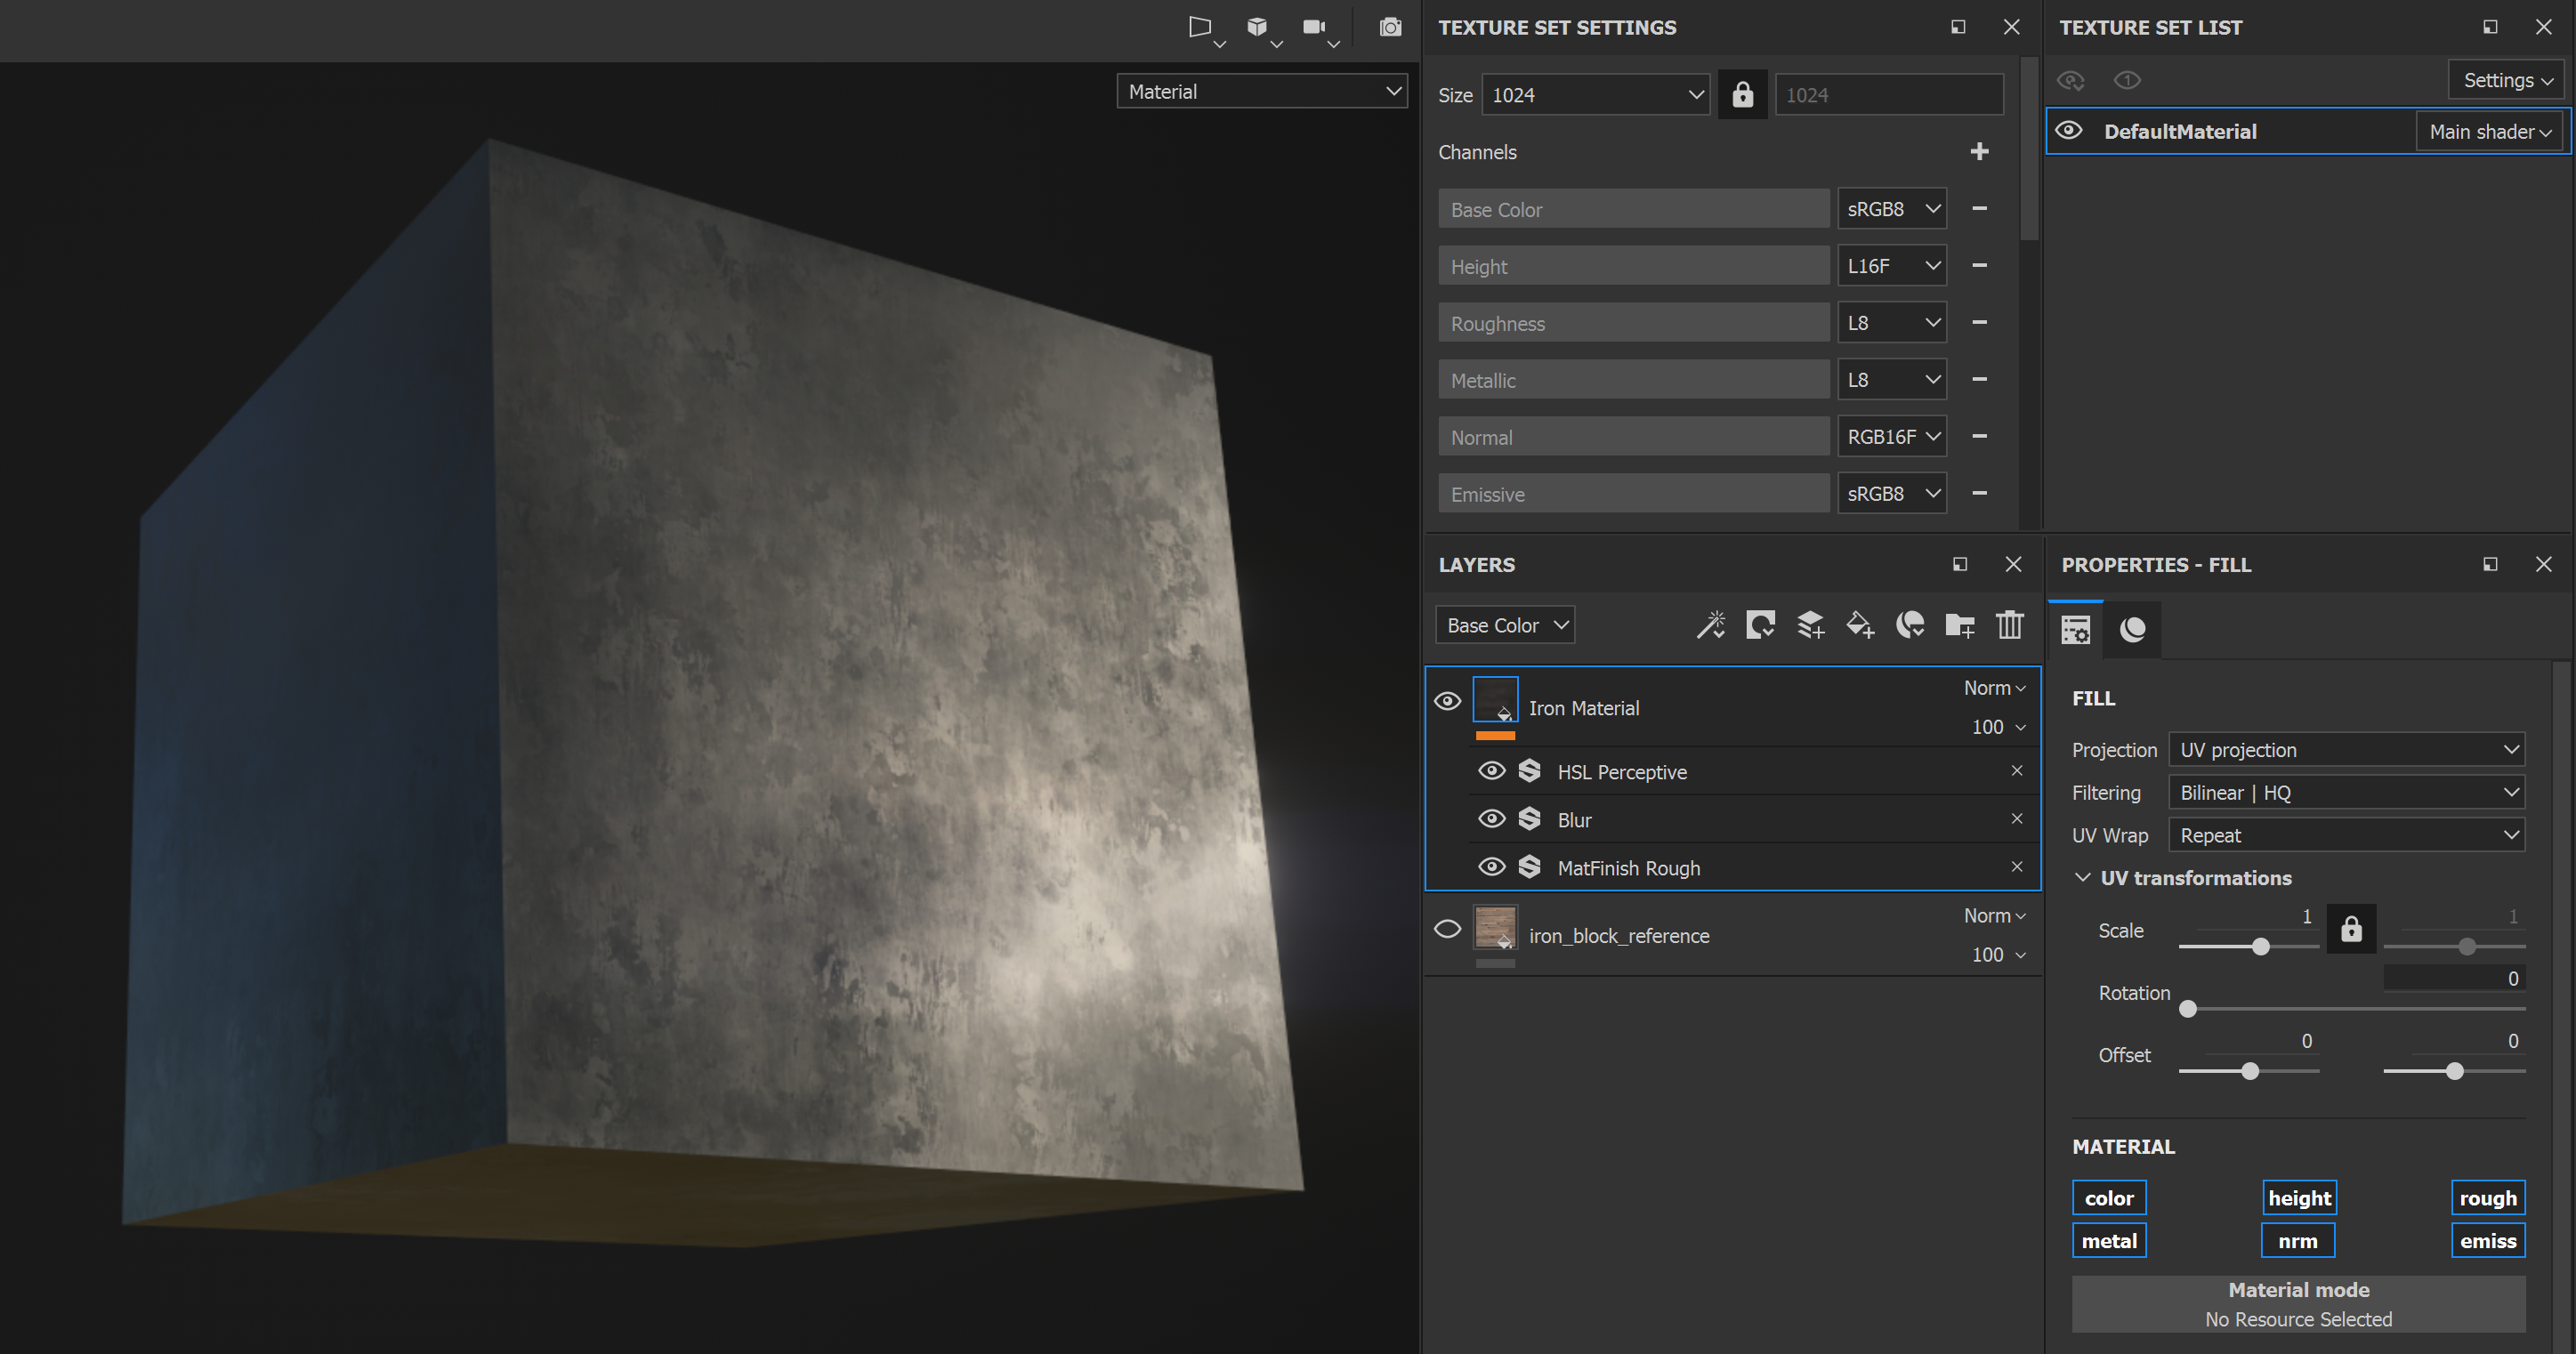
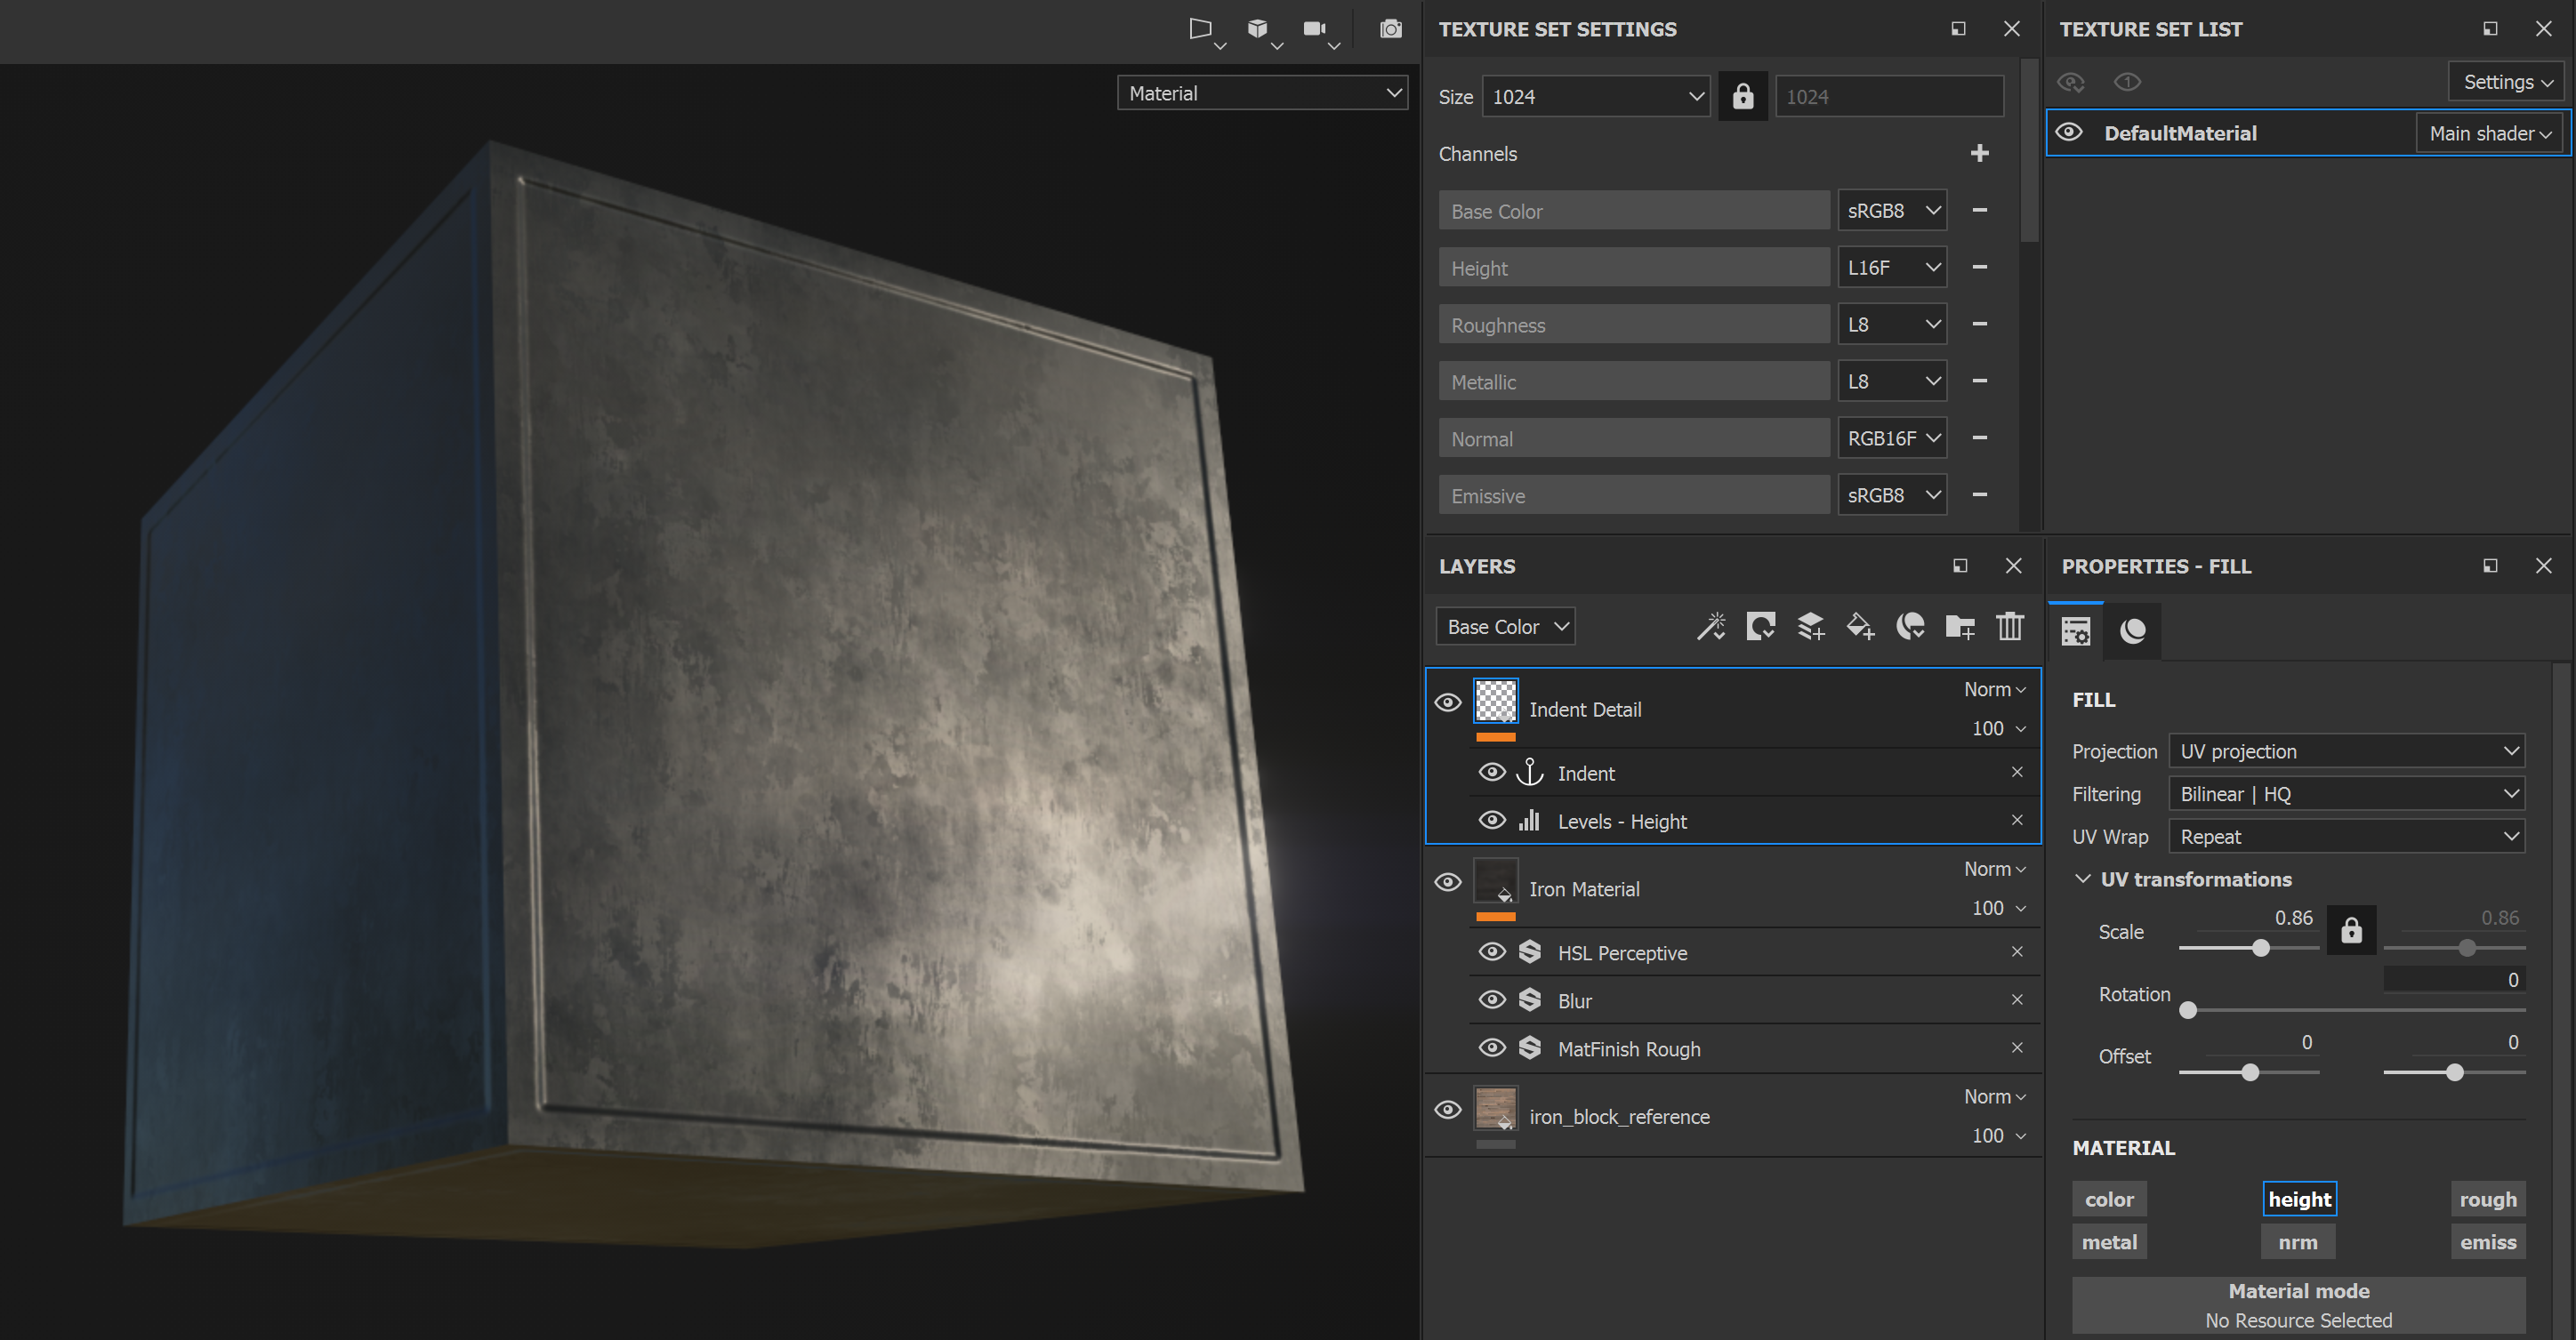
13. Next, a new fill layer adding an indent detail to give the surface of the block some new character.
13、接着添加一个新的填充图层,增加一些细节,以给方块表面增加一些新的特征。
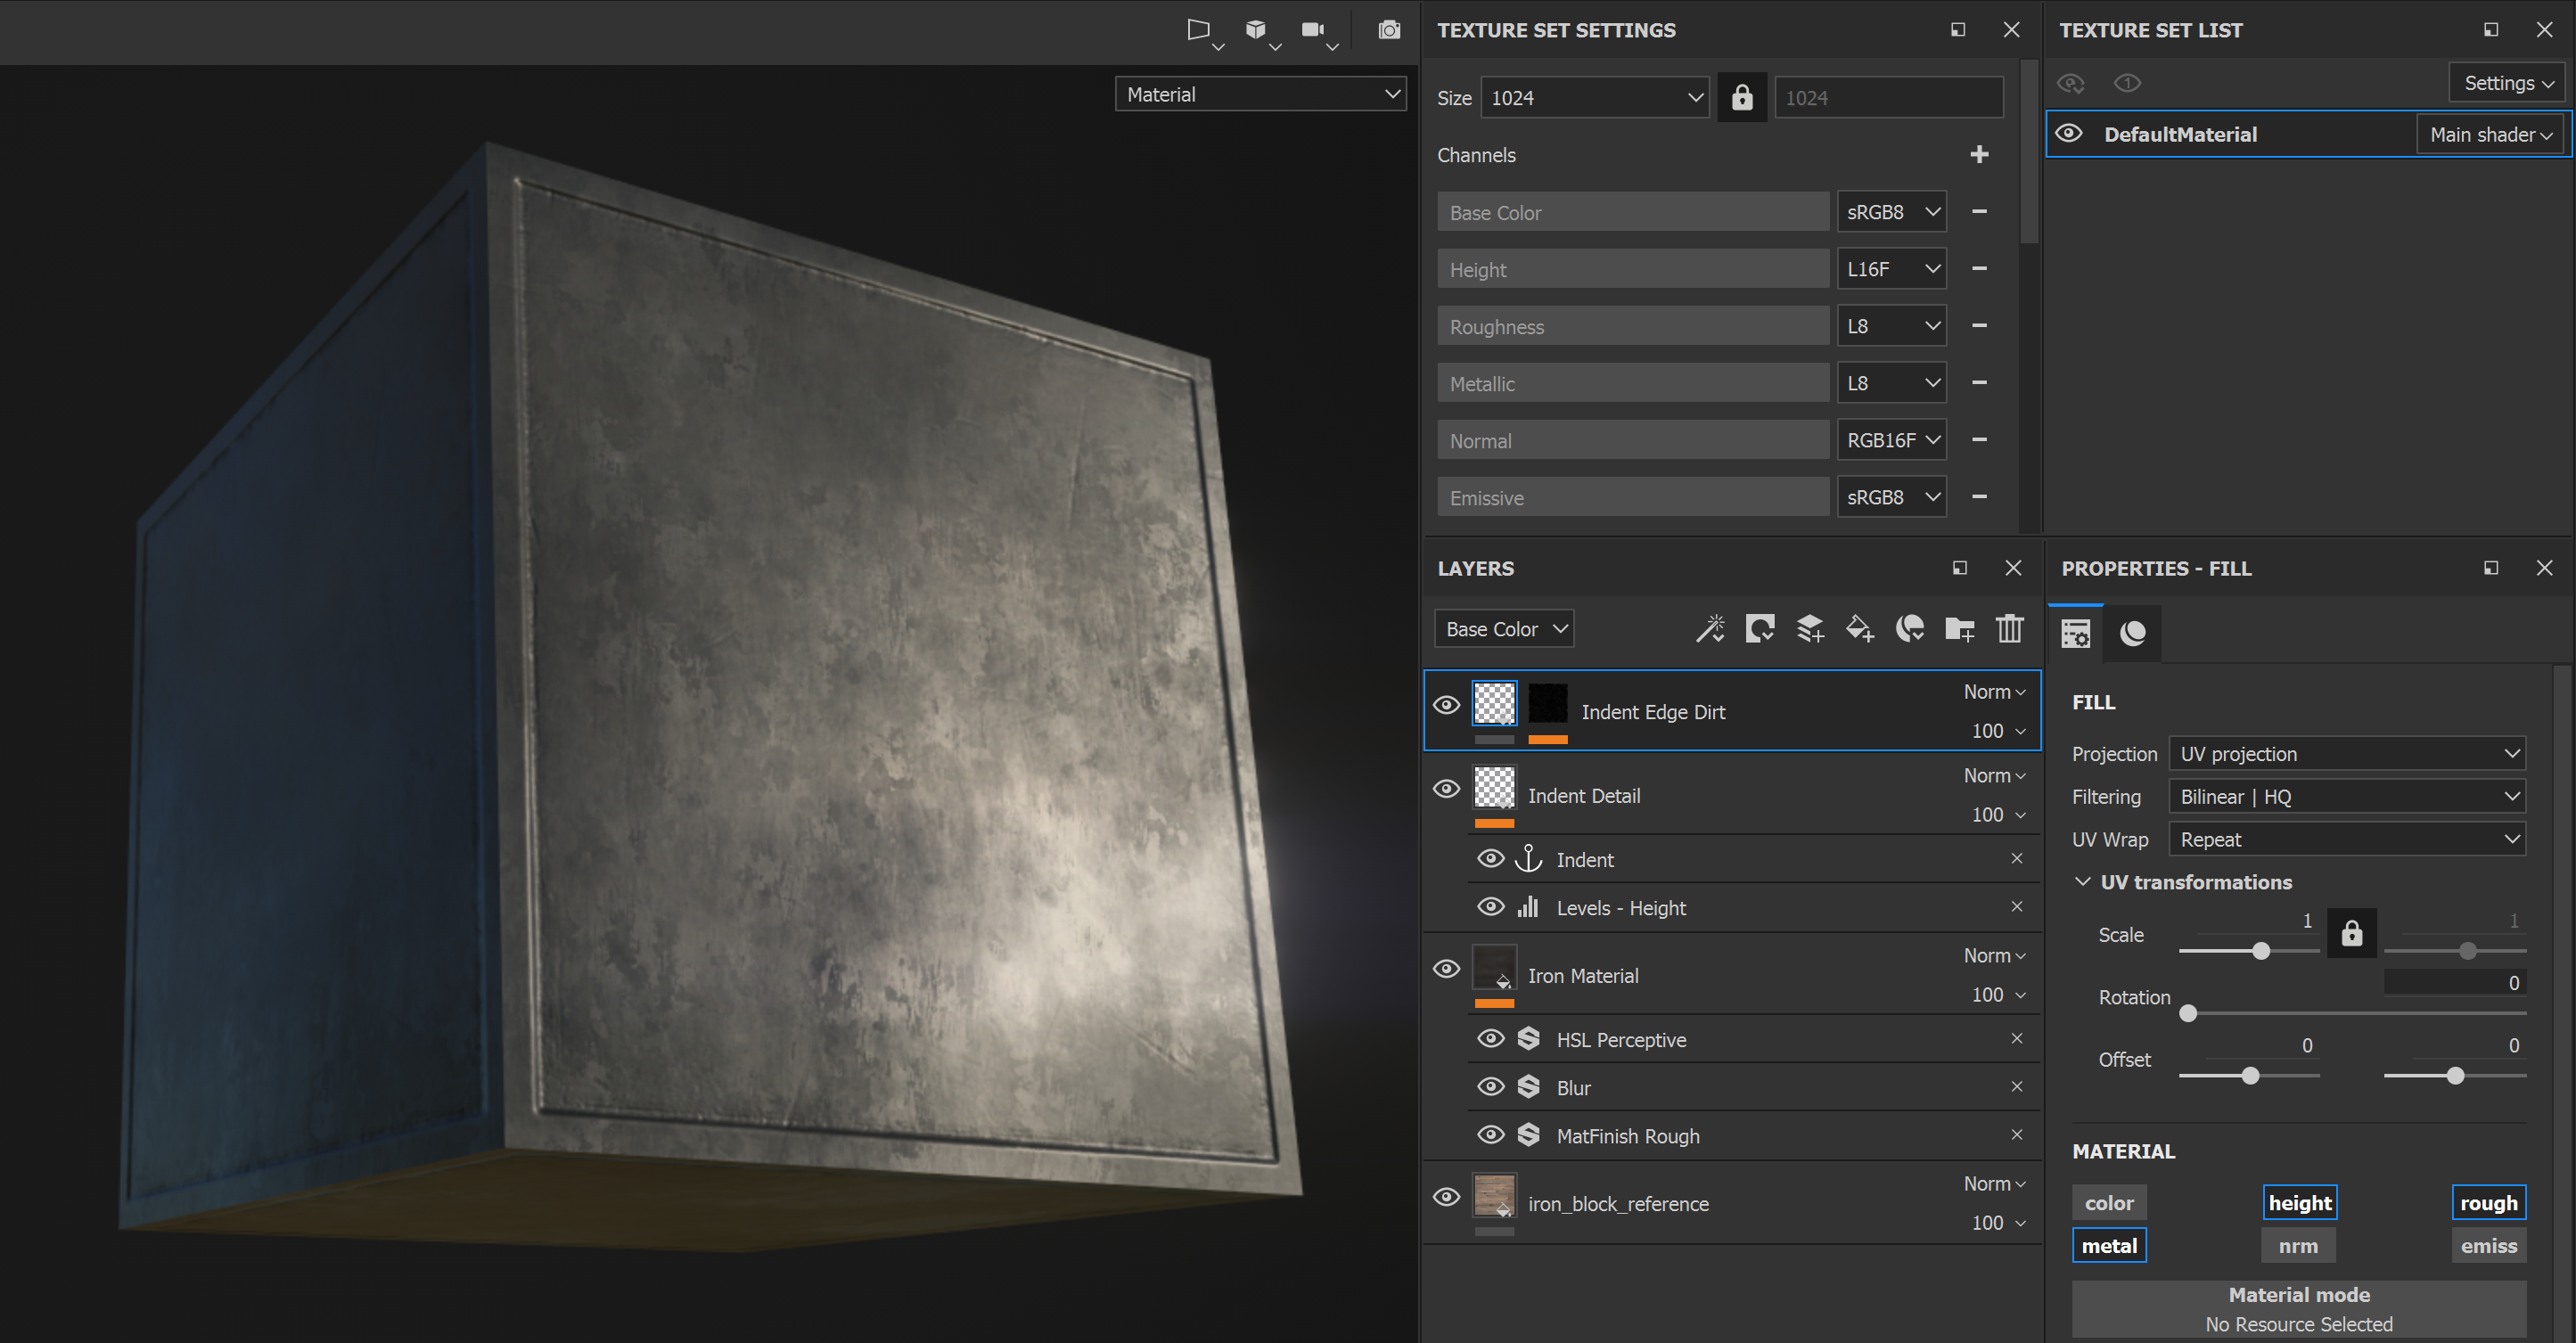
14. And finally, another fill layer to add some dirt collecting in the corners of the indent and some scratches randomly across the surface.
14、最后是另一个填充图层,在凹痕的角落添加一些污垢,在表面随机添加一些划痕。
15. Re-save as needed.
15、根据需要再次保存。
16. Now that the whole texture set is looking great inside Painter, you need to export your textures.
16、现在整个材质集看起来很不错了,需要导出您的材质了。
Select: File → Export Textures to open the export subwindow.
单击:文件 → 导出贴图...以打开导出窗口。
17. Create a new export preset configuration like this, which will output your texture set in a way that can be used by the game build.
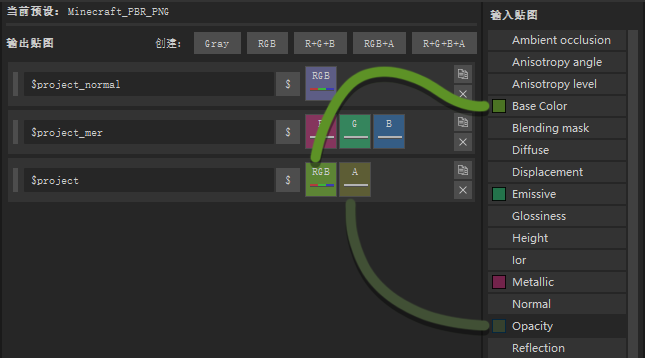
17、创建一个如图所示的输出预设配置,它将以游戏可以使用的方式输出您的材质集。
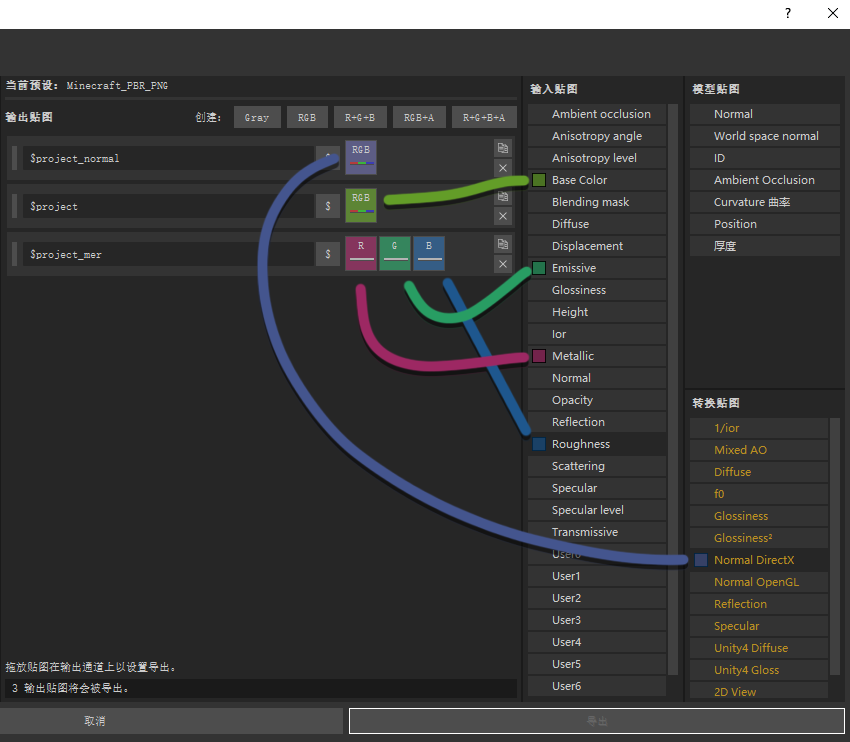
Note that the “$project” prefix on each output map will name each of the exported texture files after the name of the project. So, if you named your project after the game object that this texture set will belong to, all of your exported textures will immediately be ready for use in the game without any additional renaming.
需要注意的是,每个输出贴图的“$project”前缀将会以您目前项目的名称来命名每个输出的材质文件。(译者注:意为输出的材质名称中,“$project”将会被当前项目的名称替换,在本例中为“iron_block”)因此,如果您用这个材质集所属的游戏对象来命名您的项目,您输出的所有材质将立即可以在游戏中使用,而不需要任何额外的重命名。
18. Once you have your export preset set up, select it in the “Config” field and use these recommended settings:
18、一旦您设置好了您的导出预设,在“配置”中选择并使用这些推荐的设置。
Location - This can be the textures location for the resource pack that you’re working on. This makes things easier because you can export textures from Painter and they will immediately show up or be updated in the same folder that the game is referencing when it runs (assuming that you have your resource pack activated in the game).
位置 - 这可以是您正在制作的资源包的材质位置。这可以让事情变得简单,因为您可以从Substance Painter中导出贴图,并且游戏运行时,它们会立即在游戏引用的同一文件夹中显示或者更新(如果您在游戏中激活了该资源包)。
PNG - Use this setting to ensure that your files can be used by the game and that they are as small and efficient as possible.
PNG - 使用此设置可以确保您的文件能被游戏使用,并且占用空间较小。
Texture set resolution - This is the size of the textures that will be exported. This setting is independent of the resolution of your project. So, if you want you work on your project at one resolution and then export files at another resolution. 1024x1024 is recommended for HD texture sets.
材质集分辨率 - 这将是导出的材质的大小。这个设置与您的项目分辨率无关。所以,只要您想的话,可以在一个分辨率下制作您的项目,并在另一个分辨率下导出文件。推荐高清材质集使用1024x2024。

Note: The example above is for a fully opaque texture set. If you are using an opacity map in your texture set list for transparency, you will want to export your base color map as a targa (.TGA) file (instead of a .PNG) with the opacity map being stored in the alpha channel.
注意:上述示例为一个完全不透明的材质集。如果您为了不透明度在材质集中使用了不透明度贴图,您需要把您的基础颜色贴图导出为targa(.TGA)文件(而不是一个.PNG),而不透明度贴图会存储在alpha通道中。
19. Re-save your project! This will save your export settings as well, which will make your workflow much faster as you do further iterations with your texture set.
19、重新保存您的项目!这将会保存您的导出设置,从而使您的工作流程更快,因为您下次更新材质集的时候不需要再次设置导出配置了。
20. Finished! You have created your first set of HD PBR textures for Minecraft with RTX! Refer to the earlier sections, Resource Pack Setup and How to Test Your Textures in the Game, to find instructions on how to view your new textures in the game.
20、完成了!现在您已经创建了您在《Minecraft RTX》中的第一组PBR材质!请参考之前的章节资源包设置以及如何在游戏中测试您的材质,以找到如何在游戏中查看您的新材质的说明。
Credit:
鸣谢:
All textures were created with “Substance”the leading software solution for 3D digital materials.
所有的材质都使用3D数字材质的领先软件解决方案“Substance”绘制。
https://www.substance3d.com/
@Substance3d
#MadeWithSubstance
#CreateWithSubstance

Minecraft with RTX: PBR Texturing Guide
Minecraft光追:PBR材质绘制教程
By Andrew Burnes, Johnny Costello, Kelsey Blanton on March 30, 2020 | Featured Stories, Guides, Minecraft with RTX, Ray Tracing
由Andrew Burnes,Johnny Costello,Kelsey Blanton撰写于3月30日 | 精选文章,教程,Minecraft光追,光线追踪
Introduction
介绍
Bedrock Minecraft, a.k.a. Minecraft for Windows 10, is being updated with cutting-edge path-traced ray tracing, enabling gamers and world builders to craft incredible new sights, and immersive environments. To take full advantage of the new possibilities ray tracing introduces, physically-based textures have also been introduced, featuring extra surface detail, the ability to emit light, and more.
《Minecraft》基岩版,亦称《Minecraft》Windows10版(译者注:《Minecraft》Windows10版是基岩版的一个版本,基岩版包括了许多平台的不同版本),正在更新具有最先进的基于路径追踪的光线追踪,使游戏玩家和世界建造者能够创造出巧夺天工的新景观和身临其境的环境。为了充分利用光线追踪带来的新的可能性,基于物理的材质也被引入了,拥有额外的表面细节以及发光能力等特性。
Ray Tracing Off(PBR Enabled Textures)
光线追踪关闭(开启PBR材质)
Ray Tracing On(Same PBR Enabled Textures)
光线追踪开启(同样开启PBR材质)
In this guide, we’ll walk you through the steps of creating your own Minecraft PBR textures, or upgrading your existing textures and texture packs, so that your ray-traced Minecraft worlds take full advantage of everything that Bedrock Minecraft brings to the table.
在本教程中,我们将引导您完成创建自己的《Minecraft》PBR贴图,或者升级现有的材质和材质包的步骤,以使您光线追踪的《Minecraft》世界充分利用《Minecraft》基岩版带来的一切。
In addition, we’ll demonstrate how you can create your own high resolution textures for worlds made of lifelike high definition blocks, and offer an alternative, simpler, easier workflow using the premium Substance Painter application.
此外,我们还将演示该如何为由栩栩如生的高清晰度方块组成的世界创建自己的高分辨率材质,并使用优质的Substance Painter软件提供一个可替代的、更简易的工作流程。
For a guide on how to convert your world, head here. And to ensure you have optimal gaming experiences, download the latest Game Ready Driver for Minecraft with RTX when it launches.
要了解如何转换您的世界,请点击这里。为了确保您有最佳的游戏体验,当《Minecraft RTX》发行时,请为它下载最新的Game Ready驱动程序。
2021.12 数据,可能有更多内容
Minecraft with RTX: PBR Texturing Guide
Minecraft光追:PBR材质绘制教程
By Andrew Burnes, Johnny Costello, Kelsey Blanton on March 30, 2020 | Featured Stories, Guides, Minecraft with RTX, Ray Tracing
由Andrew Burnes,Johnny Costello,Kelsey Blanton撰写于3月30日 | 精选文章,教程,Minecraft光追,光线追踪
Introduction
介绍
Bedrock Minecraft, a.k.a. Minecraft for Windows 10, is being updated with cutting-edge path-traced ray tracing, enabling gamers and world builders to craft incredible new sights, and immersive environments. To take full advantage of the new possibilities ray tracing introduces, physically-based textures have also been introduced, featuring extra surface detail, the ability to emit light, and more.
《Minecraft》基岩版,亦称《Minecraft》Windows10版(译者注:《Minecraft》Windows10版是基岩版的一个版本,基岩版包括了许多平台的不同版本),正在更新具有最先进的基于路径追踪的光线追踪,使游戏玩家和世界建造者能够创造出巧夺天工的新景观和身临其境的环境。为了充分利用光线追踪带来的新的可能性,基于物理的材质也被引入了,拥有额外的表面细节以及发光能力等特性。
Ray Tracing Off(PBR Enabled Textures)
光线追踪关闭(开启PBR材质)
Ray Tracing On(Same PBR Enabled Textures)
光线追踪开启(同样开启PBR材质)
In this guide, we’ll walk you through the steps of creating your own Minecraft PBR textures, or upgrading your existing textures and texture packs, so that your ray-traced Minecraft worlds take full advantage of everything that Bedrock Minecraft brings to the table.
在本教程中,我们将引导您完成创建自己的《Minecraft》PBR贴图,或者升级现有的材质和材质包的步骤,以使您光线追踪的《Minecraft》世界充分利用《Minecraft》基岩版带来的一切。
In addition, we’ll demonstrate how you can create your own high resolution textures for worlds made of lifelike high definition blocks, and offer an alternative, simpler, easier workflow using the premium Substance Painter application.
此外,我们还将演示该如何为由栩栩如生的高清晰度方块组成的世界创建自己的高分辨率材质,并使用优质的Substance Painter软件提供一个可替代的、更简易的工作流程。
For a guide on how to convert your world, head here. And to ensure you have optimal gaming experiences, download the latest Game Ready Driver for Minecraft with RTX when it launches.
要了解如何转换您的世界,请点击这里。为了确保您有最佳的游戏体验,当《Minecraft RTX》发行时,请为它下载最新的Game Ready驱动程序。
Minecraft Texturing Overview
Minecraft材质绘制概述
Most texture files in vanilla Minecraft (Bedrock) only use 2 maps: base color and opacity. The base color map is stored in the RGB channels of the texture. This is the texture map that most people think of when talking about Minecraft textures.
原版《Minecraft》(基岩版)中的大多数材质文件只使用两张贴图:基础颜色和不透明度。基础颜色贴图被存储于材质的RGB通道中。这是大多数人在讨论《Minecraft》材质时想到的材质贴图。
Some textures also have an additional opacity map that is either stored in the alpha channel (for .TGA texture files) or stored implicitly (for .PNG texture files). For Minecraft with RTX, you’ll want to use .TGA files with alpha channels for opacity maps. More on that later.
一些材质还有一个额外的不透明度贴图,存储于alpha通道(用于.TGA材质文件)或者隐藏了(用于.png材质文件)。在《Minecraft RTX》中,您需要使用带有alpha通道的.TGA文件来处理不透明度贴图。在下文会详细介绍。
The new PBR system uses these 2 maps, as well as 4 additional ones, to help describe the real-world material surface that is being represented by the texture:
新的PBR系统使用这两个贴图,同时为了描绘逼真的材质表面,使用了四个在材质中表示的额外贴图:
Metallic map (sometimes called “metalness”)
金属度贴图(有时候被称为“金属性”)
Emissive map
发光度贴图
Roughness map
粗糙度贴图
Normal/Height map
法线贴图/高度图
Asset Flow
资源流
This is how the various PBR texture maps relate to objects in the game:
这是各种PBR贴图如何与游戏中的对象相关联的:
6 PBR Texture Maps >packed into> 3 Texture Files (.PNG) >referred to as a> Texture Set >for each> Block/Item/Object
6张PBR贴图 > 打包到 > 3个材质文件(.PNG) > 对应一个 > 材质集 > 对应每个 > 方块/物品/对象
Currently, each of the 6 PBR maps get packed into the channels of 3 texture files, which are then used by the game. Packing the maps reduces the overall file size and number of files of the new texture set.
目前,6张PBR贴图的每一张都会被打包进3个材质文件的通道中,并在之后被游戏使用。打包贴图减少了材质集文件的总大小和文件数量。
For example, for a PBR version of the “gold_ore” block:
例如,一个PBR版的金矿石方块中:
Texture file 1 = gold_ore.PNG
材质文件1 = gold_ore.PNG
Red, Green, and Blue (RGB) channels = Base Color map
红绿蓝(RGB)通道 = 基础颜色贴图
Alpha (A) channel = None. Not used for this specific texture set since the gold_ore block is intended to be fully opaque.
Alpha(A)通道 = 空,由于金矿石方块是完全不透明的,不用于此材质集。
Note: Texture sets that do use opacity maps can store them in this alpha channel. See the Opacity Maps section.
注意:使用不透明度贴图的材质集可以存储在这个alpha通道中。参见不透明度贴图章节。
Texture file 2 = gold_ore_mer.PNG
材质文件2 = gold_ore_mer.PNG
Red channel = Metallic map (grayscale)
红色通道 = 金属度贴图(灰度图)*
Green channel = Emissive map (grayscale)
绿色通道 = 发光度贴图(灰度图)*
Blue channel = Roughness map (grayscale)
蓝色通道 = 粗糙度贴图(灰度图)*
Alpha (A) channel = None. Not used at this time
Alpha(A)通道 = 空。目前未使用。
The “*_mer” suffix is just a reminder that the Metallic, Emissive, and Roughness maps go into the RGB channels, respectively.
“*_mer”后缀只是一个金属度贴图、发光度贴图和粗糙度贴图分别进入RGB通道的提醒。
*译者注:表示以灰度图存储,而不是在材质中编辑为灰色
Texture file 3 = gold_ore_normal.PNG
材质文件3 = gold_ore_normal.PNG
RGB channels = Normal map
RGB通道 = 法线贴图
Note: Alternatively, this texture file can store a height map instead of a normal map. See the Height Maps subsection of the New PBR Texture Maps section
注意:此外,这个贴图文件可以存储一张高度图而不是法线贴图。参见新PBR材质贴图章节
Alpha (A) channel = None. Not used at this time
Alpha(A)通道 = 空。暂时没有使用。
Note: In the final release, this system of channel packing will be upgraded to the new “Texture Sets” system, which will be much more flexible in regards to file naming and texture map/channel management. After the upgrade, you will still be able to use the channel packing/file system detailed in this document without having to rework any of your texture files. For the initial Minecraft with RTX release, use the channel packing listed above.
注意:在最终发布版本中,这个通道打包系统将升级为新的“材质集”系统,在文件命名和材质映射/通道管理方面将更为灵活。在这次升级之后,您仍然可以使用本文档中详细介绍的通道打包/文件系统,而不必修改您的材质文件。对于最初的《Minecraft RTX》发布版本,请使用上文所述的通道打包系统。
Tools Needed
所需工具
To create your own PBR texture sets, you will need a photo-editing/digital painting application. Here are a few excellent options:
为了创建自己的PBR材质集,您需要一个照片编辑/数字绘画应用。以下是一些不错的选择:
Adobe Photoshop
Adobe Photoshop
GIMP
GIMP
Paint.net
paint.net
Pixlr.com
Pixlr.com
GraphicsGale, etc.
GraphicsGale,等等。
This guide will cover the Photoshop workflow specifically, but the concepts should transfer to other digital painting applications.
本教程将具体介绍Photoshop的工作流程,但概念应该类比到其他数字绘画软件上。
Opacity Maps
不透明度贴图
Opacity maps work great with RTX game builds and are great for making materials like glass and tree leaves. However, you’ll need to paint them in the alpha channel of texture file 1 (see above) and save the file as a 32-bits/pixel .TGA file, instead of a .PNG file. Otherwise, the opacity map will not work correctly.
不透明度贴图在游戏的光追版本中工作非常出色,非常适合制作玻璃或者树叶这样的材质。不过,您需要在材质文件1的alpha通道中绘制它们,并且将该文件保存为32位/像素的.TGA文件而不是.PNG文件。否则不透明度贴图可能会工作得不正常。
Note: In the initial release of Minecraft with RTX, the client will use the same textures for both RTX enabled and disabled. This means that an opacity value that is tuned for RTX enabled might look too transparent when RTX is disabled.To help balance this out, the game will only use the upper half of the range of the texture’s alpha channel (0.5 - 1) when RTX is enabled, but it will map this range to the full range of opacity in the game so no functionality is lost. For RTX disabled, the full range of the alpha channel will be mapped to the full range opacity in the game.
注意:在《Minecraft RTX》的初始版本中,无论光追是否启用,客户端都会使用相同的材质。这意味着当禁用光追时,为启用光追而调整的不透明度值可能看起来过于透明。为了平衡这一点,启用光追时,游戏将只使用材质alpha通道的上半部分(0.5 ~ 1),但是它将会将这个范围映射到游戏的整个不透明度范围,所以不会丢失任何功能。当禁用光追时,alpha通道的全范围将被映射到游戏中不透明度的全范围中。
Examples:
示例:
If the texture’s alpha channel value = 0 (black), then:
如果材质的alpha通道数值 = 0(黑色),则:
For RTX enabled in the game, texture opacity =0 (fully transparent)
当光追在游戏内启用时,材质不透明度 = 0(完全透明)
For RTX disabled in the game, texture opacity = 0 (fully transparent)
当光追在游戏内禁用时,材质不透明度 = 0(完全透明)
If the texture’s alpha channel value = 0.5 (middle gray), then:
如果材质的alpha通道数值 = 0.5(中等灰色),则:
For RTX enabled in the game, texture opacity =0 (still fully transparent)
当光追在游戏内启用时,材质不透明度 = 0(仍然完全透明)
For RTX disabled in the game, texture opacity = 0.5 (50% opaque)
当光追在游戏内禁用时,材质不透明度 = 0.5(50%透明)
If the texture’s alpha channel value = 0.75 (light gray), then:
如果材质的alpha通道数值 = 0.75(浅灰色),则:
For RTX enabled in the game, texture opacity =0.5 (50% opaque)
当光追在游戏内启用时,材质不透明度 = 0.5(50%透明)
For RTX disabled in the game, texture opacity = 0.75 (75% opaque)
当光追在游戏内禁用时,材质不透明度 = 0.75(75透明)
If the texture’s alpha channel value = 1 (white), then:
如果材质的alpha通道数值 = 1(白色),则:
For RTX enabled in the game, texture opacity =1 (fully opaque)
当光追在游戏内启用时,材质不透明度 = 1(完全不透明)
For RTX disabled in the game, texture opacity = 1 (fully opaque)
当光追在游戏内禁用时,材质不透明度 = 1(完全不透明)
New PBR Texture Maps
新PBR材质贴图
The PBR system doesn’t require you to use all of the PBR maps for every texture set. However, you will get the best looking results if you do.
PBR系统不会要求您在每个材质集使用所有的PBR贴图。不过,如果您使用所有的PBR贴图,最后会更好看。
Metallic map - How metallic is a pixel in your texture:
金属度贴图 - 您的材质中一个像素的材质有多金属:
Value of 0 (black) means non-metallic (wool, wood, plastic, dirt, grass. etc.)
0的数值(黑色)表示非金属材质(羊毛、木头、塑料、泥土、草等等)
Value of 1 (white) means fully metallic (gold, iron, copper, etc.)
1的数值(白色)表示完全金属材质(金、铁、铜等)
Grayscale values between 0 and 1 can also be used
也可以使用0到1之间的灰度值(译者注:例如金属表面被氧化失去部分光泽,或者石墨等)
In the example above, the block has uniform roughness on all of its surfaces, but it is using a metallic map to control which pixels are metallic (white), and which pixels are non-metallic (black). The metallic pixels look more like gold while the non-metallic pixels look more like shiny, yellow plastic.
在上述示例中,方块所有的表面都有均匀的粗糙度,但是它使用金属度贴图来控制哪些像素是金属(白色),哪些像素是非金属(黑色)。金属的像素看起来更像黄金,而非金属像素看起来更像闪亮的黄色塑料。
Emissive map - How much a pixel in your texture should glow:
发光度贴图 - 您的材质中一个像素发出的光有多强:
Value of 0 (black) means no glow
0的数值(黑色)表示不发光
Value of 1 (white) means the strongest glow
1的数值(白色)表示发出最强的光
Grayscale values between 0 and 1 can also be used
也可以使用0到1之间的灰度值
Color of the glow is determined by the pixels in the base color map
发光的颜色由基础颜色图中的像素决定。
Roughness map - How rough (to the touch) is a pixel in your texture:
粗糙度贴图 - 您的材质中一个像素有多么粗糙(触觉上的)
Value of 0 (black) means very smooth (glass, polished stone, etc.)
0的数值(黑色)表示非常光滑(玻璃、磨制石头等等)
Value of 1 (white) means very rough (most dirt, bark, wool, etc.)
1的数值(白色)表示非常粗糙(大部分泥土、树皮、羊毛等)
Grayscale values between 0 and 1 can also be used
也可以使用0到1之间的灰度值
In the example above, the block has uniform metalness on all of its surfaces, but it is using a roughness map to control which pixels are very rough (white), which pixels are very smooth (black), and some pixels that are somewhere in between (gray). The smooth, less rough pixels look more like shiny blue gemstones while the rough pixels look more like rough gray rock.
在上述示例中,方块所有的表面都有均匀的金属触感,但是它使用粗糙度贴图来控制哪些像素非常粗糙(白色),哪些像素非常光滑(黑色),以及一些介于两者之间的像素(灰色)。光滑、不那么粗糙的像素看起来更像闪耀的蓝宝石,而粗糙的像素看起来更像粗糙的灰色岩石。
Normal map - How bumpy is a pixel in your texture:
法线贴图 - 您的材质中一个像素的倾斜角度如何:
Normal maps use the 3 color channels (RGB) in the texture to change how light behaves when hitting the texture. By doing this, it can fake surface details that appear to stick up or recede down into the surface of the 3D mesh.
法线贴图通过材质中的3个颜色通道(RGB)来改变光线在材质上的表现。它可以通过这种方式伪造看起来似乎在表面的三维网格中凸起或凹陷的细节,。
RGB values of (128, 128, 255) means the pixel doesn’t stick up or recede down when lit. It will appear at the height of the surface of the 3D mesh. When in doubt, use this default color for your normal map, or don’t use one at all to save on file size.
(128,128,256)的RGB值表示像素在被照亮时不会凸起或凹陷。它将会出现于3D网格的表面高度。如果有疑问,在法线贴图中使用此默认颜色,或者不使用法线贴图来减小文件大小。
RGB values other than this default color (above) should not be manually painted unless you’re confident working with normal maps this way. Normal maps are usually automatically generated from other height information when using specific software applications. More details can be found later in this document.
除非您确定这样使用法线贴图,除了此默认颜色(上述)之外的RGB值不应被绘制。法线贴图经常在使用特定的应用程序时根据其他高度信息自动生成。更多细节可以在本文下方找到。
Height map - Additionally, the normal texture file can also function as a height map.
高度图 - 另外,法线材质文件也可以作为高度图使用。
Height maps have some limitations and should only be used for pixelated texture sets like the 16x16 pixel vanilla Minecraft textures. If you’re painting non-pixelated textures, consider using a normal map instead of a height map.
高度图有一些限制,并且只应该用于像素化的材质集,例如16x16的原版Minecraft材质。如果您正在绘制非像素化的材质,考虑使用法线贴图而不是高度图。
The normal texture file will only be treated as a height map when the channels are set up in a specific way:
仅当颜色通道以特定方式设置时,法线贴图文件才会被视为高度图:
R channel = Height map (grayscale)
R通道 = 高度图(灰度图)*
Value of 1 means the pixel will appear to stick out
1的数值表示这个像素会凸出来
Value of 0 means the pixel will recede inward
0的数值表示这个像素会凹进去
Value of 0.5 means no surface change
0.5的数值表示没有表面的变动
G and B channels must both = 0 (black), otherwise the game will treat the height map as a normal map.
G和B通道必须均为0(黑色),否则游戏会视这个高度图为一个法线贴图。
*译者注:同之前的_mer.PNG中提到的,表示以灰度图存储而不是在材质中绘制为黑色
Creating the Base Color and Opacity Texture File
创建基础颜色和不透明度材质文件
First things first, let’s create custom base color and opacity maps:
首先,让我们来创建自定义基础颜色和不透明度贴图:
1. Open a vanilla Minecraft texture in the app as a starting point, or skip to Step 2.
1、第一步,在app中打开一个原版的《Minecraft》材质文件,或者跳到第二步
2. Create a new document at the texture resolution that you want. (16x16 pixels for most vanilla Minecraft textures) Also, 72 pixels/inch is recommended for the pixel density.
2、创建一个您想要的材质分辨率的新文档。(对于大多数原版《Minecraft》材质来说是16x16像素)同时,像素密度的推荐值是72像素/英寸。
3. Create working layers for the base color and opacity map (if needed). Paint what you want and make any edits in these layers. In the example below, multiple layers have been painted to edit the base color map (more gold!).
3、为基础颜色和不透明度贴图(如果需要)创建工作图层。绘您所想,对图层做任意的修改。在下面的示例中,已经绘制了多个图层来编辑基础颜色贴图(更多的金!)。
4. Once you have the base color and opacity map layers looking the way you want, it’s a good idea to save your Photoshop document using the name of the object’s texture set. For this example, this file was saved as “gold_ore.PSD”. Next, we need to save out a texture file that the game can use.
4、当您拥有了想要的基础颜色贴图和不透明度贴图,用目标材质集的名字来保存Photoshop文档是个好主意。在这个例子中,这个文件被保存为“gold_ore.PSD”。接下来,我们需要保存一个游戏可以使用的材质文件。
Note: For most game objects, transparent pixels in the opacity map must also be painted black in the base color map (e.g. tree leaves). However, there are exceptions where the transparent pixels must also be painted white in the base color map in order to appear correct in the game (e.g. rails). Some experimentation may be necessary.
注意:对于大部分游戏对象来说,不透明度贴图中透明的像素也需要在基础颜色贴图中绘制为黑色(例如树叶)。不过,为了在游戏中正确显示,也有透明像素需要在基础颜色贴图中绘制为白色的特殊情况(例如铁轨)。一些实验可能是必要的。
5. (Optional, for non-opaque objects only) - Duplicate your opacity map layers, merge the duplicates together to create a single layer, and then copy it (Ctrl+C).
5、(可选,仅部分透明的对象) - 复制您的不透明度图层,合并成一个图层,复制此图层(Ctrl+C)。
6. (Optional, for non-opaque objects only) - In the Channels tab, create a new alpha channel, and paste (Ctrl+V) your merged opacity map into this channel. Click on the small gray box to the left of the RGB channel to make the RGB channels visible again.
6、(可选,仅部分透明的对象) - 在通道选项卡中,创建一个新的alpha通道,并向此通道粘贴(Ctrl+V)合并后的不透明度贴图。点击RGB通道左侧的小灰框以使RGB通道再次可见。
(译者注:图片中的按钮是创建alpha通道的按钮。在通道/图层不可见时,左侧的眼睛图标会变成小灰框)
You now have your base color map being stored in the RGB channels and the opacity map stored in the alpha channel.
现在您的基础颜色贴图存储在RGB通道,不透明度贴图存储在alpha通道。
7. (Optional, for non-opaque objects only) - Go back to the Layers tab and hide any of your opacity map layers. Only your base color map layers should be showing.
7、(可选,仅部分透明的对象) - 返回图层选项卡,隐藏所有的不透明度图层。显示的应该只有基础颜色图层。
8. Re-save the .PSD.
8、重新保存.PSD文件。
9. Use the Save As command to save a .PNG texture file that can be used by the game.
9、使用“存储为”命令保存一个游戏中可使用的.PNG材质文件。
Note on opacity: You will save out a 32-bits/pixel .TGA file at this step if your object is intended to be non-opaque and uses an opacity map in the alpha channel. See the Opacity Maps section above.
不透明度注意事项:如果您的目标打算部分透明并且在alpha通道使用了不透明度贴图,您将在这一步保存一个32位/像素的.TGA文件。参见上方的不透明度贴图章节。
Note on naming: File naming is important at this step! This .PNG should have the same name as the game object that you are modifying. For this example, this file was saved as “gold_ore.PNG”.
命名注意事项:这一步的文件命名十分重要!这个.PNG文件必须与您修改的游戏内对象名称相同。在这个示例中,文件被保存为“gold_ore.PNG”。
10. You have successfully created the first of 3 texture files for a complete PBR texture set.
10、您成功创建了一个完整的PBR材质集中3个材质文件的第一个。
Creating the Metallic, Emissive, and Roughness Texture File
创建金属度,发光度和粗糙度材质文件
Next, you’ll want to create the second PBR texture file combining the metallic, emissive, and roughness PBR maps.
现在,您将需要创建第二个结合了金属度,发光度和粗糙度PBR贴图的PBR材质文件。
1. (Optional) Open a vanilla Minecraft texture in Photoshop or a similar app as a starting point, or skip to the next step.
1、(可选)在Photoshop或者相似的app内打开一个原版《Minecraft》材质作为第一步,或者跳到下一步。
2. Create a new document at the same texture resolution as your first texture file (base color and opacity map). (16x16 pixels for most vanilla Minecraft textures) Again, 72 pixels/inch is recommended for the pixel density.
2、新建一个材质分辨率与您的第一个材质文件(基础颜色和不透明度贴图)相同的文档。(对于大多数原版Minecraft材质来说是16x16像素)。同样,推荐的像素密度是72像素/英寸。
3. Create working layers for the metallic, emissive, and roughness map. Paint what you want and make any edits in these layers.
3、为金属贴图、发光贴图和粗糙度贴图创建新的图层。绘您所想,对图层做任意的修改。
Note: You only need to paint these maps using grayscale values.
注意:您只需要使用灰度值绘制这些贴图。
In the example below, multiple layers have been painted to create the desired roughness map result.
在下面的示例中,为了创建所需的粗糙度贴图绘制了多个图层。
4. Make sure to place layers of each map type into layer groups. This is important for the next few steps.
4、确保各个贴图的图层放进了对应的图层组。这对下一步来说很重要。
(译者注:图片中指向的按钮为创建图层组。选中多个图层并点击此按钮可以把选中的图层放进新建的图层组中。)
5. Right-click on the Metallic layer group and select “Blending Options”.
5、右击金属度贴图的图层组,选择“混合选项”
6. Uncheck the green (G) and blue (B) channels:
6、取消勾选绿色(G)和蓝色(B)通道:
7. Click “OK” to close the Blending Options window for the Metallic layer group.
7、点击“OK”以关闭金属贴图图层组的混合选项窗口。
8. Right-click on the Emissive layer group and select “Blending Options”.
8、右击发光度贴图的图层组,选择“混合选项”
9. Uncheck the red (R) and blue (B) channels:
9、取消勾选红色(R)和蓝色(B)通道:
10. Click “OK” to close the Blending Options window for the Emissive layer group.
10、点击“OK”以关闭发光贴图图层组的混合选项窗口。
11. Right-click on the Roughness layer group and select “Blending Options”.
11、右击粗糙度贴图的图层组,选择“混合选项”
12. Uncheck the red (R) and green (G) channels:
12、取消勾选红色(R)和绿色(G)通道:
13. Click “OK” to close the Blending Options window for the Roughness layer group.
13、点击“OK”以关闭粗糙度贴图图层组的混合选项窗口。
14. Once you have the metallic, emissive, and roughness map layers looking the way you want, it’s a good idea to save your Photoshop document using the name of the object’s texture set with the addition of the *_mer suffix.
14、当您的金属度、发光度和粗糙度贴图看起来就是您想的那样时,使用目标的材质集名称并添加*_mer后缀来命名并保存您的Photoshop文档是个好主意。
For this example, this file was saved as “gold_ore_mer.PSD”. Next, we need to save out a texture file that the game can use.
在此示例中,文件被保存为“gold_ore_mer.PSD”。下一步,我们需要导出一个游戏可以使用的材质文件。
15. Use the Save As command to save a .PNG texture file that can be used by the game.
15、使用保存为命令保存一个游戏可以使用的.PNG材质文件。
Note: Again, file naming is important at this step. This .PNG file should have the same name as the game object that you are modifying with the addition of the *_mer suffix. For this example, the file was saved as “gold_ore_mer.PNG”.
注意:同样,文件命名在这一步很重要。这个.PNG文件必须与您想要修改的游戏内对象拥有相同的名字并在后面加上*_mer后缀。在此示例中,文件被保存为“gold_ore_mer.PNG”。
16. Finished! You have created the second of 3 texture files for a complete PBR texture set.
16、完成了!您现在已经创建了一个完整的PBR材质集中3个材质的第二个。
Creating the Normal Texture File
创建法线材质文件
Normal maps are usually created using specialized tools. There are many professional software options as well as some great, free alternatives available:
法线贴图一般使用专门的工具创建。有许多专业的软件以及一些免费而优质的软件可供选择。
Free Tool - xNormal
免费的工具 - xNormal
Adobe Photoshop - Filters → 3D → Generate Normal Map
Adobe Photoshop - 滤镜 → 3D → 生成法线图
PBR Painting - Substance Painter
PBR绘制 - Substance Painter
PBR Painting - Quixel Mixer
PBR绘制 - Quixel Mixer
Example of a brick wall PBR texture set (left) and its normal map (right):
以一个砖墙的PBR材质集(左)和它的法线贴图(右)为例:
1.Create a normal map using your preferred tool or workflow at the same resolution as your first texture file (base color and opacity map). Again, 72 pixels/inch is recommended for the pixel density.
1、使用您喜欢的工具或者工作流程创建一个分辨率与第一个材质文件(基础颜色和不透明度贴图)相同的法线贴图。同样,像素密度建议使用72像素/英寸。
2.Use the Save As command to save a .PNG texture file that can be used by the game.
2、使用保存为命令保存一个游戏可以使用的.PNG材质文件。
Note: Again, file naming is important at this step. This .PNG should have the same name as the game object that you are modifying with the addition of the *_normal suffix. For this example, the file was saved as “gold_ore_normal.PNG”.
注意:同样,文件命名在这一步很重要。这个.PNG文件必须与您想要修改的游戏内目标拥有相同的名字并在后面加上*_normal后缀。在此示例中,文件被保存为“gold_ore_normal.PNG”。
If you’re not familiar with creating normal maps, you can always just leave it out or create a “blank” normal map by filling a texture with (128, 128, 255) RGB color and saving the .PNG file.
如果您不熟悉法线贴图,您可以总是不创建法线贴图或者通过使用(128,128,255)的RGB颜色填满一张贴图并保存为.PNG文件来创建一个“空的”法线贴图。
Alternatively, since the “gold_ore” example is a pixelated texture, we could have also used the height map option to create surface details. The file name would still be “gold_ore_normal.TGA” in this example, but the information stored in the texture channels would be different. See the Height Maps subsection of the New PBR Texture Maps section above for more info.
此外,由于示例“gold_ore”是一个像素化的材质,我们也可以选择高度图来制作表面细节。此示例中文件名称依然是“gold_ore_normal.TGA”,但是材质通道中存储的信息会有所不同。更多信息参见新PBR贴图章节中的高度图小节。
3.Finished! You have created the third and final texture file for a complete PBR texture set.
3、完成了!现在您已经创建了一个完整的PBR材质集中的最后一个材质文件。
Alternate Workflow: Using Photoshop’s Generate Image Assets Function
可选工作流程:使用Photoshop的生成图像资源功能
Instead of having 3 Photoshop .PSD files for each of the 3 PBR texture files, you could alternatively use a single .PSD file and take advantage of Photoshop’s Generate → Image Assets function in the File menu.
您可以选择只使用一个.PSD文件,并利用Photoshop文件菜单中的生成 → 图像资源功能,以免为了3个PBR贴图文件各生成总共3个Photoshop的.PSD文件。
As long as you create a layer group for each PBR texture file and name it with the correct file name and file type (.png), they will save themselves automatically after each change (after you initially save the .PSD file).
只要您为每个PBR材质文件创建一个图层组,并使用正确的文件名和文件类型(.png)命名它,它们就会在每次更改后自动保存自己(在您初次保存.PSD文件之后)。
More information can be found here.
在这里查询更多信息。
Note: Since this function cannot output .TGA files, you won’t be able to use it to save a texture file with an alpha channel like those needed for non-opaque texture sets.
注意:由于这个功能无法输出.TGA文件,您不能使用它来保存带有alpha通道等用于部分透明材质文件组的材质文件。
Caveats for Flipbook Textures/Animated Objects
关于动态材质/带有动画的对象的注意事项
In Minecraft, animated objects (such as sea lanterns, fire, and lava) utilize flipbook textures and must be handled differently. At present, these animated objects do not support PBR features. For the final release, Minecraft with RTX will support these flipbook textures once altered to a higher level of detail using the steps above.
在《Minecraft》中,带有动画的对象(例如海晶灯、火和岩浆)使用了动态材质,必须使用不同的方式处理。目前,这些带有动画的物体暂时不支持PBR特性。在最终发布版中,如果使用上述步骤改变更高级别的细节,《Minecraft RTX》将会支持这些动态材质。
Caveats for Creating Mirrors with Perfect Reflections
关于创建拥有完美的反射的镜面的注意事项
Using PBR maps like metalness and roughness along with ray tracing, you can create highly reflective materials like shiny plastics, smooth metal, or polished stone. All of these will have high quality reflections.
您可以通过和光追一起使用金属性和粗糙度贴图之类的PBR贴图来创建高反射度的材质,例如闪光的塑料,光滑的金属或者磨制的石头。这些都会有高质量的反射。
However, for perfectly reflective objects like mirrors, you’ll want to configure your PBR maps to enable a perfect mirror.If you use a solid black roughness map (0.0) and a solid white (1.0) metalness map, the game will interpret your material as a perfect mirror. This means that the ray tracing code can take some shorter paths during its calculations since it knows that the material will fully reflect the environment without any additional details to take into account.
但是,对于像镜子这样的完全反射的物体,您需要配置您的PBR贴图以启用一个完美的镜面。如果您使用一张纯黑的粗糙度贴图(0.0)和一张纯白的金属性贴图(1.0),游戏会将您的材质表现为一个完美的镜面。这意味着光线追踪的代码在计算过程中可以采用一些捷径,因为它知道材质将完全反射环境,而不用考虑任何额外细节。
Resource Pack Setup
资源包设置
Finally, before testing your textures in the game as part of a resource pack, you’ll need to make one small addition to the resource pack’s manifest.JSON file in order to enable RTX.
最后,把您的材质作为资源包的一部分在游戏内测试前,您需要在资源包的manifest.JSON文件中小小地添加一点东西以启用光追。
Add this section to manifest.JSON before the final closed curly brace:
把这一小段加入到manifest.JSON最后一个右花括号的前面:
"capabilities": [
"raytracing"
]
How to Test Your Textures in the Game
如何在游戏中测试您的材质
When Minecraft with RTX is released, you can test your new PBR texture set in-game by following these steps:
当《Minecraft RTX》发布时,您可以通过以下步骤在游戏中测试您的PBR材质集:
1.Copy the new PBR texture files into the appropriate location in your resource pack.
1、将新的PBR材质文件复制到资源包中的适当位置。
For the “gold_ore” example, the texture files were copied into a resource pack named VanillaPBR located here:
以“gold_ore”为例,材质文件被复制到一个叫VanillaPBR的资源包中,位置为:
C:\Users\[username]\AppData\Local\Packages\Microsoft.MinecraftUWP_8wekyb3d8bbwe\LocalState\games\com.mojang\resource_packs
C:\Users\[用户名]\AppData\Local\Packages\Microsoft.MinecraftUWP_8wekyb3d8bbwe\LocalState\games\com.mojang\resource_packs
2.Run the game build.
2、启动游戏。
3.Enable your resource pack.
3、启用您的资源包。
4.Create/Open a world.
4、创建/打开一个世界。
5.Construct the game object that matches up with your new texture set.
5、建造匹配您的新材质集的游戏对象。
6.Enjoy your new PBR texture set!
6、享受您的新PBR材质集!
To demonstrate the possibilities of the new Minecraft PBR textures, we’ve worked with Razzleberries to create the Texture Expo world, a large Smithsonian-esque museum showcasing every enhancement, benefit and improvement offered by Minecraft with RTX. As you stroll through the world, when released alongside Minecraft with RTX, you’ll see how PBR textures work in concert with ray tracing to enable a level of detail and fidelity that was previously impossible to achieve with traditional rasterization and effects.
为了展示新的《Minecraft》 PBR材质的可能性,我们与Razzleberries合作创建了材质展览会世界,一个巨大的史密森式的博物馆,展示了《Minecraft RTX》带来的每一处增强,优点与改进。当您在已发布的《Minecraft RTX》的世界中漫步时,您将会看到PBR材质如何与光追协同工作,以实现高等级的细节和保真水平,这在以前是不可能通过传统的光栅化和特效实现的。
Hopefully, this stunning showcase will provide you with inspiration for your own PBR textures and ray-traced world. For other examples of what can be achieved, stay tuned to our YouTube channel, where we’ll be showcasing several more ray-traced creations.
这个令人震惊的演示将会为您的PBR材质和光线追踪的世界提供灵感。对于其他可以实现的示例,请继续关注我们的YouTube频道,我们会在那展示更多的光线追踪的创作。
How to Create PBR Textures in Substance by Adobe
如何使用Adobe的Substance创作PBR贴图
(译者注:由于软件汉化不完全,软件未汉化的部分将在后方用括号注释英文原文)
If you have access to the Substance Painter app, you can create higher resolution PBR texture sets in a much more intuitive manner. This software lets you see all of the maps of your PBR texture set displayed in real-time on mesh geometry. This allows you to tune your texture maps as you work without having to launch the game, move any files around, or modify channels.
如果您可以访问Substance Painter软件,您可以使用一种更直观的方式创建分辨率更高的PBR材质集。这个软件让您可以实时看到显示在几何网格中的PBR材质集内所有的贴图。这允许您在工作时调整您的材质贴图,而不需要启动游戏,移动文件,或者修改通道。
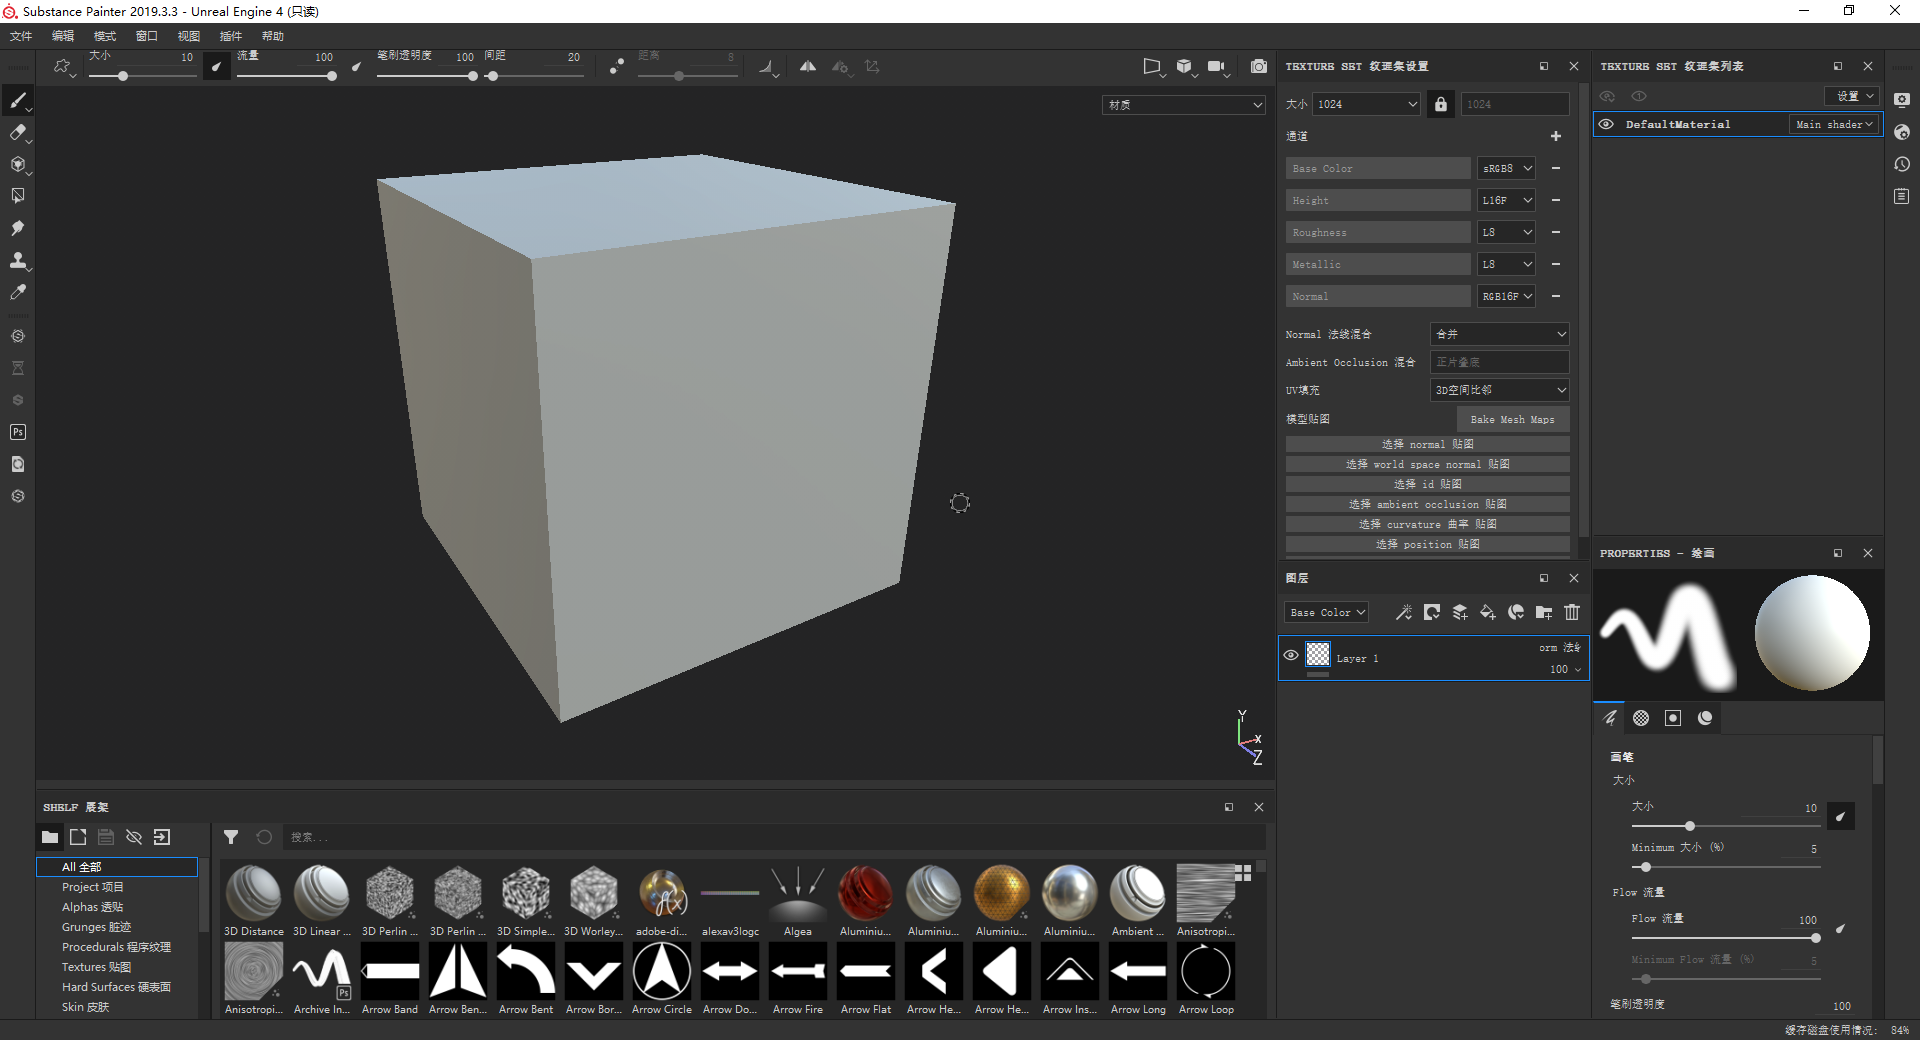
1. Launch the application and select New Project from the File menu.
1、启动应用程序,从“文件”菜单中选择“新建...”。
2. Template = Unreal Engine 4 - This will automatically set a variety of application and viewer settings. Feel free to try other options or make your own template!
2、模版(Template)选择虚幻引擎4(Unreal Engine 4) - 这将自动设置各种应用程序和浏览器的设置。您可以尝试其他选项或者自己制作模版!
3. File → Select - This is where you select what mesh you would like to display and paint your textures on. For Minecraft with RTX, using a 1 meter by 1 meter cube mesh with just 6 faces (no subdivisions) will give you an exact preview of how your textures will look when mapped onto a block in the game. Using the .FBX mesh format is recommended.
3、文件(File) → 选择(Select...) - 您可以在这里选择使用哪种模型来显示并绘画材质。对于《Minecraft RTX》来说,使用一个1mx1m的只有六个面的方块(没有曲面细分)会使您的材质在游戏中映射到一个方块的样子得到精确的预览。建议使用.FBX网格格式。
4. Document Resolution - This is the texture resolution that you’re targeting. Note: This setting can be changed later non-destructively at any time. For HD textures, it’s recommended to work at 1024 - you’ll get lots of detail in your textures with minimal pixelation, the app will run nice and fast on most PC setups, and your HD textures should look sharp in the game.
4、文档分辨率(Document Resolution) - 这是您材质分辨率的目标。注意:这个设置可以在此后的任何时候进行无损更改。对于高清材质,建议在1024的分辨率下工作——您的材质在像素化程度极低的时候能获得很多的细节,应用程序能在大部分电脑的设置上运行速度更快,而且这样您的高清材质在游戏中看起来应该会较为清晰。
If you’ve only ever worked with textures in vanilla Minecraft, you’ll notice that you can’t select 16 pixels by 16 pixels here for your resolution (the lowest is 128). However, you can always author and export textures at 128x128 (or larger) and scale them down later in an image-editing application like Photoshop.
如果您只使用过原版《Minecraft》中的材质,您将会发现不能选择16x16像素的分辨率(最低的是128)。不过,实际上您可以在128x128(或者更大的)画布上绘制并导出材质,并在Photoshop之类的图像编辑程序中缩小它们。
5. Normal Map Format = DirectX (leave as default)
5、法线贴图格式(Normal Map Format) = DirectX(留为默认值)
6. Compute Tangent Space Per Fragment = True (leave as default)
6、计算每个片段的切线空间(Compute Tangent Space Per Fragment) = 是(留为默认值)
7. Add - (Optional) Here you can choose to import any supporting textures that you already have completed. If replacing a vanilla Minecraft texture with an HD version, it can be helpful to import the vanilla texture here for use as a reference. Note: This import step can also be performed later at any time. For this example, the vanilla “iron_block” texture file is going to be imported when the new project is created to be used as a reference.
7、添加(Add) - (可选)您可以在这里选择导入任何您做好的材质。如果使用高清材质替换原版的《Minecraft》材质,在这里导入原版材质作为参考会有很大的帮助。注意:此导入步骤也可以在任何时候执行。在本示例中,原版的“iron_block”材质将会在创建新项目时作为参考导入。
8. Click “OK”. The application should open this new project that you’re creating and look something like this:
8、点击“确定”。应用程序应该会打开您正在创建的新项目,看起来是这样的:
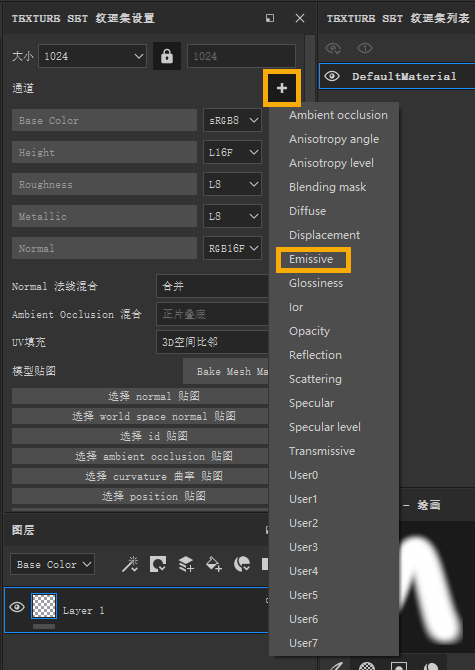
9. It’s a good idea to add the emissive map to your texture set list at this point. Even if your texture set isn’t going to use emissivity, don’t worry, it will default to black (0.0) and won’t hurt anything.
9、这时候最好将发光度贴图添加到材质集列表。即使您的材质集并不打算使用发光强度,也不用担心,它将留为黑色(0.0),不会有任何影响。
Note: You can also add an opacity map to your texture set list in the same way if you’re planning on creating a non-fully opaque texture set.
注意:如果您打算创建一个部分透明的材质集,也可以使用同样的方式将不透明度贴图添加到您的材质集列表中。
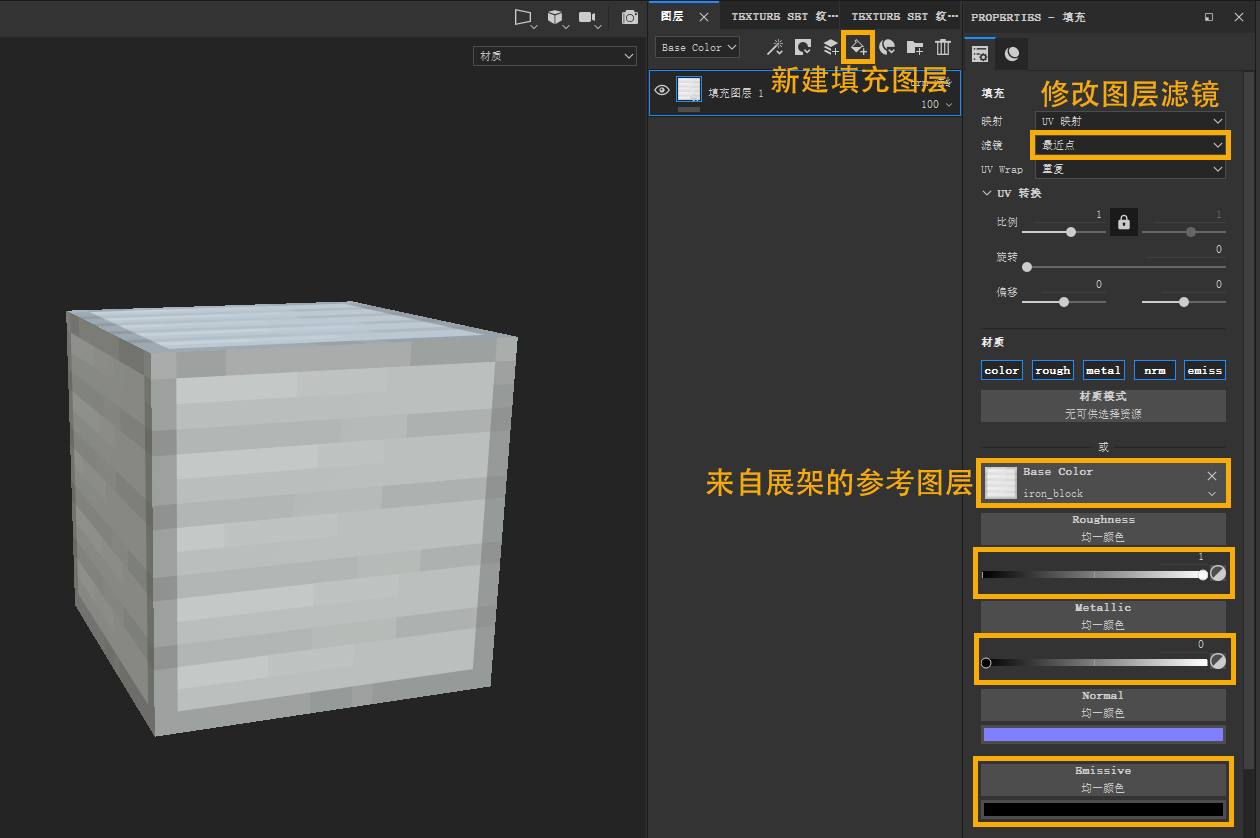
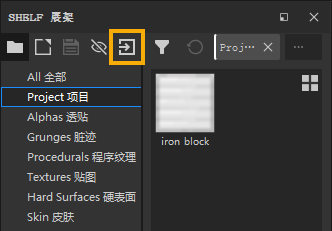
10. (Optional) Next, add your texture reference to a new fill layer in the Base Color slot. You’ll find your imported reference texture on the Shelf under the Project heading.
10、(可选)接下来,将您的材质参考添加到基础色槽中的一个新填充图层中。您可以在项目标题下的展架中找到导入的参考材质。
(译者注:译者本人安装的Substance Painter中,展架最初在整个窗口的最下层。)
Layers are automatically set to bilinear filtering when created, which can make pixelated textures like vanilla Minecraft textures look blurry. To correct this, just set the layer’s Filtering to Nearest. However, if you’re not using pixelated textures, leave your layer filtering on the default setting of bilinear HQ.
图层在创建时会自动设置为双线性过滤。这可能会使原版《Minecraft》材质之类的像素化材质看起来模糊不清。只需要把图层的滤镜从双线性调整至最近点就可以修正这一点。不过,如果您没有使用像素化的材质,把您的图层滤镜保留为双线性|HQ的默认设置。
From here, it’s also a good idea to set this reference layer to have full roughness (1.0), no metalness (0.0), and no emissivity (black: 0, 0, 0). This will make sure that the reference texture is displayed in Painter as close to the vanilla game as it can be.
从现在开始,最好将这个参考图层设置为完全粗糙(1.0)、无金属感(0.0)、完全不发光(黑色:0,0,0)。这将确保参考材质在Substance Painter中的显示效果尽可能接近原版游戏。
Note: If you didn’t import reference textures or other resources when you created the project, you can do so at any time using the Import Resources button on the Shelf.
注意:如果您在创建项目的时候没有导入参考材质或者其他资源,您可以随时使用展架上的导入资源按钮进行导入。
11. Now is a great time to save your project. It’s recommended to name your Painter project after the game object whose texture set you are replacing. For this example, this project file has been saved as “iron_block.SPP”. Naming your project this way will make things easier when exporting your texture set later.
11、现在是保存您的项目的好时机。建议以您想要替换的游戏对象的材质集名称来命名您的Substance Paint项目。在本示例中,项目文件被保存为“iron_block.SPP”。这样命名您的项目会让以后导出材质集时更方便。
12. From here, you can create your texture set with all of its PBR maps as you see fit.
12、从这一步开始,您可以根据自己的需要创建材质集的所有PBR贴图。
In this example, a new fill layer was added (with some adjustment sub-layers) to create a dark, high definition iron material.
在本示例中,添加了一个新的填充图层(有一些调整子层)以创建一个暗色、高清晰度的铁质材料。
13. Next, a new fill layer adding an indent detail to give the surface of the block some new character.
13、接着添加一个新的填充图层,增加一些细节,以给方块表面增加一些新的特征。
14. And finally, another fill layer to add some dirt collecting in the corners of the indent and some scratches randomly across the surface.
14、最后是另一个填充图层,在凹痕的角落添加一些污垢,在表面随机添加一些划痕。
15. Re-save as needed.
15、根据需要再次保存。
16. Now that the whole texture set is looking great inside Painter, you need to export your textures.
16、现在整个材质集看起来很不错了,需要导出您的材质了。
Select: File → Export Textures to open the export subwindow.
单击:文件 → 导出贴图...以打开导出窗口。
17. Create a new export preset configuration like this, which will output your texture set in a way that can be used by the game build.
17、创建一个如图所示的输出预设配置,它将以游戏可以使用的方式输出您的材质集。
Note that the “$project” prefix on each output map will name each of the exported texture files after the name of the project. So, if you named your project after the game object that this texture set will belong to, all of your exported textures will immediately be ready for use in the game without any additional renaming.
需要注意的是,每个输出贴图的“$project”前缀将会以您目前项目的名称来命名每个输出的材质文件。(译者注:意为输出的材质名称中,“$project”将会被当前项目的名称替换,在本例中为“iron_block”)因此,如果您用这个材质集所属的游戏对象来命名您的项目,您输出的所有材质将立即可以在游戏中使用,而不需要任何额外的重命名。
18. Once you have your export preset set up, select it in the “Config” field and use these recommended settings:
18、一旦您设置好了您的导出预设,在“配置”中选择并使用这些推荐的设置。
Location - This can be the textures location for the resource pack that you’re working on. This makes things easier because you can export textures from Painter and they will immediately show up or be updated in the same folder that the game is referencing when it runs (assuming that you have your resource pack activated in the game).
位置 - 这可以是您正在制作的资源包的材质位置。这可以让事情变得简单,因为您可以从Substance Painter中导出贴图,并且游戏运行时,它们会立即在游戏引用的同一文件夹中显示或者更新(如果您在游戏中激活了该资源包)。
PNG - Use this setting to ensure that your files can be used by the game and that they are as small and efficient as possible.
PNG - 使用此设置可以确保您的文件能被游戏使用,并且占用空间较小。
Texture set resolution - This is the size of the textures that will be exported. This setting is independent of the resolution of your project. So, if you want you work on your project at one resolution and then export files at another resolution. 1024x1024 is recommended for HD texture sets.
材质集分辨率 - 这将是导出的材质的大小。这个设置与您的项目分辨率无关。所以,只要您想的话,可以在一个分辨率下制作您的项目,并在另一个分辨率下导出文件。推荐高清材质集使用1024x2024。
Note: The example above is for a fully opaque texture set. If you are using an opacity map in your texture set list for transparency, you will want to export your base color map as a targa (.TGA) file (instead of a .PNG) with the opacity map being stored in the alpha channel.
注意:上述示例为一个完全不透明的材质集。如果您为了不透明度在材质集中使用了不透明度贴图,您需要把您的基础颜色贴图导出为targa(.TGA)文件(而不是一个.PNG),而不透明度贴图会存储在alpha通道中。
19. Re-save your project! This will save your export settings as well, which will make your workflow much faster as you do further iterations with your texture set.
19、重新保存您的项目!这将会保存您的导出设置,从而使您的工作流程更快,因为您下次更新材质集的时候不需要再次设置导出配置了。
20. Finished! You have created your first set of HD PBR textures for Minecraft with RTX! Refer to the earlier sections, Resource Pack Setup and How to Test Your Textures in the Game, to find instructions on how to view your new textures in the game.
20、完成了!现在您已经创建了您在《Minecraft RTX》中的第一组PBR材质!请参考之前的章节资源包设置以及如何在游戏中测试您的材质,以找到如何在游戏中查看您的新材质的说明。
Credit:
鸣谢:
All textures were created with “Substance”the leading software solution for 3D digital materials.
所有的材质都使用3D数字材质的领先软件解决方案“Substance”绘制。
https://www.substance3d.com/
@Substance3d
#MadeWithSubstance
#CreateWithSubstance